Showing posts with label tray bakes. Show all posts

April 10, 2025

COFFEE AND WALNUT TRAYBAKE


I had my eye on this recipe for the next time I needed to make a cake for a bit of a gathering and it didn't disappoint.  It’s from the original "Baking Bible" by Mary Berry.

It’s an all-in-one recipe and instead of butter I used the last of my pack of "spreadable" butter called Nordpak which came from Aldi in the UK.  (A number of very similar spreads and butters are available in France.)  After my experience with the lemon cake I did make sure it was very soft by giving it a few seconds of the "soften butter" function on my microwave, i.e. at a very low power.  I have to be careful with this as it’s easy to take it too far and end up with melted butter instead, but it's a useful function.
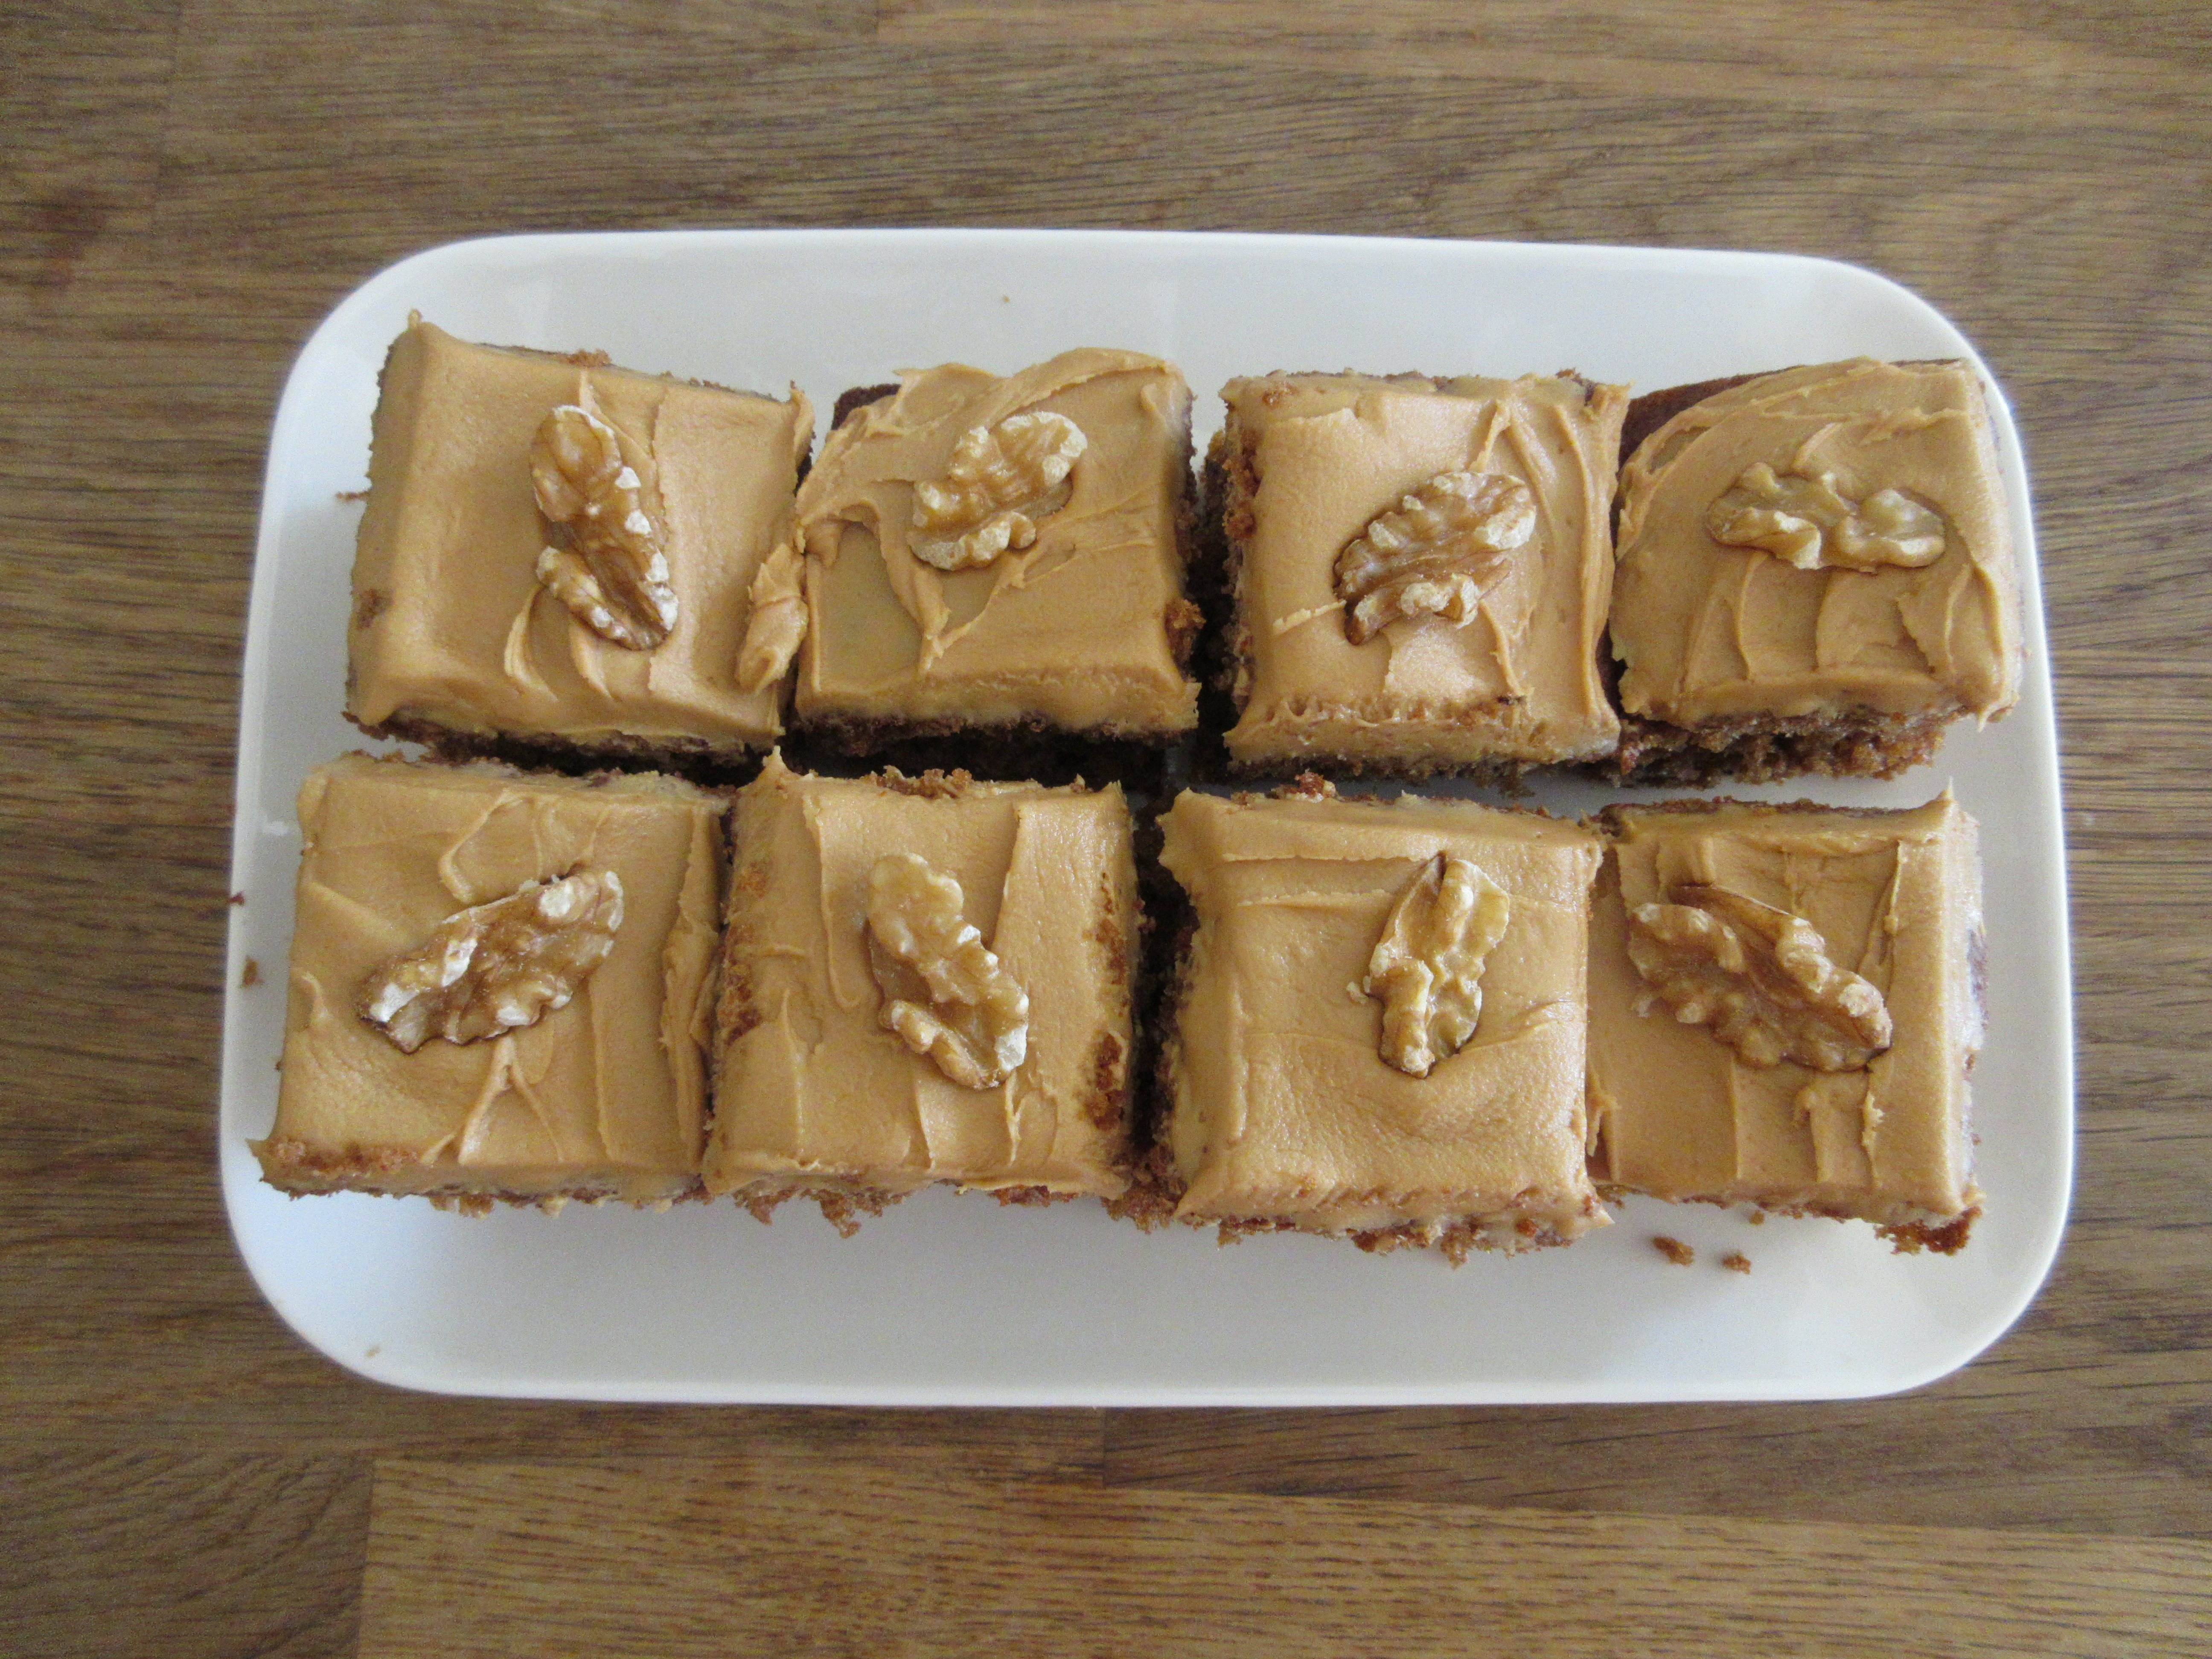
There are subtle differences between baking products available in France and those from the UK.  Some of my friends have trouble with the flour and the range of sugars on sale.  I'm getting used to using them and on this occasion I used a French brand of icing sugar (sucre glacé) for the buttercream topping.  Somehow this icing sugar seemed "claggy" or almost damp and it was taking ages to sift it.  In truth it had to be pushed through the sieve.  So I resorted to the food processor which made light work of it, giving the icing sugar a blitz on its own first.  Looking at the picture in the book the icing seemed quite soft so I added a few more spoonfuls to make it stiffer.

The cake was not the lightest sponge I have ever made but it tasted good and went down well.  It had risen beautifully and cut into 24 generous squares, ideal for a crowd, just the right size to handle and eat without getting too messy.  I trimmed the edges before icing and slicing to remove the crust from the sides.

Ingredients

For the cake

225g softened butter or spreadable butter product

225g light muscovado sugar (I used mostly soft light brown sugar as that's what I had)

 275g self raising flour

2 tsp baking powder

4 large eggs (I used 5 small eggs as they weighed about the same)

2 tblsp milk

2 tblsp Camp coffee essence

75g chopped walnuts

For the icing

75g softened butter

225g icing sugar 

2 tsp milk

2 tsp Camp coffee essence

walnut pieces to decorate

Method

Line a greased traybake tin, 30 x 23cm (mine was slightly bigger) with baking paper.  Preheat the oven to 180 C / 160 fan / gas mk 4.  

Put all the cake ingredients into a large mixing bowl and beat with an electric mixer until well combined.  

Spoon into the prepared tin and level the top.  Bake for 35-40 minutes until done.  Mine was a little over at 35 minutes probably due to the slightly larger tin, so I would check at 30 minutes next time.

Cool in the tin.

To make the buttercream put the icing sugar into a food processor and blitz for a few seconds to remove any lumps.  Add the coffee, butter and milk and process until combined and smooth.

Make sure the cake is completely cold and slice off the edges.  Spread the buttercream over the top and cut into squares of the size you prefer. 

Decorate each square with half a walnut or a few bits of chopped walnuts.

Cuts into 24 squares.

November 8, 2024

CARROT CAKE with or without icing

I’ve tried various recipes for carrot cake from my collection of cookbooks over the years but was never completely ecstatic about any of them.  In fact one of them turned out so awful that I actually wrote "horrible and inedible" at the top of the page because that’s what it was - soggy, oily, dull and unpleasant and I hadn’t made another one since!

So, with a surfeit of carrots in the veg drawer and a carrot soup already gurgling away in the soup maker, I decided to have another go.  This time I used a recipe from Mary Berry's Baking Bible, the latest edition thereof.  There were no spices or dried fruit in this recipe, unlike some of the others I had tried.

It turned out really well, delicious in fact.  I then discovered that the same recipe appears in some  of Mary's previous books with one principle difference; this most recent recipe says to use one teaspoon of baking powder and all the others say two!  How odd!  However, it rose well so one is clearly enough!  Also, the instructions say to bake for 50-60 minutes.  Mine was done in 50 minutes and if anything was slightly over.  I would check after 40 minutes next time.  

It's a pity I hadn't spotted this Mary Berry recipe before as I would have made dozens of them by now, especially as they are immensely popular at cake sales, especially it seems with the French.

I made this one as an uniced traybake for ease of cutting and handing round.  I decided that the next time I would try adding a little mixed spice, and for a cake sale I would definitely ice it, but it was really good just as per the recipe.  Very simple to make and delicious.

~~~~~~~~~~~~~~~

I have a tip for grating carrots.  Weigh slightly more than you want and grate as far down as you dare until you have a short stump which you can do something else with (such as chomp on it while you grate the next carrot). That way you get the amount of grated carrot you want with your fingers intact!

~~~~~~~~~~~~~~~~

As is the way of things here, the opportunity arose to make the cake again for a cake sale at an event in the next village a few weeks later.  This time I added a teaspoon of mixed spice and iced it as per Mary's recipe, decorating it with chopped walnuts and banana chips.  It looked the business and sold out early in the day.

I would happily have used the little marzipan carrot decorations that identify it immediately as a carrot cake but the only place I could find them in France was online and the price worked out at 1€ per carrot!  I resisted, as the cost of a pack of decorations would have been more than the cost of making the whole cake!

As an aside, it’s amazing how much the French seem to love English cakes, considering their reputation for fine patisserie.  On the cake stall this time we were asked by a French couple if we ran a course on how to make them!  Now there’s an idea……..

This is the recipe for the iced version with a little added spice.

Ingredients

For the cake

225g self raising flour, sifted

1 level tsp baking powder

1 tsp mixed spice (optional)

150g light muscovado sugar

50g chopped walnuts

115g carrots, peeled and coarsely grated

2 ripe bananas, mashed

2 eggs

150ml sunflower or vegetable oil

For the icing  (if using)

175g full fat cream cheese

55g softened butter

115g icing sugar, sifted

To decorate

banana chips 

2 tblsp chopped walnuts

(or mini carrot decorations if you can get them)

Method

Preheat the oven to 180°C / 160° fan / gas mk 4.  Butter a 20cm square or round springform cake tin and line the base with baking paper. 

Put all the cake into a large bowl and beat until smooth.

Spoon into the tin and level the top.  Tap a couple of times on the worktop to dispel any air bubbles.

Bake for 50-60 minutes but check after 40 minutes as mine was well done by 50 minutes and a square cake may also be done sooner.

Cool in the tin for 5 minutes then turn out, remove the baking paper and leave to cool on a wire rack.  Once cool it can be frozen by wrapping tightly in foil.

To make the icing, put all the ingredients into a bowl or food processor and beat well until smooth.  Make sure the cake is completely cold (or thawed if it's been frozen) and spread the icing over the top.  Decorate with the chopped walnuts and banana chips (or any decoration of your choice such as purchased sugar paste carrots).

Cuts into 10-12 slices.

February 4, 2024

PARSNIP, DATE AND CLEMENTINE CAKE


It's been a dull, grey weekend, the oven whispered "bake a cake" around lunchtime, and with a few parsnips lurking in the fridge, some lonely clementines in the fruit bowl and an unopened packet of chopped dates in the cupboard, a particular cake sprung to mind.  It's many years since I made it and the original comes from one of my most  favourite food blogs written by Dominic Franks.  You can see the last time I made this cake to Dom's recipe here.

Several people expressed a certain amount of scepticism when I made a cake using parsnips a few weeks ago, but on actually tasting it "ate their words".  Parsnips work just as well in a cake as do carrots, courgettes and other vegetables.  (I draw the line at kale.  The kale and apple cake I made a few years ago was truly horrible and I still shudder when I think about it!)

This time I used the dates instead of sultanas and, as both dates and parsnips are fairly sweet, I omitted the small amount of honey.  I also decided not to glaze it with the honey and clementine glaze either.  It was sweet enough without it and the top already looked nice and glossy so I didn't ice it.  I also decided to grate the parsnips a bit finer, using the medium grater on my box grater, which produced a nice cloud of fluffy parsnip which would be more easily concealed in the cake if anyone had doubts about it!

I made it as a traybake, with the walking group debriefing session in mind and it worked beautifully.  It was moist, delicious and kept well - possibly being even better the day after baking.  It was a huge hit with the handful of intrepid walkers that braved a cold, grey and muddy walk then retired to the bar.  There was only the slightest twitch of a raised eyebrow from our French members who by now probably realise that the English, although bonkers, can make a good cake from peculiar ingredients.  One even compared it to pain d'epices - and had a second slice.  Praise indeed!  A winner!

Ingredients

150g chopped dates

juice and zest of 4 clementines (or satsumas, mandarins or maybe 2 small oranges)

3 large eggs 

175ml groundnut or sunflower oil

200g soft light brown sugar

200g self raising flour

50g ground almonds

1 tsp baking powder

1 tsp ground ginger

½ tsp ground cinnamon

200g parsnips

Method

Put the dates and clementine juice into a small pan.  Add a little water if necessary to ensure they are covered.  Bring to the boil, turn off the heat and set aside to cool.

Peel and grate the parsnips, using the medium fine side of your grater, grating only the fleshy part and discarding the tougher core.

Preheat the oven to 170° C / 150° fan / gas mk 3½.  Butter and line the base and sides of a large traybake or roasting tin measuring about 33 x 24 cm.

In a large bowl, beat together the eggs, sugar and flour until well blended and creamy.  This is easy enough to do with a wooden spoon.

Add the soaked dates including any liquid and all the other ingredients including the clementine zest.  Mix well.

Spoon the mixture into the prepared tin and level the top.

Bake for 40-45 minutes until golden brown and cooked.  Cool in the tin.

Cuts into 12-16 slices or squares, depending on how many people you want to feed.

December 3, 2023

BROWNIES

I wanted to bake something for the walking group that was quick and easy, preferably a traybake, and brownies came to mind.  I hadn’t made brownies for years and looked for a recipe that didn't require melted chocolate as I didn't have any real chocolate to melt except for a bag of chocolate chips.  This one by Mary Berry has to be the easiest recipe ever.

They turned out to be really good with a crusty top and a squidgy middle.

What more could you want?!

Ingredients

275g softened butter

375g caster sugar

4 large eggs

75g cocoa powder

100g plain flour

100g dark chocolate chips

Method

Preheat the oven to 180°C / 160° fan / gas mk 4.  Grease a large baking tin or roasting tin measuring about 30 x 23cm and line with baking paper.  

Put all of the ingredients except for the chocolate chips into a large mixing bowl and beat together using an electric mixer or a wooden spoon and a hefty amount of muscle power! I started with the wooden spoon but resorted to a hand held mixer which was working very hard.  Next time I will use my Kenwood food mixer.

Add the chocolate chips and stir in.  Transfer to the tin and level the top.  Tap on the worktop a few times to settle the mixture and dispel any air bubbles.

Bake for 30 minutes then cover loosely with foil.  Bake for a further 10 minutes until just done.  Over baking will cause the brownies to lose their gooey centre.  Cool in the tin.

Cuts into 24 generous squares. 

November 14, 2023

APPLE AND RAISIN CAKE

I recently stumbled across a really nice website containing lots of lovely home baking recipes.  It’s for a brand of flour called Odlums which I had never heard of before and comes from Ireland.  From it I had bookmarked a nice looking recipe for an apple cake which you can see here.  

This week’s Monday walk was cancelled for the third time due to the wet weather.  I have to say that the weather has been grim for at least the last four weeks which is very disappointing.  However, our walking group are a social bunch so even if they can’t walk the debriefing in the bar afterwards usually goes ahead!  More often than not someone brings a cake so I decided to make the apple cake.  (I added a handful of raisins to the list of ingredients, just because it seemed like a nice idea.)  

I really liked the decoration for what was a very plain cake - rings of apple arranged on top.  This posed a challenge as my usual method for coring an apple wouldn't work.  I good old rummage in my kitchen drawer unearthed my little used apple corer.

I usually cut the apple in half vertically from north to south and dig out the core with a melon baller.  This method is good for producing thick or thin wedges.  To get the apple rings I cut the apple in half horizontally around the equator and used the apple corer.  I then sliced the apple thinly to get the rings.  Easy peasy.  You can never beat having the right equipment (even if you have to hunt for it).

It was a very nice cake.  I often find that apple cakes can be a bit fragile, especially those containing apple slices.   They can fall apart which makes being handed round rather messy.  This one held its shape perfectly, possibly because the apples were chopped into quite small dice and the mixture was quite stiff.  It had to be spread into the tin rather than poured.  

I baked it in an oblong tin measuring  11" x 7" rather than the loaf tin in the recipe.  It cut perfectly into 12 squares of just the right size for a group.  Definitely a recipe I will be using again.  The only change I would try is to add a little more spice next time.

The more eagle eyed of you might notice a different cat in one of the pictures.  We were so sad to have to say goodbye to our beloved Daisy last month when she (and we) lost the battle with her tumour.  Yvonne came into our lives just one week later.  Her owner had left her with a friend for a couple of weeks in the summer but two months later he made it clear that he was not coming back for her.  Word went out among the walking group that a new home was needed so she is now part of our little family.  She's nine years old and is settling in really well so far.

You can read more about Daisy here.

Ingredients

225g self raising flour

175g softened butter or baking spread

175g golden caster sugar

3 eggs

1 tsp ground cinnamon

3 eating apples

50g raisins

Method

Preheat the oven to 190°C / 170° fan / gas mk 5.  Grease or line a 2lb loaf tin or a 11" x 7" baking tin with parchment.

In a large bowl, cream the butter or spread with the sugar until light and fluffy.  Beat in the eggs one at a time, adding a tblsp of flour with each addition.

Sift in the rest of the flour and cinnamon and fold in.

Peel and core the apples.  Chop 2½ of the apples into small dice and add to the mixture with the raisins.  Stir into the mixture and transfer to the tin.  Level the top.

Cut the remaining half apple into thin slices and arrange on top of the cake.

Bake for 40-50 minutes until golden brown and set.  Cool in the tin for 5 minutes before transferring to a wire rack.

Dust with icing sugar before serving.

Cuts into 12 squares or 8-10 slices.

August 8, 2023

COCONUT AND LEMON TRAYBAKE


We joined a walking group when we first came to France this year, back in March.  After each walk (called a randonée) most people retire to the bar in the village, or sometimes to someone's house, for a debriefing - liquid refreshment and a slice of cake!


A traybake is ideal for this as it can easily be cut into squares and passed along the table for people to help themselves.  The resulting chunk of cake tends to look a bit tidier and is easier to handle than a slice from a round cake.  (Loaf cakes are equally good in this respect too.)


I had it in mind to make Mary Berry's lemon drizzle traybake but on reorganising my pantry and kitchen cupboards (what a joy it is to have a pantry!) I found several packets of coconut which, I know, is not everyone's favourite in a cake but needed using up.  


To make the cake I adapted a recipe from a charity shop find - a book called "Cakes, regional and traditional" by Julie Duff which, as the title implies, is full of lovely old fashioned and traditional recipes from all over Britain.  I based this recipe on the one for coconut pound cake and will be delving into the pages of this book again!

The cake was lovely, a nice moist and soft texture with not too much coconut and a delicate lemon flavour. 

For another coconut and lemon cake see here.

Ingredients
For the cake

225g self raising flour

225g caster sugar

225g baking spread or softened butter

3 eggs, lightly beaten

115g desiccated coconut

1 tsp coconut essence (or Malibu)

zest of 1 lemon

For the icing

3 tblsp icing sugar, sifted

lemon juice

Method

Butter and line the base of a large roasting tin or traybake tin that measures roughly 30 x 23 cm (or 12" x 9").  Preheat the oven to 180°C / 160° fan / gas mk 4.

Put all the cake ingredients into a large bowl and beat well until thoroughly combined.  I managed this with a wooden spoon but a hand held mixer would have been easier!

Tip the mixture into the prepared tin, spread it out and level the top.

Bake for about an hour or until done.  Mine was ready in 55 minutes.

Cool in the tin for about ten minutes then turn out carefully onto a wire rack.

To make the topping, mix the icing sugar with enough lemon juice to make a runny but creamy consistency and drizzle any way you like over the cooled cake.

Cuts into 24 squares.

May 2, 2023

ORANGE AND SULTANA TRAYBAKE


Over the last six months I have only made two cakes.  This is the second and I made it for the meeting of a walking group we have joined in France.  After each weekly walk most walkers retire to the bar for refreshments, some bringing a cake to share. Traybakes are ideal for large groups.

This is a Mary Berry recipe and although it tasted good I was disappointed that all of the fruit sank into a layer at the bottom.  


The recipe is an easy all-in-one mixture with two tablespoons of milk.  I thought as I was turning the mixture into the tin that it was a bit runny which is probably why the fruit sank.  I would use less milk and make it stiffer next time.

The recipe also requires you to sprinkle demerara sugar over the cake part way through cooking.  Opening the oven door before the cake was set is what produced the uneven top I think so next time I would either sprinkle it over the top before baking or drizzle some orange flavoured icing over the finished cake to add extra sweetness instead.  I also think I might stir in the sultanas at the end of the mixing, or even drop them onto the top of the mixture in the tin to see if that stops them from sinking to the bottom.  Definitely a recipe for my tweaking list!

Still, it went down well with the crowd.  It was soft and light and I would make it again.  A crowd pleaser, easy to make and easy to eat.


Ingredients

For the cake

225g butter, softened, or baking spread

225g caster sugar

275g self raising flour

2 level teaspoons baking powder

4 large eggs

2 tablespoons milk*

275g sultanas

grated rind of 2 oranges

For the topping

demerara sugar, to sprinkle* (about 2 tablespoons)

Method

Preheat the oven to 180C / 160 fan / gas mk 4.

Grease or butter a large oblong roasting tin or traybake tin measuring roughly 30 x 23cm  (12" x 9").  Line the bottom of the tin with greaseproof paper or baking parchment.

Measure all the cake ingredients into a large bowl and beat until well blended.  A food mixer or hand held electric whisk will make quick work of this but a wooden spoon will do just as well.

Spoon the mixture into the prepared tin and level the top.

Bake for 25 minutes then remove from the oven, sprinkle the demerara sugar over the top.  Return to the oven and bake for a further 10-15 minutes until done.

Cool in the tin.

Remove carefully from the tin and cut into 20-24 squares.

*See the text for my notes on the milk and demerara sugar.

February 12, 2023

SIN FREE MEATBALLS


The diet I have been following is very effective.  It cuts out most fat, sugar and some of the carbs from my daily intake, allowing plenty of veg, fruit and protein.  Pasta, potatoes and rice can be eaten freely, which seemed odd at first but I can understand the reasoning behind it.  There is a limit to how much of that stuff I can eat at a meal and if I'm full on those I'm then less likely to snack on fattening foods between meals.  I have never once felt hungry during the fourteen weeks I have been following the plan and so far have lost 1 stone 9 lb, i.e. 23 lb or roughly 11 kilos.  I feel immensely better for it, in so many ways.

Success lies in planning meals, not being caught out when eating out and, above all, changing the way we cook.  I say we because Nick does about the same amount of cooking as I do and we are eating the same things.  He does not need to lose any weight so fills up on bread, toast, extra potatoes or pasta or whatever.  We always had what I thought was a healthy diet but without a doubt there were too many treats, snacks and wine.  (Reducing our wine intake has been the hardest part.)

We have both adapted to the new way of cooking which is basically with virtually no fat.  It's true that a certain amount of butter or oil in cooking adds flavour to the food (and realistically we never had that much of either of them) but we have got used to not having them, to the extent that we no longer feel the need to use them.  It's an interesting process of change.  Understanding that you can cook tasty food without fattening ingredients is key to the process.

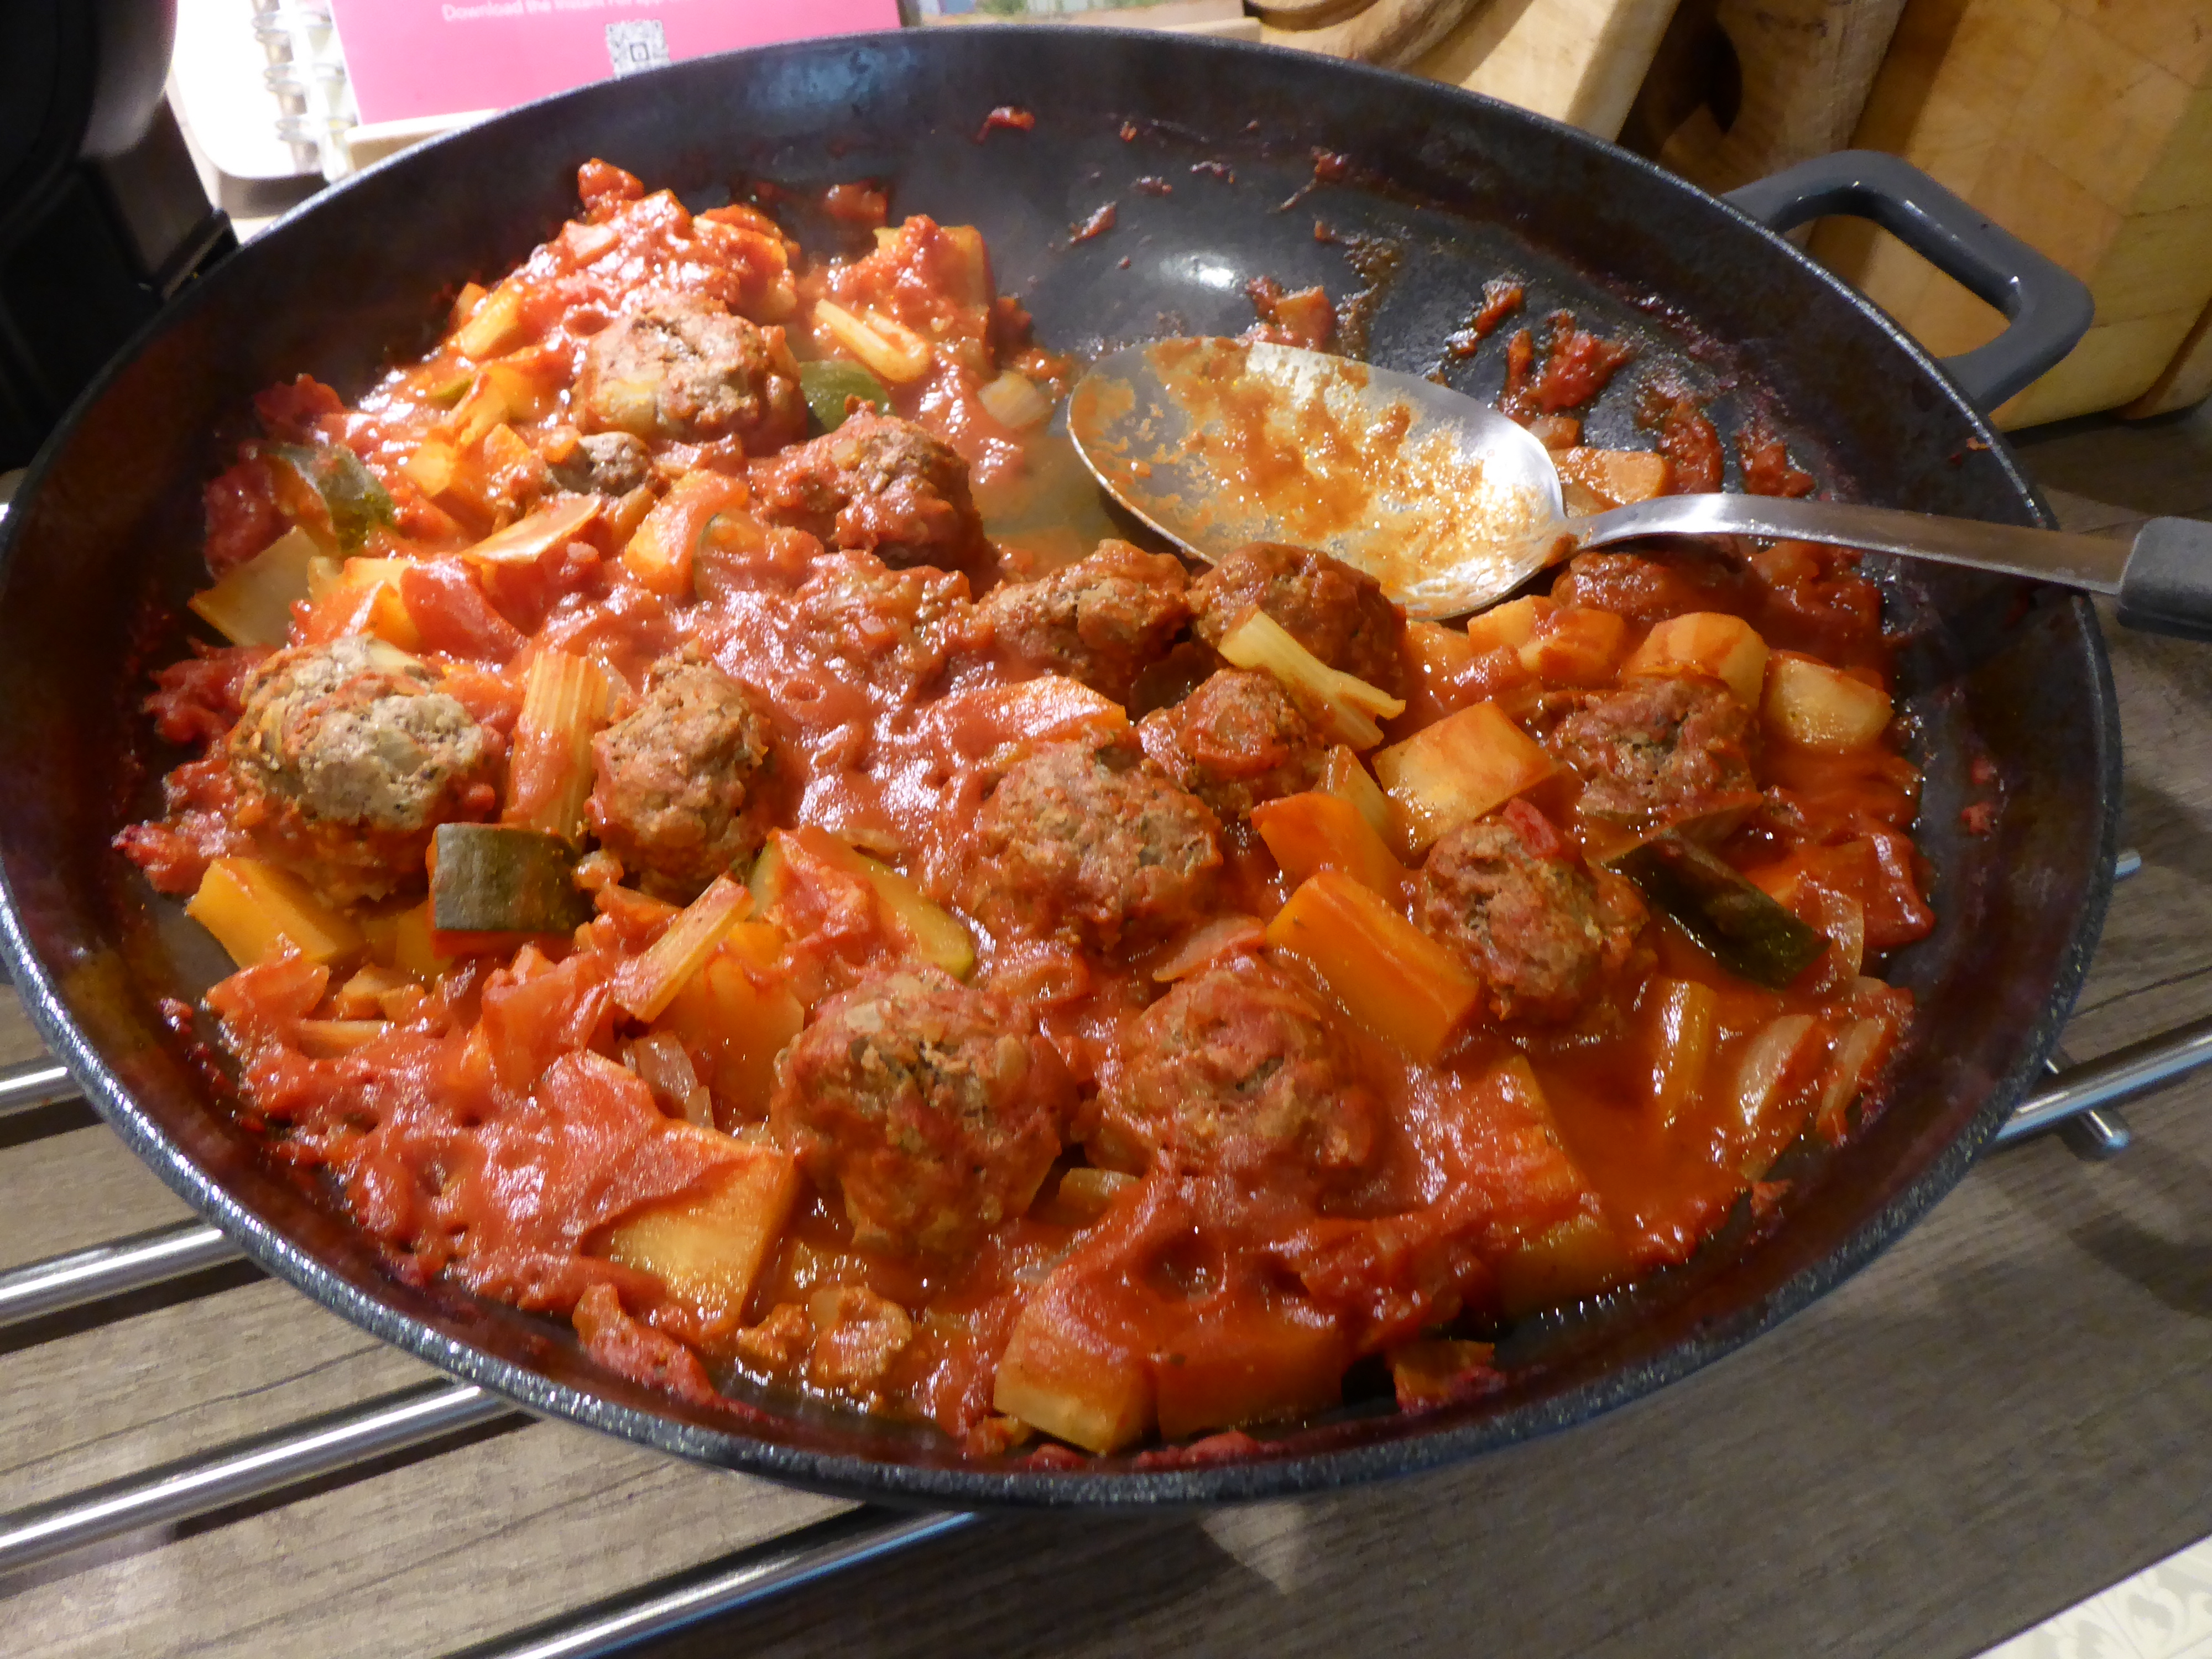
I personally make meatballs very infrequently, probably about once every ten years!  I always thought they were a bit of a faff but this recipe is very quick to prepare if much slower to cook.  The original gives courgettes and aubergine as the veg part of the dish but I used some bits and pieces of other veg instead of the aubergine, as that's what I had in the fridge.

The quantity serves four so we had the first half served separately with pasta, then turned it into a pasta traybake the next day.  Delicious and very un-fattening!

Ingredients

For the meatballs

500g very lean minced beef, 5% fat or less

1 onion finely chopped

2 cloves garlic, crushed

For the sauce

1 onion, finely chopped

2 tsp dried oregano

1 large can chopped tomatoes

1 400g carton passata 

1 veg stock pot made up to 150 ml with boiling water (or home made stock)

1 large courgette, cut into large chunks

Root veg such as parsnip, swede, butternut squash, celeriac, trimmed and cut into chunks

Method

Preheat the oven to 200°C / 180° fan / gas mk 6.

Put the tomatoes, passata and stock into a large roasting tin or casserole dish, add the veg, oregano and one of the chopped onions and stir together.  Cover with foil or a lid and bake in the oven for 50 minutes

While the veg are cooking make the meatballs by putting the minced beef, the other chopped onion and the crushed garlic into a large bowl.  With your hands mix it all well together.

Divide the mixture into 20 roughly equal portions and roll each one into a ball.  Place them on a tray of some kind and put in the fridge to chill.

After the 50 minutes cooking time, stir the meatballs into the mixture and bake with the lid on for another 40 minutes.

Serve with pasta or veg.

Serves 4.

June 10, 2022

SCHOOL CAKE


I do remember having this as a pudding for school dinners - a sponge cake topped with jam and coconut, scooped in chunks from enormous baking trays.  It was served with pink custard usually once a week, maybe every two weeks at the most.  I loved it!  The dinners at my secondary school were excellent, especially the puddings! 

I first made it myself as part of my afternoon tea.  You can read about that here.  I used quite a large traybake tin which made a shallow sponge, easy to cut into tiny squares.


The squares looked the bees knees when topped with a fresh raspberry and tasted divine.  I took a box full of the leftovers to my knitting group where they were very popular.

I made the cake again for another event, cut into larger squares to be served as a dessert.  It was equally popular.  This recipe is definitely a keeper!  You can see the original here.


It's hard to resist such a dainty treat!

One thing I haven't done with it so far is to repeat the whole school experience and actually serve it with pink custard!  There's time yet!  

Ingredients

For the cake

225g baking spread

225g caster sugar

225g self raising flour

4 eggs

a splash of milk if needed

For the topping

a jar of raspberry jam

25g desiccated coconut

a small punnet of fresh raspberries (optional)

Method

Preheat the oven to 180C / 160 fan / gas mk 4.  Grease and line the base of a traybake tin measuring roughly 30 x 18cm.

Put all the cake ingredients into a large bowl and whisk with an electric whisk until creamy and well combined.  Whisk in a splash of milk if it seems rather stiff.

Pour the mixture into the tin and spread out evenly, levelling the top.  Bake for 25-30 minutes until done.

Take the cake out of the oven.  Put about half of the jar of jam into a small bowl and stir to loosen it.  Spread this over the warm cake, making sure there are no bare patches.

Sprinkle the desiccated coconut over the jam in a thick dusting and leave to cool in the tin.

When cool mark the top into squares to be cut later or cut into squares of the required size straight away.

To decorate, cut a thin sliver from the flat end of each raspberry - this makes sure they stand pointy end up and don't wobble over.  Place one in the middle of each square and gently push it into the jam slightly so that it stays put.

Serves as many as you like, depending on the size of squares you want.

June 6, 2022

AFTERNOON TEA


With all the Queen's Jubilee celebrations for being on the throne for 70 years there has been much talk of street parties and afternoon teas.  In fact in our part of France friends held their own afternoon tea party to celebrate but unfortunately I was unable to attend.  I'm back home in the UK because my father is in hospital and his future care is again under debate.  

So instead I decided it was time I posted about the afternoon tea I held for a friend's birthday just a couple of months ago.  That was in France too.

I used my three tier glass cake stand which I acquired at a brocante a couple of years ago for just 2€.  It matches some dessert plates and a regular one tier cake stand that were also collected for next to nothing from brocantes over the years.  My best white tablecloth doesn't come out very often but with that and real cups and saucers the table looked the business, even if I say so myself! 

The bottom layer was a selection of sandwiches with the crusts cut off (of course!).  There were home made egg mayonnaise and rocket on brown bread, smoked salmon, cream cheese and cucumber on brown and smoked ham with tomato and cucumber on white.

You can see the recipe for egg mayonnaise here.  I have never seen cress for sale in France so opted for rocket instead.  It was a good substitute.

Being in France, the sliced bread available is not quite like in the UK.  Generally the texture is nice but it always seems to me to be slightly sweet.  We toyed with the idea of making our own bread but as it was only a few days after we had arrived and we were still dealing with all the usual problems of being away from the house for so long decided it was a step too far.


The middle layer was Victoria scones.  For such an important occasion I didn't trust myself to make ordinary scones, my success with those being variable.  The Victoria scones are easy to make from the Be-Ro book recipe and for me they work every time.  They looked cute on the stand although someone who saw the pictures on Facebook said they looked like fat rascals!  


I can't say I've ever eaten a fat rascal so wouldn't know but they sound like fun so will add them to my ever lengthening bucket list of thing to bake!  You can see the recipe for Victoria scones here or look it up in the Be-Ro book - it's in all the recent editions.


The top layer, the crowning glory, was of small cakes.  The raspberry sponges were cut from a traybake recipe for a jam and coconut sponge, otherwise known as "school cake" and which I have been hankering after making for some time!  I used a recipe on the Asda website which you can see here.  It is very quick and easy and the little squares looked very pretty when topped with fresh raspberries.  You can also see the recipe here.

The little chocolate cakes were to a recipe from one of the collection of slim volumes that Delia Smith put out many years ago called "Baking".  They are chocolate, prune and Armagnac mini muffins and I topped them with an excellent chocolate icing from Lynn Hill's website Traditional Home Baking.  You can see the icing recipe here and I added a few decorations including halved glacé cherries, halved chocolate covered raisins and choclate vermicelli.  They were delicious!


No afternoon tea would be complete without an actual slice of cake so for that I made a lemon layer cake filled with lemon curd to another Delia recipe from the same book.  You can see that here.  I didn't make my own lemon curd but used a Bon Maman jar which I brought over from the UK.  Bizarrely you can buy lemon curd in France but not the Bon Maman one!

I had never made this cake before but had eaten it several times as it's a family favourite of Nick's sisters.  It was easy to make and, of course, yummy!


Our birthday guests enjoyed the afternoon tea and so did we.  Being Americans they had only ever had afternoon tea a couple of times before when in London.  It was fun to make and fun to eat.  It does involve a lot of preparation and baking with all the different elements but it's well worth the effort.

You can see my lemon curd layer cake here.
The prune and chocolate mini muffins are here.
The little raspberry cakes are here.
The egg mayonnaise recipe is here.

February 26, 2021

BLUEBERRY AND LEMON CAKE


Internet shopping for groceries is a trial.  Some websites are easier to navigate than others but we usually get some surprises!  A recent one was an extra punnet of blueberries that we weren't expecting.


As well as the erroneous ordering there is also the phenomenon of strange substitutions.  Early in the lockdown last year I ordered a bag of caster sugar and was given this stuff instead.  It's granulated sugar with some sweetener added.  I was unsure about baking with it as most recipes specify caster sugar because dissolves more easily in baking, but have been using it to sweeten fruit in pies and crumbles.

When I was looking for a cake recipe using blueberries I turned up this one on the Baking Mad website and was intrigued that it used Half Spoon as the sugar ingredient.  I decided to give it a go, if only to use up some of the sugar!


It was dead easy to make, nothing complicated, and although I used my recently acquired Kenwood KMix, a bowl, a wooden spoon and a bit of elbow grease would be just as good.  It was quick to bake too.


The cake was lovely (although I was slightly miffed that most of the blueberries sank to the bottom).  I marked out the cream cheese topping in a pattern that would make the cutting of regular slices easy whether in oblongs, squares or triangles.  I was very pleased with it.


I did however make a mistake in placing the blueberries for decoration.


Something else I was very pleased with is this food cover.  I had seen one in use at cake club and eventually spotted them for sale on Amazon (the dreaded).  It comes in a set of three different sizes and will cover anything more effectively than the square tent shaped ones I normally use, which are often plenty wide enough but not tall enough to cover a cake on a cake stand.  This one easily fitted over the cake on its stand, keeping it safe from the attention of insects and pets.  Highly recommended.

Ingredients

For the cake

300g self raising flour (or ⅔ SR and ⅓ sponge flour)

1½ tsp baking powder

300g soft margarine (I used Stork)

125g Half Spoon sugar alternative*

5 medium eggs

zest and juice of 1 lemon

100g blueberries

a splash of milk if needed

For the topping

180g cream cheese

25g softened butter

2 heaped tblsp icing sugar

A handful of blueberries

Method

Grease and line the base of a 22 or 23 cm square tin.  Preheat the oven to 190°C / 170° fan / gas mk 5.  

Put all the cake ingredients except for the blueberries into a large bowl and beat well until combined. Beat in a splash (about a tablespoon) of milk if the mixture seems quite stiff (mine was but I now wonder if adding the milk is why the blueberries sank.  I might omit it and go with a stiffer mixture next time).   Fold in the blueberries until evenly distributed.

Spoon the mixture into the tin and level the top.  Tap the tin on the worktop a few times to settle the mixture and dispel any air bubbles.

Bake for 25-35 minutes until done.  Cool in the tin for a few minutes then turn out onto a wire rack.

To make the topping, beat the cream cheese and butter together until smooth.  Sift in the icing sugar and beat in.  When the cake is completely cool, spread the topping over and swirl it or use a fork to create a pattern.  Distribute the extra blueberries over the top.  Dust with icing sugar before serving.

Cuts into 12-16 portions.

*If you want to make the recipe with caster sugar instead of Half Spoon, follow the advice in the link.  Essentially it implies that you would use twice as much sugar and less baking powder.  I haven't tried it!

July 14, 2018

RASPBERRY SLICE–a request for a recipe.

raspberry slice

This is not a recipe, but a request for one!  The raspberry slice or pavé framboise is a delicious thing that I sometimes buy from our favourite boulangerie in Descartes.

raspberry slice2

I would really like to know how to make it!  It comes as a large square which I usually then cut into four smaller squares to serve as a dessert or with a cuppa.  A whole slice takes some eating but a small one is quite manageable – in fact we can usually manage a couple!

raspberry slice3

Its type is very much a throw back to my childhood and I’m sure that either my mum used to make something similar or it was served for pudding at school dinners.

I have looked in my cookbooks and on the internet and none of the recipes I have found seem quite right.  Some have a pastry base, some have coconut in the topping, but this has neither of those.

The top and bottom are the same, a bit like a firm but crumbly cake or soft biscuit texture.  Definitely not pastry yet the top looks like it has been given an egg wash glaze.  In between there is a raspberry layer which could be jam or just fruit.  Either way it is delicious!

So, if anyone out there has any idea how to make it, I would be very pleased to hear about it!

November 12, 2016

OAT AND GINGER TRAYBAKE

ginger traybake

It was Nick’s birthday the other day and I was just dying to bake a cake.  Any excuse.  Unfortunately he’s a bit fussy when it comes to cake and has definite likes and dislikes, which can narrow my choice somewhat.  Ginger cake is one of his few favourites.

So I spent ages leafing through my embarrassingly huge collection of recipe books to find the perfect ginger cake but most recipes were either too fussy and complicated for a man that just likes a simple ginger cake, or they were of the gingerbread variety that should have been made days before to enable the stickiness and flavours to develop.

ginger traybake2

With an enormous pile of books on the bedside table as I sipped my morning tea (retirement, I can recommend it heartily), I settled on a recipe in the gorgeous book, “Simply baking” by Sybil Kapoor.  This book is stuffed full of well tried and tested recipes from various kitchens of the National Trust and I really can’t understand why I hadn’t noticed this one before.

ginger traybake3

It’s described as a fusion of gingerbread, parkin and flapjack and I would say that’s very accurate.  It had the treacly gingeryness of gingerbread, the oatyness of parkin and the chewyness of flapjack.  Truly a match made in heaven and an absolute hit with Nick who thought he’d died and gone to heaven. Highly praised and very highly recommended.

In fact, it beat the Bonfire Night Parkin that I made for a large gathering last weekend well into second place.  The recipe I used for that was traditional but the end result was nowhere near as nice as this.

(You can no longer see this recipe and photo online as the website has, like so many, morphed into something else!)

Ingredients

150 ml milk (I used semi-skimmed as that’s what we have)

40g black treacle

80g salted butter

55g plain flour

1½ tsp ground ginger (Nick reports that this is plenty)

½ tsp ground cinnamon

½ tsp bicarb

115g light muscovado sugar

40g dark muscovado sugar

100g porridge oats

Method

In a small saucepan, put the treacle, butter and milk and heat gently until the butter is melted, stirring every so often.  Set aside to cool slightly.

Grease and line a traybake tin that measures roughly 18 x 28 cm.  Preheat the oven to 150°fan / gas mk 2½.

Sift the flour, bicarb and spices into a large bowl.  Add the oats and sugar and mix well.  Add the treacle mixture and mix again to combine thoroughly.

Pour into the tin and bake for 45 minutes.  Cool in the tin.

Cuts into 8-12 slices, depending on how small or large you like your slices.

March 5, 2016

APPLESAUCE CAKE

applesauce cake2

I have been meaning to have a go at baking this cake ever since it appeared in my friend Ken’s blog a while ago.  Finally the right moment arrived.  (Do other people have to have the right moment to bake a certain cake or is it just me?)  It’s a popular American recipe.

applesauce cake

I was in need of a cake that was quick to put together, moist and very tasty.  Something that would not need fancy decoration to make it tempting, that would keep well and be perfect with a cup of tea or equally good with a dollop of custard.  And no sickly icing to set your teeth on edge.

applesauce cake3

It turned out to be the perfect cake in all those respects.  My father who is 87 has been very poorly with a nasty bout of shingles and very unpleasant complications.  He had not felt much like eating and a piece of tasty cake was just what he needed to rejuvenate the taste buds, stimulate the appetite and set him on the right course to build up his strength again.  The strength of cake.  The glory of calories when you need lots of them.

applesauce cake4

This cake is a good keeper so that foil wrapped squares of it can be left in his fridge for nibbling on at any time when he feels like it.  Just the job.

You can see Ken’s post about it here.  I converted the fl oz measurements into grams for future use and the only change I would make when I make it again is to reduce the amount of salt in the ingredients.  If you like gingerbread style cakes you will like this one.  (There is no ginger in it but the spices are full on.)  For the apple sauce I used a jar of apple compote that you find on the shelves in French supermarkets.  You could simply used stewed apple instead.  I also added some dried fruit for no other reason than I had it to use up.

Ingredients

365g plain flour

365g golden caster sugar

2 tsp baking powder

1½ tsp salt ( I would reduce this to 1 tsp or less next time)

¾ tsp ground cinnamon

½ tsp ground cloves

½ tsp ground allspice

120ml vegetable oil

120ml water

360ml unsweetened apple compote

2 eggs

2 tblsp dried mixed fruit

Method

Preheat the oven to 180° C / 160° fan.  Grease a 22cm square baking tin and line the base with baking paper.

Sift the flour, spices, bp and salt into a large bowl.  Add the sugar and mix together.

Beat the eggs with the oil and water.  Add to the flour mixture along with the apple and beat together until just combined.  Stir in the dried fruit and mix well.

Pour into the prepared tin and level the top.  Bake for about an hour until done.

Cool in the tin for 10 minutes then turn out onto a wire rack.  Cut into squares when cold.

Cuts into a minimum of 16 squares, depending on how big you cut the squares.