Showing posts with label coconut. Show all posts

February 24, 2025

CHERRY AND COCONUT CAKE


Whilst doing my occasional purge of ancient condiments and out of date foods in the fridge I found a part used jar of bottled cherries.  These things are very sweet but delicious on ice cream or with chocolate cake.   This time my thoughts turned to "cherry cake" swiftly followed by "coconut"! 

I used one of my favourite coconut recipes from the Waitrose website which you can see here. I've previously adapted it to make a delicious coconut and lemon cake which you can see here.

I rinsed, dried and quartered the cherries, a process which I find a bit tedious which is why I've given the cake two stars for the faffing about.  It’s not hard to do, just always takes longer than you think!

The mixture turned out stiffer than I remember so I had to add a splash of milk if I was ever going to get it into the tin.  The good bit about that is that the cherries didn't all sink to the bottom of the cake!

Anyway, it turned out really well, was a lovely cake, with a good coconut flavour, a crisp crust, moist with a Madeira-like texture and little hits of the very sweet cherries.  Perfect for a "not quite Spring yet" cup of tea in the warm afternoon sunshine.  

It was very much appreciated in my watercolour class where we were painting snowdrops and everyone had a second slice!


Ingredients

175g unsalted butter, softened
175g golden caster sugar
3 eggs
1/4 tsp coconut flavouring (optional)
175g self raising flour
100g dessiccated coconut
100g bottled or glacé cherries
a splash of milk if needed
 
Method
 
Butter and line a 900g (2lb) loaf tin or use a paper liner.  Preheat the oven to 180°C /160°Fan / gas mk 4.

Rinse the cherries well and pat dry with kitchen paper.  Cut into quarters.  Put about a tablespoon of the measured flour into a small bowl and tip the cherries in.  Roll them around in the flour with a spoon so that they are well coated in flour.  This should help to avoid them all sinking to the bottom of the cake (although sometimes they do even though I have done this step!).
 
In a large bowl, cream the butter and sugar using a hand mixer, until light and fluffy.  

In a jug, beat the eggs with the coconut flavouring and then add a dribble at a time to the creamed mixture along with a little flour, beating well with each addition.
 
Fold in the remaining flour, then the coconut and cherries.  If the mixture seems very stiff, mix in a splash of milk to loosen it.  Spoon into the tin and level the top.
 
Bake for 50-60 minutes, covering with foil after 30 minutes, until done.  
 
Leave the cake to cool in the tin for 10 minutes then turn out onto a wire rack to cool completely.
 
Cuts into 8-10 generous slices.  
(Leftover slices are nice served warm as a pudding with custard!)

August 8, 2023

COCONUT AND LEMON TRAYBAKE


We joined a walking group when we first came to France this year, back in March.  After each walk (called a randonée) most people retire to the bar in the village, or sometimes to someone's house, for a debriefing - liquid refreshment and a slice of cake!


A traybake is ideal for this as it can easily be cut into squares and passed along the table for people to help themselves.  The resulting chunk of cake tends to look a bit tidier and is easier to handle than a slice from a round cake.  (Loaf cakes are equally good in this respect too.)


I had it in mind to make Mary Berry's lemon drizzle traybake but on reorganising my pantry and kitchen cupboards (what a joy it is to have a pantry!) I found several packets of coconut which, I know, is not everyone's favourite in a cake but needed using up.  


To make the cake I adapted a recipe from a charity shop find - a book called "Cakes, regional and traditional" by Julie Duff which, as the title implies, is full of lovely old fashioned and traditional recipes from all over Britain.  I based this recipe on the one for coconut pound cake and will be delving into the pages of this book again!

The cake was lovely, a nice moist and soft texture with not too much coconut and a delicate lemon flavour. 

For another coconut and lemon cake see here.

Ingredients
For the cake

225g self raising flour

225g caster sugar

225g baking spread or softened butter

3 eggs, lightly beaten

115g desiccated coconut

1 tsp coconut essence (or Malibu)

zest of 1 lemon

For the icing

3 tblsp icing sugar, sifted

lemon juice

Method

Butter and line the base of a large roasting tin or traybake tin that measures roughly 30 x 23 cm (or 12" x 9").  Preheat the oven to 180°C / 160° fan / gas mk 4.

Put all the cake ingredients into a large bowl and beat well until thoroughly combined.  I managed this with a wooden spoon but a hand held mixer would have been easier!

Tip the mixture into the prepared tin, spread it out and level the top.

Bake for about an hour or until done.  Mine was ready in 55 minutes.

Cool in the tin for about ten minutes then turn out carefully onto a wire rack.

To make the topping, mix the icing sugar with enough lemon juice to make a runny but creamy consistency and drizzle any way you like over the cooled cake.

Cuts into 24 squares.

October 13, 2022

LIME AND COCONUT CAKE


I recently made two cakes for the Tea Garden at an event here in France; a caramel apple cake and this lime and coconut cake.  With my cookbooks all safely under dust sheets because of the ongoing building work I looked to the internet for ideas and spotted this recipe on the Carnation website.


Once the mixture was made I tasted it and thought it was not very sweet.  I looked at the recipe and noticed that it contained no sugar.  "How very odd" I thought.  The recipe must be wrong!

I Googled other recipes for lime and coconut cake and saw that they all contained sugar.  In fact sugar is surely a principal ingredient of all cakes.  The recipe had loads of complimentary reviews, no mention of sugar.  So I decided to add some.  Thinking that evaporated milk is itself slightly sweet I just added 100g.

In accordance with my recent lightbulb moment regarding the conundrum of giving away cakes made to an untried recipe I made a couple of muffins with a spoonful of the mixture.  They tasted good, a nice flavour of lime with a hint of coconut, just as I would expect, moist and with a nice even crumb, which confirmed my conclusion that the recipe on the internet must be wrong and the sugar had been omitted.  The lime flavoured icing was delicious.

It wasn't until I looked at the recipe again for writing up the blog post that I realised my mistake........I should have used condensed milk, not evaporated milk, condensed milk being an already sweetened product.  No wonder the recipe contained no actual sugar!  I can't believe I did that but brain fog has been a feature of my life so far this year!  

In the words of René Artois from "Allo, allo":  "you stoopid wooman!!"

The cake sold well, every slice devoured, so I leave it up to you whether you make it with evaporated milk or condensed milk.  I will add this cake to my tweaking list and try the condensed product myself next time!

(You can buy tinned condensed milk everywhere in France and I think also evaporated milk, sold as an addition for coffee, although I haven't tried it.  I brought mine from the UK in the pre-Brexit days when that was allowed.)

A word here about zesters.


The above is a microplane grater or zester.  It will give you very finely grated zest such as would be ideal for incorporating into cake mixtures and other recipes.  Flecks of the zest are not usually visible.  They are extremely sharp and you have to be very careful not to brush your hand over it as they will easily remove a layer of skin.  They can be quite expensive but a worthwhile investment if you want to get fine, almost powdery, zest.
This is a lemon zester.  It will give you strips or strands of peel that are good for decorating a cake or dessert.  Until I invested in a microplane grater this was all I ever used as I didn't mind the visible strips of zest in a cake.  They are quite cheap and available in most supermarkets.

Ingredients

For the cake

175g softened butter or baking spread

3 large eggs, beaten

55g desiccated coconut

zest of 2 limes

175g self raising flour

1 tsp baking powder

250g evaporated milk*

100g caster sugar*

For the icing and decoration

100g icing sugar, sifted

juice of 2 limes

as sprinkling of desiccated coconut

strands of lime zest (optional)**

Method

Preheat the oven to 170°C / 150° fan / gas mk 3.  Butter a 900g / 2lb loaf tin and line the base with a strip of baking paper, or use a paper liner.

Put all the cake ingredients into a large bowl and using a hand held electric whisk beat together until pale and creamy.

Transfer the mixture to the prepared tin, level the top and bake for 50-60 minutes.  If the top is looking brown before the middle is cooked, cover with a piece of baking paper or foil.

Cool in the tin for 10 minutes then remove to a wire rack to cool completely.

To make the icing, mix the icing sugar with enough of the lime juice to make a thick pouring consistency and drizzle imaginatively over the cake.

Sprinkle coconut over the cake for decoration.  If using an extra lime, scatter strips of lime zest over the cake.

Cuts into 10-12 slices.

*instead of evaporated milk and sugar use 250g condensed milk

**if using the extra lime to create the topping it occurred to me that you could drizzle the juice from it over the cake before icing it.

June 10, 2022

SCHOOL CAKE


I do remember having this as a pudding for school dinners - a sponge cake topped with jam and coconut, scooped in chunks from enormous baking trays.  It was served with pink custard usually once a week, maybe every two weeks at the most.  I loved it!  The dinners at my secondary school were excellent, especially the puddings! 

I first made it myself as part of my afternoon tea.  You can read about that here.  I used quite a large traybake tin which made a shallow sponge, easy to cut into tiny squares.


The squares looked the bees knees when topped with a fresh raspberry and tasted divine.  I took a box full of the leftovers to my knitting group where they were very popular.

I made the cake again for another event, cut into larger squares to be served as a dessert.  It was equally popular.  This recipe is definitely a keeper!  You can see the original here.


It's hard to resist such a dainty treat!

One thing I haven't done with it so far is to repeat the whole school experience and actually serve it with pink custard!  There's time yet!  

Ingredients

For the cake

225g baking spread

225g caster sugar

225g self raising flour

4 eggs

a splash of milk if needed

For the topping

a jar of raspberry jam

25g desiccated coconut

a small punnet of fresh raspberries (optional)

Method

Preheat the oven to 180C / 160 fan / gas mk 4.  Grease and line the base of a traybake tin measuring roughly 30 x 18cm.

Put all the cake ingredients into a large bowl and whisk with an electric whisk until creamy and well combined.  Whisk in a splash of milk if it seems rather stiff.

Pour the mixture into the tin and spread out evenly, levelling the top.  Bake for 25-30 minutes until done.

Take the cake out of the oven.  Put about half of the jar of jam into a small bowl and stir to loosen it.  Spread this over the warm cake, making sure there are no bare patches.

Sprinkle the desiccated coconut over the jam in a thick dusting and leave to cool in the tin.

When cool mark the top into squares to be cut later or cut into squares of the required size straight away.

To decorate, cut a thin sliver from the flat end of each raspberry - this makes sure they stand pointy end up and don't wobble over.  Place one in the middle of each square and gently push it into the jam slightly so that it stays put.

Serves as many as you like, depending on the size of squares you want.

May 23, 2022

COCONUT AND LEMON CAKE

Blogging has been rather random lately but baking has been going on throughout so a bit of a catch up is needed methinks.


This is an adaptation of a raspberry and coconut cake that I first wrote about here.


I have now made this cake three times, the first time it was a birthday gift, the second a donation to an event.  Consequently, the first two times I made it I didn't get to taste it!  However, I was reliably informed by those that did taste a slice that it was lovely so I made it again for a MacMillan coffee morning and actually had a slice myself!  It was lovely.  Like a lemon drizzle cake with added coconut.


The recipe originally came from the Waitrose website and you can see it here.  It's for a raspberry and coconut cake that I have made many times and which always goes down well.  For this version I simply omitted the fruit and added lemon zest instead.  Then I iced it with a simple icing and decorated it with lemon zest, coconut and some edible flowers (which were actually self seeded violas growing in our gravel drive!).

Ingredients

175g unsalted butter, softened

175 golden caster sugar

zest of 1 lemon

3 eggs

¼ tsp coconut flavouring

175g self raising flour

100g dessicated coconut (plus extra for decoration)

2-3 tblsp icing sugar, sifted

1 tblsp lemon juice

extra lemon zest for decoration (optional) 

edible flowers or other sprinkles for decoration (optional)

Method

Butter and line a 2lb, 900g loaf tin with baking parchment or use a paper liner.  Preheat the oven to 180C / 160 fan / gas mk 4.

In a large bowl, cream together the butter, sugar and lemon zest.  Beat the eggs with the coconut flavouring and beat into the mixture a dribble at a time with a spoonful of the flour.

Fold in the remaining flour and coconut.  Spoon into the prepared tin and level the top.

Bake for 50-60 minutes, covering with foil after 30 minutes if it looks as though it's browning too much.

Cool in the tin for 10 minutes then turn out onto a wire rack to cool completely.

To make the icing, sift the icing sugar into a bowl and mix with enough lemon juice to make a runny consistency, thick enough to hold its shape and just run down the cake slightly, not run off completely.  Sprinkle with lemon zest (if you are happy to use a second lemon, otherwise omit).  Sprinkle with dessicated coconut and decorate along the inevitable crack down the middle with edible flowers or other sugar decorations of your choice.

Cuts into 9-10 slices.

April 6, 2021

GINGER AND COCONUT TARTS


This is another variation of one of my favourite Be-Ro book recipes.


They are called in the book "rich coconut tartlets" and are essentially jam tarts with a coconut topping.  My mum used to make them by the dozen most weekends.  The last time I wrote about them I had made a version using quince jelly which you can see here.  In that post I originally gave a link to the recipe on the Be-Ro website but, like so many links, it has disappeared!  It's so annoying to get all excited about baking something you've seen in a blog, only to find that when you look up the link all you get is "Error 404"!  


Comparing these to the quince ones it looks like there is much more topping.  That's probably down to using a large egg instead of a medium one.  The large free range eggs we now get are huge!!

I love the knobbly, rustic and home made look!

For these tarts I used Sainsbury's ginger preserve, a favourite jam that I like to have on toast.  I've also used the same jam to fill my pear and ginger upside down cake which you can see here.  (Robertson's make a ginger marmalade which would work nicely too.)  I finished each tart with a bit of crystallised ginger, popped on top before baking. 


This week's weather.


They are perfect for the current weather.  As I write this hail is falling and covering the ground like snow.  This day last week we were basking in 20°C and lighting the barbecue, thinking that this lockdown business is not so bad.  Such is the nature of April weather in Derbyshire, especially during the Easter school holidays!   April showers, I suppose!

Last week's weather - prior to the schools breaking up for Easter!!

Ingredients

100g shortcrust pastry - home made using 100g flour or shop bought

a few teaspoons of ginger jam or marmalade

50g soft margarine

50g caster sugar

1 egg, beaten

50g dessicated coconut

12 pieces of crystallised ginger (optional)

Method

Preheat the oven to 180°C / 160° fan / gas mk 4.  Grease a 12 hole patty tin.

Roll out the pastry and cut twelve 3" (7.5cm) circles using a fluted pastry cutter.  Gently press one circle into each hole and put about ½ tsp jam in the centre of each one.  (This doesn't sound much but any more will cause the jam to leak out and boil over when cooked.)

In a small bowl, beat together the margarine and sugar until light and fluffy.  Beat in the egg and the coconut.

Plop about 1 tsp of the coconut mixture on top of the jam in each tart, teeming and ladling until it's all used up and shared out evenly, and push the mixture to the edges of each one to seal in the jam.

Drop a piece of crystallised ginger into the centre of each one.

Bake for about 20 minutes until the coconut mixture is risen and golden.  Cool before serving as the jam will be very hot.

Makes 12 tarts.

August 29, 2020

COURGETTE, LIME AND COCONUT CAKE

 
I made this cake recently for a friend's birthday.
 
It's an adaptation of a recipe which I've used before and you can see here.  On that occasion (two years ago) I was using up a glut of courgettes but this year we have none at all, which is very sad indeed.
 
Last year's wasn't a great harvest either, largely because during a spring storm the wind blew over two of our four plants, the green ones, and broke the tops off.  Luckily the other two plants gave a reasonable supply of small yellow courgettes.  This year we were in the UK drowning our sorrows in Italian rosé wine at the time when we should have been planting courgette plants in our French garden.

 
Fortunately we have friends who have some to give away so we're not going entirely without courgettes this year. 
 
Unfortunately I wasn't able to taste the cake after I had given it away.  Good for my lockdown waistline but it would have been nice to be able to verify that it tasted as good as my friend said.  It may seem odd to post about a cake that I haven't actually tasted but it wouldn't be the first time!  The main reason is that so I can remember how I made it for next time.  It's a further adaptation of Nigella Lawson's recipe for "Flora's courgette cake", adding some coconut instead of the dried fruit.
 

I made the cake again, just to check it was good.
 
 It was!
 
Ingredients
 
250g courgettes, unpeeled
2 large eggs
125ml sunflower oil
150g caster sugar
225g self raising flour
½ tsp bicarbonate of soda
½ tsp baking powder
50g desiccated coconut
zest of 1 lime*

For the topping and filling

2-3 tblsp lemon curd**
zest and juice of 1 lime*
100g cream cheese
50g butter, softened
50g icing sugar

Method

Grease and line the bases of two 20cm sponge tins.  Preheat the oven to 180C / 160 fan / gas mk 4.
 
Wipe the courgettes clean with damp kitchen paper and grate them, unpeeled, using the course side of a box grater.  Squeeze small handfuls of the grated courgettes and place in a sieve over a bowl to allow any more liquid to drip out.
 
In a large bowl, beat the eggs, oil and sugar with an electric whisk until light and creamy.  Sieve in the flour, baking powder and bicarb and beat again to combine.  Stir in the courgettes, coconut and lime zest until well blended.
 
Divide the mixture evenly between the two tins and bake for 30 minutes until firm and golden brown.  Cool in the tin for five minutes then turn out onto a wire rack to finish cooling.
 
While the cakes are cooling, put the lemon curd into a small bowl and mix well with a dash of lime juice to sharpen it if needed**.  Set aside.
 
In another bowl, beat the cream cheese until smooth, beat in the butter and icing sugar and a dash of lime juice to taste.  Refrigerate until needed.
 
When the cakes are cold, place one of them on a plate or stand and spread with the lemon curd.  Place the other on top and spread with the cream cheese topping.  Sprinkle a few strands of lime zest over to decorate.  Add a few edible flowers for decoration if you like.
 
Cuts into 8-10 slices.
 
*the unused lime juice can be used to make margaritas which would go well with a slice of this cake!
**the jar of lemon curd I used, French from SuperU, seemed already quite sharp to me so I didn't add any lime juice to it.

August 21, 2019

RASPBERRY AND COCONUT CAKE, be careful what you wish for and a demon banished.


It has been a strange summer.  While in France we have had to endure not one, but three heatwaves.  They only ever last for a few days when at their worst but either side of those three days it can still be unbearably hot.  During the last heatwave we had temperatures of 38 - 43C and either side of that it was well over 30C for days on end.  Consequently we were glad to return to the UK for a couple of weeks to cool off a bit.

 
And so, back in the UK, we're getting typical school holiday weather.  A few sunny days in between pouring rain.  In years gone by I would have been spitting nails about the lousy summer weather but this time, having experienced how strangulating such heat can be, I'm glad to be able to get out and about as much as I like, albeit with an umbrella. However, having wished to be a bit cooler, when it was tipping it down the other day I wondered if I should have been more careful what I wished for!  Hopefully it will not continue to rain every day until we return to France. 
 
 
Last week was, apparently, "afternoon tea week". 
Who would have thought it?  Everything one does now has its own week!  Still, with visitors coming, at least it presented an excuse to be indoors, while it poured down outside, and bake a cake.  I chose to make a raspberry and coconut cake because there were boxes of beautiful raspberries being sold off very cheaply in the supermarket - a casualty of the cool, wet weather no doubt.
 
I'd been hankering after a good coconut and raspberry cake recipe for a while and found this one on the Waitrose website.  It looked very promising so I decided to risk it, although adapting it slightly to make a round cake rather than a loaf cake.


It was delicious!  Moist, with a perfect balance of the sweetness and texture of coconut and the sharpness of the raspberries.


I cheated a bit, having spotted a bottle of coconut flavouring in Waitrose (on one of our occasional pilgrimages to our nearest shop which is about an hour away).  I have no idea how much it actually enhanced the flavour of the cake but I would use it again anyway.
 
 
These pictures were taken outdoors the day after I made the cake, when the sun was shining.  I had to be careful not to leave my one last slice of the cake unattended as I seemed to be being watched!


The cake recipe is definitely a keeper.  Instead of decorating it with coconut yoghurt and raspberries as per the recipe I added a drizzle of plain water icing, a scattering of toasted coconut flakes and a sprinkling of freeze dried raspberry pieces.  It looked pretty glamorous I thought. 


The cake looked and tasted just as good the second time I made it, for a Macmillan coffee morning which we held in France.  (We raised £150.)


As well as the cake I decided I would have another bash at scones in honour of the concept of "afternoon tea week".  The visitors had been prewarned of my track record in the scone department and promised to bring a saw!  I used a recipe for ordinary fruit scones in the National Trust Book of Scones and......they worked a treat!  Maybe my scone demon has finally been banished - at last - I was pretty chuffed.  I have finally triumphed over my fear of scones after more than fifty years!
 
Ingredients
 
175g unsalted butter, softened
175g golden caster sugar
3 eggs
1/4 tsp coconut flavouring
175g self raising flour
100g dessicated coconut
150g raspberries, halved
2-3 tblsp icing sugar, sifted
a handful of coconut flakes
a sprinkling of freeze dried raspberry pieces
 
Method
 
Butter and line the base of a 20cm round cake tin.  Preheat the oven to 180C /160 Fan / gas mk 4.
 
In a large bowl, cream the butter and sugar using a hand mixer, until light an fluffy.  Beat the eggs in a jug with the coconut flavour and add a dribble at a time along with a little flour, beating well with each addition.
 
Fold in the remaining flour, then the coconut and raspberries.  Spoon into the tin and level the top.
 
Bake for 50-60 minutes, covering with foil after 30 minutes, until done.  When you remove the cake from the oven leave the heat on, scatter a handful of coconut flakes onto a baking tray and put in the oven for 3-5 minutes until nicely browned at the edges.
 
Leave the cake to cool in the tin for 10 minutes then turn out onto a wire rack to cool completely.
 
When the cake is cold, transfer to a plate or stand, mix the icing sugar with a little water to make a runny icing and drizzle it over the cake in a diagonal pattern.  Scatter the toasted coconut over the cake and sprinkle with the dried raspberries.
 
Cuts into 6-8 generous slices.  (Leftover slices are nice served warm as a pudding with pink custard!)

~~~~~~~~~~~~~~~~~~~~~~

I have since made this cake in a 2lb loaf tin with strawberries instead of raspberries. Decorated with a layer of a thick plain water icing made with 3 tablespoons of icing sugar spread over the top and some sliced strawberries to disguise the inevitable split down the middle!

I have also adapted it to make a CHERRY AND COCONUT CAKE which you can see here.

It was excellent as a COCONUT AND LEMON LOAF CAKE, omitting the fruit and adding the zest of one lemon instead. I decorated it with thick water icing made with the juice of the lemon, decorated with strips of lemon peel and a sprinkling of coconut. Edible flowers (violas) added along the cake to disguise the crack in the middle.  You can see that version here

July 25, 2019

BLUEBERRY, MINT AND LEMON CAKE


We have friends who are completely baffled why we live (half of the year) in France.  They have the impression that, away from the towns, the place is deserted.  Dead as a dodo.  They recall holidays where they have driven round from village to village for hours and barely seen a soul.  All houses appear shut up and empty, almost like in a ghost town.

Well, dear readers, trust me when I say, you could not be further from the truth.  Behind those shuttered windows and doors lie the real France, the goings on are way beyond your imagination and experience.....read on...…...


We are at the tail end of a heat wave.  Yesterday we were in the middle of three days of "canicule" (the French word for heatwave) and believe me, it is flippin' hot.  Yesterday the temperature was expected to reach 40C by teatime and it was hardly the ideal weather to hold a cake club meeting!
 
And sure enough, if you had driven around the village of Boussay in Touraine yesterday afternoon, you would have found the place deserted, all windows and doors shuttered against the heat and yet......an awful lot of cars parked along a certain street outside a certain house opposite the château and the sound of laughter and the clinking of glasses coming from within.  Yes, it was a cake club meeting.  Undaunted by the weather the members rose to the occasion and baked an amazing selection of cakes and bakes to the theme of "herbs".
 
 
And so I come to my blueberry, lemon and mint cake.  I saw the recipe as a loaf cake on the Delicious Magazine website and also on a blog where the writer had baked it as a Bundt cake instead of a loaf.  That was more my kind of thing so I decided to go for it.
 
It was lovely.  A nice texture which held up well (with no buttercream to melt in the heat).  I thought it had the right amount of mint but if I make it again (which I probably will) I would use double the lemons (use two instead of one) and use halve the quantity of blueberries.  In spite of adding the fruit in thirds most of the blueberries sank to the bottom of the tin which meant they were bizarrely at the top of my Bundt cake.
 
I thought it looked much better without the drizzle which was rather like mint sauce and put a kind of green sludgy finish on it but....I doubt that anyone expects glamour from this kind of cake and it did have the effect of giving the cake just the right mintyness.  I decorated mine with mint leaves, viola flowers and the rather weird looking flowers from our garden mint.  Definitely one to be made again.  You can see the recipe I used here and here for the Bundt version.
 
Ingredients
 
115g very soft butter
25g freshly picked mint leaves
250g blueberries (try 150g next time)
finely grated zest and juice of 1 large lemon (try 2 lemons next time)
250g plain flour
2 tsp baking powder
pinch of salt
2 large eggs, beaten
120ml whole milk
25g desiccated coconut
 
For the glaze
 
100g granulated sugar
 
Method
 
 
Rinse and dry the blueberries and put into a bowl.  Finely chop about a quarter of the mint leaves to yield roughly 1 tblsp.  Add to the blueberries with one tsp of the lemon juice.  Stir together and set aside.
 
Preheat the oven to 180C / 160 fan / gas mk4.  Butter a 900g loaf tin or a Bundt tin.
 
Using an electric hand mixer, cream the butter and sugar until light and fluffy (this will take longer than usual due to the high proportion of sugar).  Beat in the lemon zest then the eggs, one at a time, adding a little flour with the second egg.
 
Beat in the milk then fold in the flour. baking powder and coconut.
 
Spoon one third of the mixture into the tin followed by one third of the blueberries.  Repeat twice, ending with a layer of blueberries.  Bake for 60-70 minutes until done.
 
While the cake is cooking make the glaze by putting the rest of the mint leaves and 2 tblsp of the granulated sugar into a mini processor or pestle and mortar and process until a paste is formed.  Stir in the lemon juice and set aside.
 
When the cake is cooked leave in the tin for ten minutes then turn out if using a Bundt tin, leave in the tin if using a loaf tin.
 
Press the mint mixture through a fine sieve or tea strainer into a bowl or jug and stir in the remaining granulated sugar.  Pour the liquid over the cake and leave to cool completely.
 
If you like you can add a further drizzle of icing made with icing sugar and lemon juice.  Decorate as desired.
 
Cuts into 10-12 slices. 
 

April 6, 2019

BANANA AND COCONUT CAKE WITH MALIBU DRIZZLE

 
I wrote about this cake not long ago but, having made it again (and again), at last with the drizzle on it, I think it deserves a post of its own.
 
Neither bananas nor coconut are everybody's cup of tea in a cake, I know.  Some dislike cooked banana in any shape or form, others hate coconut.  Banana cakes can be a bit dense and rubbery.  Coconut cakes can be a bit dry.  I know this because I have used recipes that produce both of those things.  This recipe is different.  The cake is light, moist and evenly textured.  Maybe the banana makes the coconut less dry and the coconut makes the banana less soggy, but in any case, it's a winner.
 
Previously I had not got around to putting the icing on top before cutting the cake but it does make a difference.  I deviated from the original recipe by adding it as a drizzle when the cake was warm, not just as a topping and that worked really well.
 
Unfortunately the recipe has been removed from the website that I found it but you can see my original post here.
 
Ingredients
For the cake
170g softened butter or baking spread
170g caster sugar
1 tsp vanilla extract
3 eggs
170g self raising flour
1 tsp baking powder
2 medium very ripe bananas, peeled and mashed
100g desiccated coconut

For the drizzle
100g icing sugar
1-2 tblsp Malibu  (or fresh lime juice)

Method
Preheat the oven to 160°C / 140° fan / gas mk 3.  Butter and line a 900g (2lb) loaf tin, or use a paper liner.

In a large bowl use an electric whisk to beat together the butter, sugar and vanilla until light and fluffy.  Beat in the eggs one at a time.  Sift in the flour and baking powder and fold in.  Add the bananas and coconut and mix well to combine.

Spoon the mixture into the prepared tin and level the top.  Bake for 50-60 minutes until golden brown, firm and springy.  Remove from the oven and leave in the tin for 10 minutes.

Meanwhile, to make the drizzle sift the icing sugar into a small bowl.  Add enough of the Malibu to make a runny icing.

Remove the cake carefully to a wire rack and poke holes in the top using a skewer.  Drizzle about half of the drizzle topping over the cake.  When the cake is almost cool, pour the rest of the icing over the whole of the cake and allow to run down the sides.

Cuts into 10-12 slices.

September 11, 2018

A TALE OF TWO COCONUT CAKES and a reminder that you should never judge a cake by its icing.

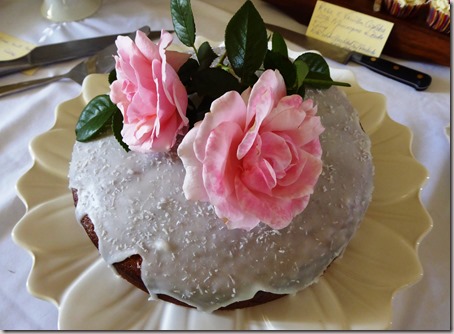
coconut cake2coconut cake
I am a fan of coconut in cakes and for our July Cake Club meeting where the theme was “flowers” I decided to make a coconut and rose cake.  Decorated with fresh roses and sitting on one of my favourite cake stands on the table, it looked very pretty but when I took a bite of the first slice it turned out to be an embarrassing disappointment.  There was rose water in the cake and the icing but you could hardly taste it and the cake itself was very dry.
Goodness only knows what I did wrong but you can see the recipe here.**  I was so miffed that it turned out so badly that I’m half tempted to revisit the recipe and try again, maybe with a little tweak or two but in reality it will probably never happen.  Unless of course I just take a simple, reliable, coconut cake recipe and add some rose water…..hmmmm………

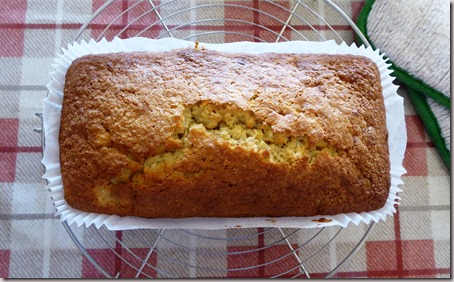
coconut cake3
Anyway, in sharp contrast this rather ordinary looking cake turned out to be absolutely gorgeous!  It’s a coconut and banana cake and I found the recipe on the Guardian website here.**

coconut cake5
Included in the recipe are instructions for a Malibu drizzle and/or a Malibu and coconut buttercream filling.  The first time I made the cake unexpected guests turned up and the cake got cut without its drizzle.  It was delicious.
The second time I made the cake was for a charity event and I gave it away, complete with the drizzle, so didn’t get the chance to taste the difference.  I imagine it would have been lovely but I’ll have to make it a third time to confirm!  That will be no hardship of course, although there are very few cakes that I make more than once…….so many cakes, so little time.  I’m not sure I would bother with the buttercream but you never know – I might even have to make the cake a fourth time to decide if it really needs it or not!
Which just goes to show that a gorgeous looking cake can disappoint but an ordinary one can be delightful.  Never judge a cake by its icing!

*Having made the cake again, this time with its Malibu drizzle icing, I can confirm that it does make a difference.  I found the quantity of icing in the original a bit too much so have amended it in the ingredients given here.
I'm not sure that I could be tempted to add the Malibu buttercream as well - maybe if I made it as a round cake……..

**Both of these recipes have now been removed from the internet.

Banana and coconut cake
Ingredients
170g caster sugar
170g softened butter or baking spread
170g self raising flour
1 tsp baking powder
2 medium ripe bananas, peeled and mashed
100g desiccated coconut
3 eggs
1 tsp vanilla extract
For the drizzle
1-2 tblsp Malibu (or you could use fresh lime juice)
100g icing sugar
Method
Butter and line a 2lb loaf tin (I used a paper liner).  Preheat the oven to 160° C / 140° fan / gas mk3.
In a large bowl, cream together the butter, sugar and vanilla until light and fluffy.  Beat in the eggs, one at a time with a spoonful of the flour and a spoonful of banana.
Sift in the remaining flour, add the coconut and banana and mix well to combine.
Pour into the prepared tin and level the top.  Bake for 50-60 minutes or until done.  Leave in the tin for ten minutes then remove to a wire rack to cool.
While the cake is cooling, make the drizzle by mixing together the Malibu and sifted icing sugar.  Make holes in the cake with a skewer and while it is still warm pour the icing over the cake so that some sinks in and some dribbles down the sides.
(Refer to the recipe in the link if you wish to fill the cake with the coconut buttercream.)

Cuts into 10-12 slices.