Showing posts with label Mary Berry. Show all posts

July 9, 2026

APPLE CARAMEL CAKE


For some time I have wanted to use a relatively new Bonne Maman product, Caramelised Apple Spread.  Curiously, although Bonne Maman is a French company I have not found this spread for sale anywhere in France.  The only place I have found it is Sainsbury's in the UK.  It tastes divinely like tarte tatin, the wonderful flavour of caramelised cooked apples, and having bought a jar I wondered what you would do with it.  Simply spreading it on toast or a crumpet seemed too ordinary but I imagined it would be fabulous as a filling for a sponge cake.


I had in mind Mary's recipe for her apple and lemon sponge cake (see here) but using the spread as a filling instead of lemon curd and cream.  I also decided to go rogue and add a layer of caramel buttercream in the middle and on top.


I my usual method for grating the apple, which was to cut the apple it half vertically, remove the core with a melon baller or teaspoon and grate using the peel to hold it.  You end up with grated apple and holding a piece of apple skin that can be discarded - with your own skin intact!

It was a very elegant looking cake with a nice moist crumb and lovely flavour of both apple and caramel.  I made this one for a very sophisticated young lady’s thirteenth birthday.  Her mum decorated it simply with two candles which said “13”.  

Ingredients

For the cake

225g each of baking spread

    caster sugar

    self raising flour

1 tsp baking powder

4 large eggs

two eating apples, peeled, cored and grated

For the filling and topping

100g unsalted butter, softened

200g icing sugar

2 tblsp Bon Maman confiture de lait or other caramel spread such as Carnation

a splash of milk if needed

3-4 tblsp Bon Maman caramelised apple spread

suitable decorations for example mini fudge chunks 

Method

Grease and line the bases of two 20cm sponge tins.  Preheat the oven to 180°C / 160° fan / gas mk4.

Put all the cake ingredients except for the apple into a large bowl and beat until smooth.  (An electric hand whisk makes this easier.)

Fold in the grated apple evenly and divide between the two prepared tins.

Bake for 25-30 minutes until golden brown and done.  Cool in the tins.

To make the buttercream, beat together the butter, icing sugar and caramel spread.  Add the milk if needed to make it spreadable (the weather was quite hot when I made this cake so very little milk was needed).

Remove the sponges from the tins.  Making sure the sponges are completely cold, place one on a cake plate or cake stand and spread the top with enough apple spread to make a generous layer (about half a jar).  Then top this with half of the buttercream.  

Place the second sponge on top and spread the remaining half of the buttercream on the top.  Decorate with mini fudge chunks if liked or serve plain.

Cuts into 8-10 slices.

June 18, 2026

LEMON SYLLABUB


A little while ago I made lemon posset for a dinner party dessert.  You can read about that here.  I served it in a variety of small, dainty cups and glasses.  


Then a couple of months ago I acquired some more small Pyrex glass cups at a village brocante which would also be perfect for the dessert.  You can read about that here.  My thinking was white china cups for the ladies, plainer glass ones for the gentlemen, corny and old fashioned I know but I didn't have a full set of either so a mix and match would be fun.  They are both roughly the same capacity.

The next time I had it in mind to make lemon posset I was looking for the recipe and came across one for lemon syllabub instead.  I wondered what the difference was.

Essentially, for lemon posset you cook the cream and mix in lemon juice.  For lemon syllabub the cream is not cooked but you make a lemon syrup and also include some sweet white wine which appealed to me!  (Other recipes I have seen online suggest just using ordinary white wine.)
Mary Berry's recipe for it is in her book "Classic Mary Berry" and also on the BBC website as a video which you can see here.  Interestingly in the book the recipe suggests leaving the syrup to infuse for at least an hour or even overnight whereas in the video you combine it with the whipped cream as soon as the syrup has cooled.  


To whisk it up I used what I call my "spider whisk" because it reminds me of the ginormous spiders we get here in France.  You push the handle up and down and the spider bit twizzles round at huge speed, making it very effective as a hand whisk.  I was pleased to find that even French double cream whipped up quickly using it.

~~~~~~~~~~~~


The other day I found a set of ten of these little glass sundae dishes in a UK charity shop. 
They cost next to nothing and are perfect for the next syllabub!
(Or ice cream, or chocolate mousse.)

Ingredients

1 lemon (well scrubbed if not unwaxed) rind and juice

100ml sweet white wine

75g caster sugar

300ml double cream

Method

First, make the syrup by peeling strips of rind from the lemon as thinly as possible using a vegetable peeler or small sharp knife.  Put the rind into a small saucepan with the lemon juice, sugar and wine.  Bring to the boil gently and once the sugar has dissolved simmer for a few moments.  Remove from the heat and set aside to cool.

Strain the cooled syrup into a bowl but reserve the peel.

Add the cream to the bowl and whisk until it just holds its shape, ie until thicker but still floppy, not stiff.

Divide the syllabub evenly between six cups, glasses or ramekins,  dropping a dessertspoonful at a time into each one.  

Cut the lemon peel into thin strips and use to decorate the syllabub.  Chill in the fridge for a minimum of two hours.  The dessert is ideal for making the morning or day before you need it.
You could also decorate it with a sprig of mint, a few raspberries, sliced strawberries or edible flowers such as violas.

Serves 6.

April 16, 2026

STRAWBERRY UPSIDE DOWN CAKE


The minute I saw Dom's post about an upside down Victoria sponge (see here), I knew I had to bake one as soon as possible!  

In the end I used my usual all-in-one sponge cake recipe from Mary Berry and constructed the cake slightly differently but it looked stunning and tasted delicious!  I took it to a friend's house for a birthday dinner and it went down very well.


I was pleased with the cream filling.  Whipping up French cream to a suitable stiffness can be a challenge but combining it with cream cheese made a difference.  For once it all stayed in the cake and didn’t run out of the middle!

~~~~~~~~~~~~~


The second time I made the cake I used a slightly smaller tin and the ingredients for a three egg sponge (175g each of flour, fat and sugar).  I had half as many strawberries so they went into one sponge tin.  I filled the cake with a good layer of strawberry jam and about two thirds of the quantity of cream filling.  I took it to an afternoon tea where it was declared a hit and there was only one slice left.

~~~~~~~~~~~~~~~~~


The next time I made the cake, this happened!

It was caused by using too many strawberries I think, plus being in a rush and removing the cake too early from the tin when it was still very fragile.  (It was for a birthday party and we were having a difficult morning with a poorly cat that we had to get to the vet urgently.)  I got away with it by using the damaged sponge as the bottom layer, sandwiching the two sponges together with plenty of whipped cream and dusting the top with icing sugar.  

It looked a bobby dazzler with birthday candles on the top.  The cake stayed together in one piece and nobody noticed.  It even survived being moved by the host from the plate I delivered it on to a cake stand!  Phew!  I have no idea how it didn't fall apart when she lifted it up - the power of whipped double cream!!


Ingredients 
For the sponges

225g each of self raising flour
                      caster sugar
                      spreadable butter, baking spread or softened butter

1 level tsp baking powder

4 eggs

a splash of milk

400g strawberries, trimmed and quartered

1 tblsp granulated sugar

For the filling

150ml double cream

100g cream cheese

1 tblsp icing sugar

Method

First of all, put the strawberries into a bowl with the granulated sugar, stir to ensure all the fruit gets a good coating and set aside while you make the cake mixture.

Preheat the oven to 180°C / 160° fan / gas mk 4.  Grease and line the base of two 20cm sandwich tins.

Put all the cake ingredients into a large bowl and beat with a hand held electric whisk (or a wooden spoon) until smooth and well combined, adding enough milk to loosen the mixture if it is very stiff.

Divide the strawberries between the two tins in an even layer and spoon the sponge mixture on the top.  Spread out carefully so as not to disturb the strawberries too much.  Level the tops and bake for about 25 minutes until done.

Leave in the tin for a few minutes before turning out onto a wire rack to cool.  Remember to remove the paper lining!  Be gentle as the sponges are quite delicate and may split.

To make the filling, put all the ingredients into a medium bowl and beat together until smooth.

When the sponges are completely cold, put one onto a serving plate or cake stand, strawberry side up.  Spread the cream filling over the top.

If you feel brave, flip the other sponge and place on top of the cream, strawberry side down as per Dom's recipe.  Otherwise, place it on top strawberry side up like mine.

Dust with icing sugar before serving.

Cuts into 10 slices

March 11, 2026

LEMON POSSET


We had dinner at a friend’s house one autumn evening last year and for dessert she served lemon posset, something I had never made or eaten before.  It was utterly divine and she served it in pretty stemmed champagne coupes.  

She and her husband are renovating one of those drop dead gorgeous French houses known as a "maison du maître" with large airy rooms, tall, draughty windows and high ceilings.  They still have plenty of work to do!  But the previous owner left behind a vast quantity of old furniture, linens, china and glassware, including the coupes.  Some of it was not to her taste but much of it was real treasure.

This is in sharp contrast to the unattractive furniture and other stuff that the owner of our first French house wanted to sell us.  We were mightily relieved to find it had all gone when we finally got the keys!  The difference is that our friend's house had been a well loved home whereas ours had been a holiday home for generations of a Parisian family who just descended on the place for six weeks every summer!  You can read a bit about that here.


Anyway, at the first opportunity, the next time we had guests for lunch, I decided to make lemon posset myself.  I served it in a hotchpotch of china cups and glasses and it went down a treat.  I adapted a Mary Berry recipe which was a doddle to make and I shall add it to my repertoire of favourite desserts.  It was luscious yet light and very lemony!  It's also ideal for a dinner party as it can be made the day before.

Ingredients

600ml double cream

15og caster sugar

3 lemons, zest and juice

a handful of fresh raspberries for decoration

strips of lemon zest for decoration (optional)

Method

Put the cream, sugar and lemon zest into a wide saucepan.  Bring to the boil over low heat and simmer gently for 3 minutes, stirring all the time.

Remove from the heat and allow to cool until lukewarm.

Stir the lemon juice into the cooled cream mixture and pour into 8 small ramekins, cups or glasses.

Chill in the fridge for at least two hours until set or overnight.

Just before serving, decorate with the fresh raspberries and strips of lemon zest.

Serves 8 portions.

January 10, 2026

PIGS IN BLANKETS CASSOULET

This was one of the recipes in Mary Berry's Christmas programme last year.  It looked so good that we bought extra pigs in blankets in order to make it.  You can see the recipe here.

We actually adapted it to a quick version that just serves two people.

In browning the PIBs the blankets (bacon) came off - the sausages became unwrapped but that was not a bad thing!  In fact it gave me the idea that the cassoulet would be just as good another time made with chipolatas and lardons! 

It was utterly delicious, perfect for a Friday night supper (or any night of the week!).  Because it contains a whole tin of beans we just had ours with extra veg; carrots and broccoli.  I used my lovely small old Cousances cast iron casserole dish, a present from my Aunty Vera in the 80’s.  She had bought it during the early trend for cast iron pots and pans but couldn’t get on with it, preferring her 1970’s Pyrex dish instead - the white one with the orange flower pattern.  I'm sure many of us remember those and I dare say some of you will still be using one!


We obviously used ready made uncooked PIBs but it would be perfect for cooked leftovers, just putting them in last thing with the beans once the sauce got going.  The advantage there is that they would probably stay in one piece!

Ingredients 

1 tblsp sunflower oil 

10 pigs in blankets (or the whole pack of 12!)*

2 small shallots, peeled and chopped

1 stick of celery, washed and sliced

2 small cloves of garlic, peeled and crushed or grated

1 400g can of chopped tomatoes 

1 400g can of haricots verts or other white beans eg butter beans, cannellini beans, chick peas, drained and rinsed

a splash of white wine (or water) used to rinse the empty tomato tin

1 tsp dried parsley or sage

1 tsp Dijon mustard (or just a spot of English mustard)

1 vegetable Oxo cube or any stock cube or stock pot

1 tsp chicken gravy granules if needed

1/2 tsp sugar if needed

Method 

Heat the oil in a heat proof (cast iron) casserole dish or sauté pan.  Add the shallots, garlic and PIBs and fry gently, stirring, to colour them.  Don’t worry if the bacon unwraps itself from the sausages!

Stir in the tomatoes, beans, and herbs, crumble in the stock cube and bring to the boil.  Add the wine and simmer gently uncovered for about 10 minutes until the sausages are cooked through. *this is the stage where you could add cooked leftover PIBs.

Season and taste the cassoulet.  Add the sugar if the tomatoes seem a bit sharp.  Add the mustard and stir in the gravy granules to thicken the sauce if it’s a bit thin.

Serve with any extra veg you like.

Serves 2.

You might also like these other sausage dishes:

Italian sausage and bean stew

Sausage and lentil stew

Sausage traybake

Sausage and potato quiche which could also be adapted to use leftover PIBs.

December 10, 2025

EMERGENCY MINCEMEAT


I had an urge to bake some mince pies, something you never see here in France except amongst the British ex-pats.  The French don't understand them, you certainly never see them in the shops and jars of mincemeat are virtually impossible to find unless very occasionally on the "English shelf" in some supermarkets (at an outrageous price).  Another ingredient hard to find is suet, or at least not in the form that we know it.  You can get lumps of fat to grate yourself from the butcher if you ask in advance!  (Or do what most ex-pats do and bring it back from visits to the UK!)

The urgent need was spurred on by the discovery of a set of Christmas cake decoration cutters in the bottom of a drawer, a rogue purchase from many years ago that had never been used.  Perfect for the pastry tops of mince pies as well as fondant icing!


So I looked for a recipe that I could adapt using what I had in stock.  You can buy delicious candied peel here but all of mine had gone into the Christmas cake so I used the zest of two clementines instead.  For the alcohol content I used Armagnac which we had bought to "water" the Christmas cake, not being brandy drinkers ourselves.


I adapted Mary Berry's recipe which you can see here which neatly makes four regular sized jam jars of mincemeat which will keep for several months.  It improves with keeping but some went into the pies straight away which were delicious and satisfied the urgent need for them!

Ingredients 
175g each of
    currants
    raisins
    sultanas
    dried cranberries
100g mixed peel or the zest of 1 small orange/2 clementines instead 
1 small apple peeled and finely chopped
50g chopped almonds
225g light muscovado sugar (or other brown sugar)
1/2 tsp ground cinnamon
1 tsp mixed spice
zest and juice of 1 lemon
125g butter, cubed or sliced
200ml brandy, rum, sherry or Armagnac

Method 
Put all of the ingredients except for the alcohol into a large saucepan and heat gently until the butter has melted.  Simmer gently for 10 minutes, stirring frequently so it doesn’t catch on the bottom of the pan.

Remove from the heat and allow to cool completely before stirring in the alcohol.

While the mincemeat is cooking then cooling sterilise your jars.  Wash the jars and lids then rinse well in hot water, shaking off the water rather than using a tea towel.  Place onto a baking sheet then into the oven  set to 160°C and leave for 10 minutes.  Remove from the oven and fill with the mincemeat while the jars are still warm.

Makes 4 jars of mincemeat which will keep for several months.

April 10, 2025

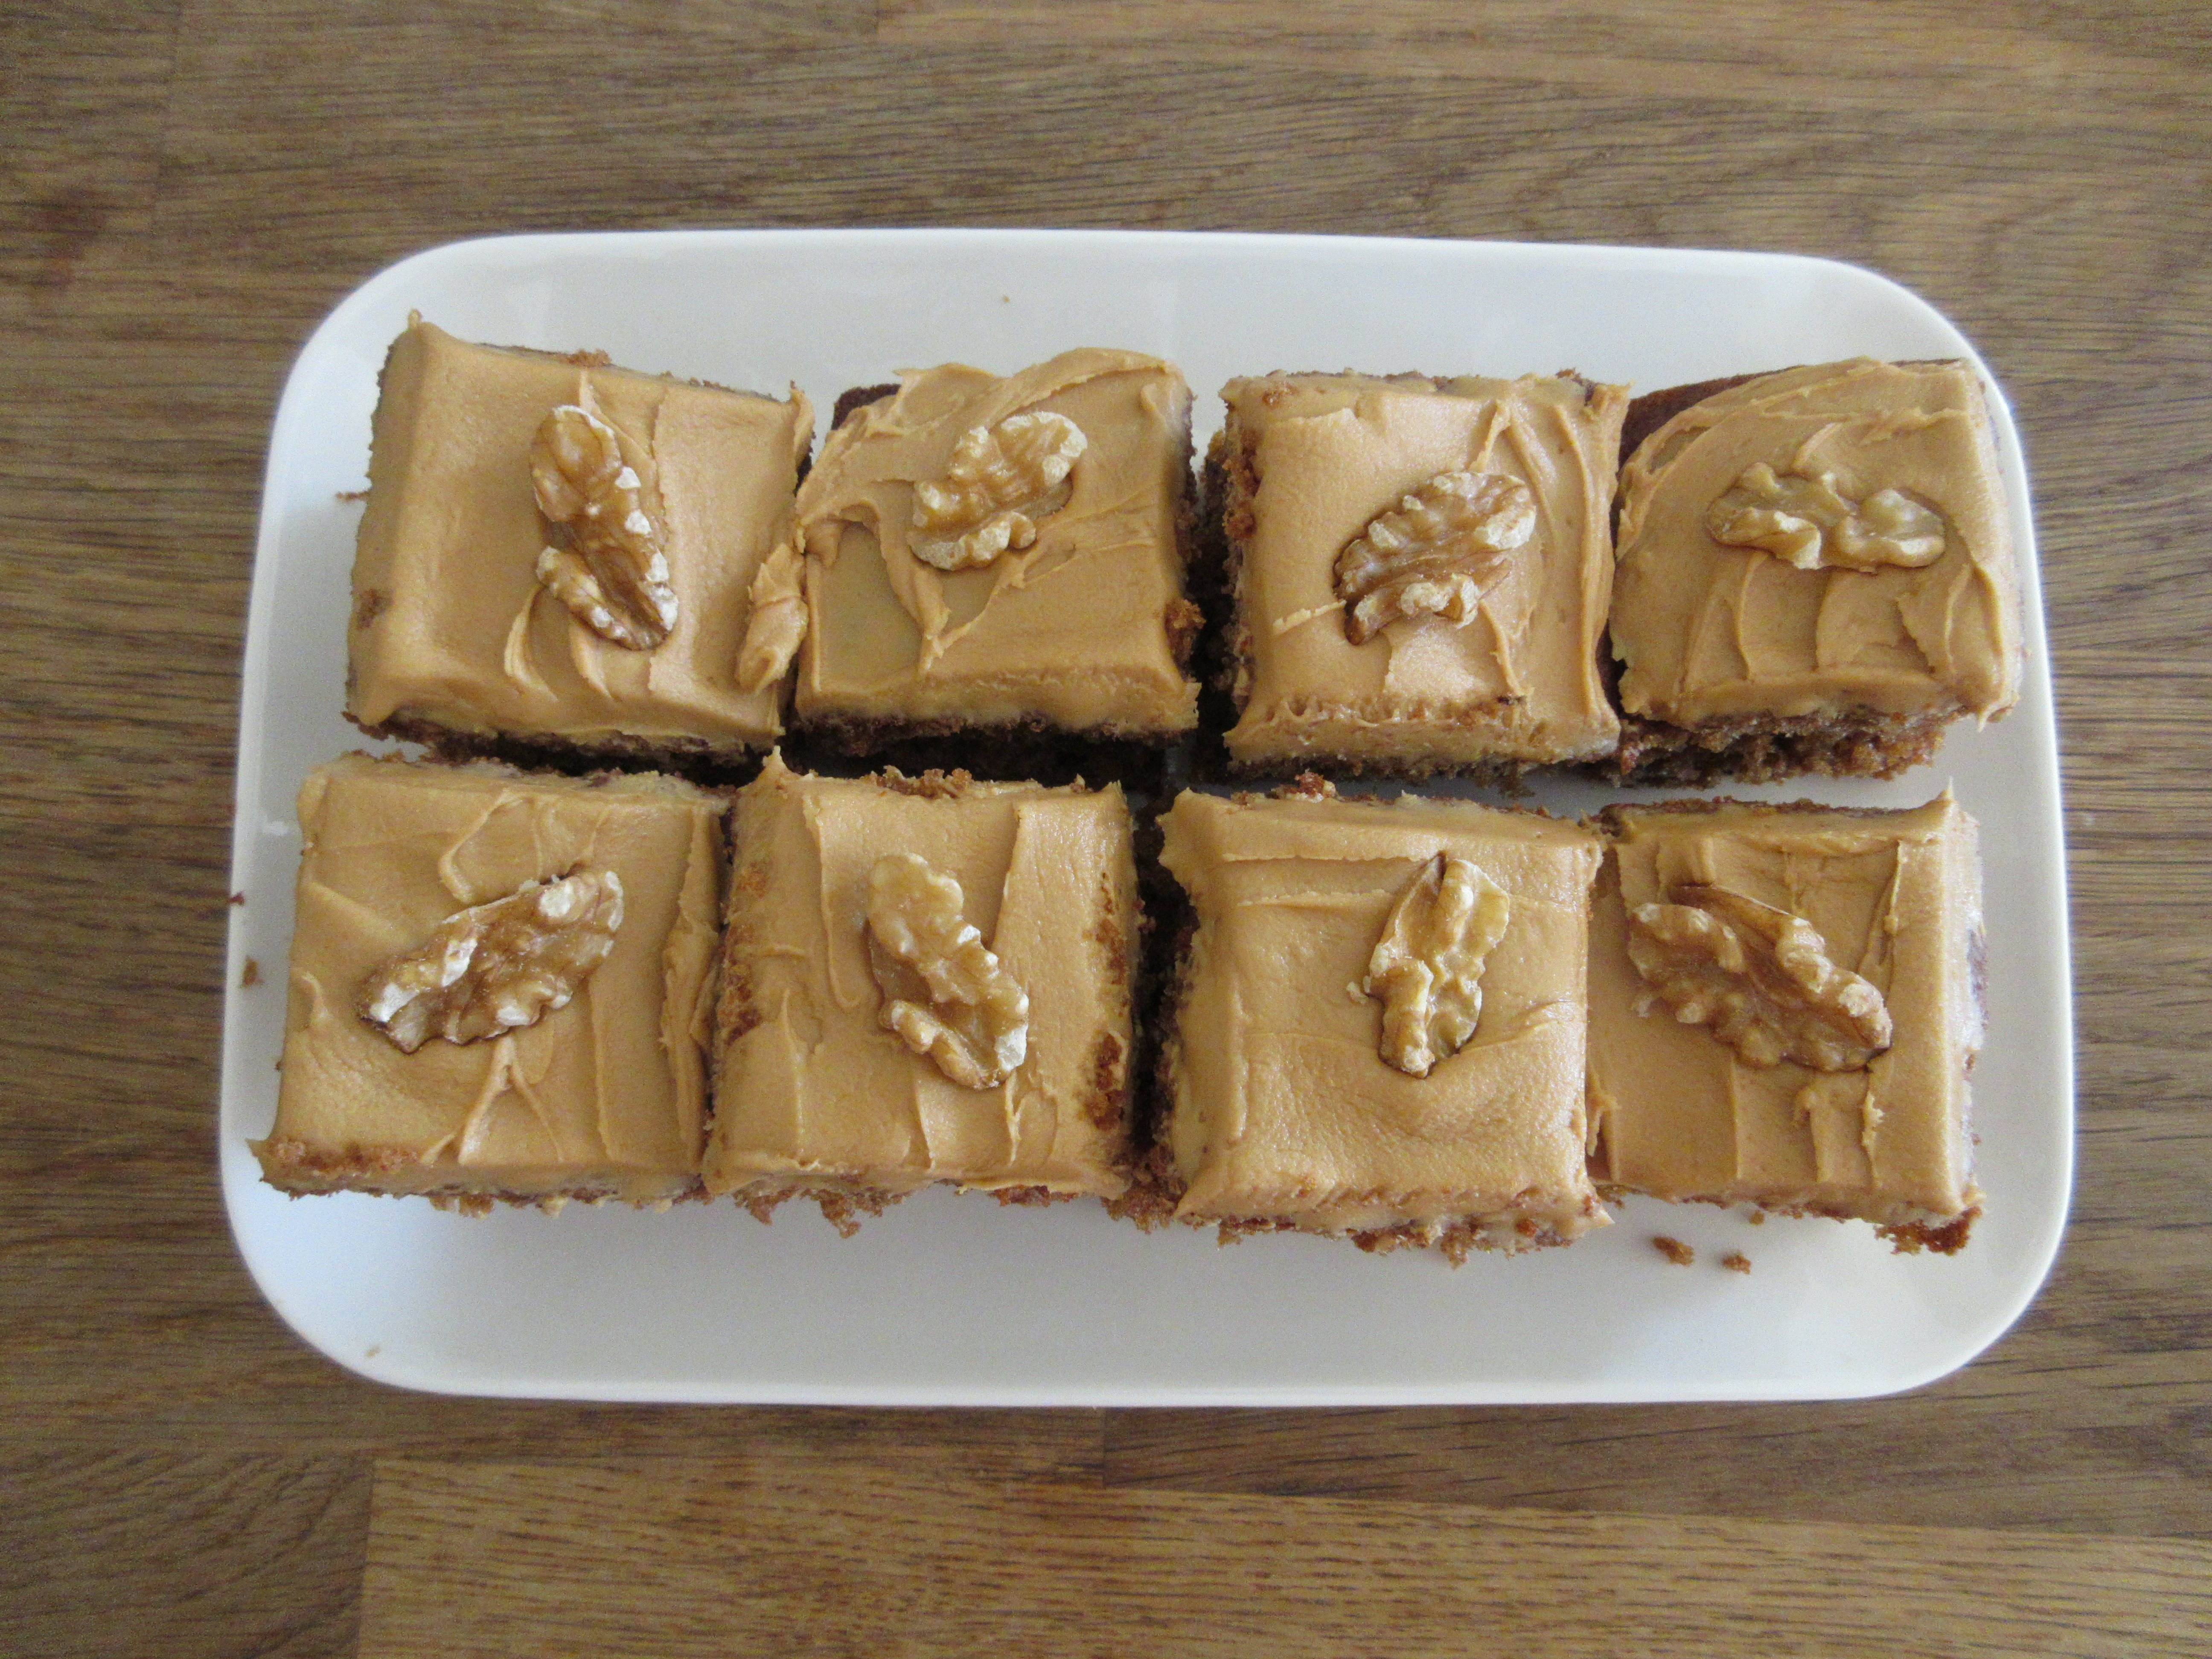
COFFEE AND WALNUT TRAYBAKE


I had my eye on this recipe for the next time I needed to make a cake for a bit of a gathering and it didn't disappoint.  It’s from the original "Baking Bible" by Mary Berry.

It’s an all-in-one recipe and instead of butter I used the last of my pack of "spreadable" butter called Nordpak which came from Aldi in the UK.  (A number of very similar spreads and butters are available in France.)  After my experience with the lemon cake I did make sure it was very soft by giving it a few seconds of the "soften butter" function on my microwave, i.e. at a very low power.  I have to be careful with this as it’s easy to take it too far and end up with melted butter instead, but it's a useful function.

There are subtle differences between baking products available in France and those from the UK.  Some of my friends have trouble with the flour and the range of sugars on sale.  I'm getting used to using them and on this occasion I used a French brand of icing sugar (sucre glacé) for the buttercream topping.  Somehow this icing sugar seemed "claggy" or almost damp and it was taking ages to sift it.  In truth it had to be pushed through the sieve.  So I resorted to the food processor which made light work of it, giving the icing sugar a blitz on its own first.  Looking at the picture in the book the icing seemed quite soft so I added a few more spoonfuls to make it stiffer.

The cake was not the lightest sponge I have ever made but it tasted good and went down well.  It had risen beautifully and cut into 24 generous squares, ideal for a crowd, just the right size to handle and eat without getting too messy.  I trimmed the edges before icing and slicing to remove the crust from the sides.

Ingredients

For the cake

225g softened butter or spreadable butter product

225g light muscovado sugar (I used mostly soft light brown sugar as that's what I had)

 275g self raising flour

2 tsp baking powder

4 large eggs (I used 5 small eggs as they weighed about the same)

2 tblsp milk

2 tblsp Camp coffee essence

75g chopped walnuts

For the icing

75g softened butter

225g icing sugar 

2 tsp milk

2 tsp Camp coffee essence

walnut pieces to decorate

Method

Line a greased traybake tin, 30 x 23cm (mine was slightly bigger) with baking paper.  Preheat the oven to 180 C / 160 fan / gas mk 4.  

Put all the cake ingredients into a large mixing bowl and beat with an electric mixer until well combined.  

Spoon into the prepared tin and level the top.  Bake for 35-40 minutes until done.  Mine was a little over at 35 minutes probably due to the slightly larger tin, so I would check at 30 minutes next time.

Cool in the tin.

To make the buttercream put the icing sugar into a food processor and blitz for a few seconds to remove any lumps.  Add the coffee, butter and milk and process until combined and smooth.

Make sure the cake is completely cold and slice off the edges.  Spread the buttercream over the top and cut into squares of the size you prefer. 

Decorate each square with half a walnut or a few bits of chopped walnuts.

Cuts into 24 squares.

November 18, 2024

LEMON TART or tarte au citron

Having friends round for dinner in November is a different kettle of fish from earlier in the year.  There is definitely a need for something comforting and warming.  On the actual day the fog never lifted and the temperature outside did not reach double figures.  I was tempted to make a crumble for pudding but with a soup for starters and a casserole for mains settled on lemon tart instead, thinking it would be lighter.

I had made one before but instead of leafing through numerous cook books for the recipe I looked online.  I somehow ended up using this recipe for Classic Lemon Tart on Mary Berry's own website.  It comes from her Complete Cookbook.

The recipe uses nine eggs and six large lemons!  When I looked again I saw that I needed a 28cm tart tin with a loose bottom, which I don't have.  I used my 25cm tin and scaled down the ingredients accordingly.  I also used ready made sweet pastry to save time, draping it over the edge of the tin as per the instructions.  Somehow the side of the tart broke away from the overlap in a couple of places and shrank back a bit.  This meant that the tart couldn't be filled right to the top because it would have overflowed.  I ended up with filling left over so simply poured this into a small dish and baked it separately.  Something to enjoy later!

It was absolutely divine, very sharp and lemony, and would serve probably about twelve people as it's very rich and you really only need a very small slice!  It kept really well in the fridge and was still delicious several days later so I would definitely make it ahead next time.  This would give me time to make my own pastry as I suspect the ready made one I used was a bit too thin and that might be why it split at the edge.

Since then I have found other Mary Berry recipes for lemon tart with more manageable quantities of ingredients!  One is on the BBC Food website here and was a technical challenge in an early series of the Great British Bake Off.  It appears in the book from the series called "How to Bake".   A very similar version of it also appears on the current edition of Mary's Baking Bible (although not the original edition).  I would use either of those next time although they both specify a 23 cm tin and at the current time of writing I only have a 20cm or 25cm!  A reason to pay a visit to our lovely nearby cookware shop perhaps!  (Or maybe I'll wait until our next visit to the UK where our local DIY/ironmonger's shop sells everything like that for much more reasonable prices!)

A tip for zesting lemons: always zest before you cut it in half to squeeze out the juice.  Zesting this many lemons is time consuming but much more fiddly if you try to zest afterwards!  Also: if you use a microplane zester the best way to get all the zest out of the groove is to use the rounded end of a teaspoon handle - not your fingernail as I once saw done in an episode of Celebrity Bake Off.  Someone (I forget who) used her hideously long false nail to scoop out the zest before putting it in the cake and if you have ever noticed how grubby those nails can be underneath..........YUK !!

Ingredients

1 ready made, ready rolled pack of sweet pastry

7 eggs

240ml double cream

280g caster sugar

zest and juice of 5 lemons

Icing sugar to dust before serving.

Method

If your pastry is in the fridge bring it out about 15 minutes before you want to use it otherwise it may crack when you unroll it.

Preheat the oven to 200° C / 180° fan / gas mk 6.  Butter a 25cm loose based fluted tart tin.

Unroll the pastry and line the tin with it, tucking the pastry into the sides and draping the excess over the edge.  Place on a baking sheet, line with baking paper and fill with baking beans.  

Blind bake the pastry for 15 minutes or until the edges are just golden.  Remove the paper and beans and carefully trim away the excess pastry.  Return to the oven for 10-12 minutes until dry.  Remove from the oven and set aside to cool.  

Reduce the oven temperature to 160° C / 140° fan / gas mk 3.

To make the filling, put all the ingredients into a large bowl and with an electric whisk beat until well combined.  The mixture will still be very liquid.

Pour the mixture carefully into the cool pastry case but do not overfill, only close to the top if there are no gaps where it might leak.

Transfer carefully to the oven and bake for 35-40 minutes.  The filling should be set but with a slight wobble in the middle.

Serve cool or completely cold.  Give a generous dusting of icing sugar just before serving.

Serves 10-12.

November 8, 2024

CARROT CAKE with or without icing

I’ve tried various recipes for carrot cake from my collection of cookbooks over the years but was never completely ecstatic about any of them.  In fact one of them turned out so awful that I actually wrote "horrible and inedible" at the top of the page because that’s what it was - soggy, oily, dull and unpleasant and I hadn’t made another one since!

So, with a surfeit of carrots in the veg drawer and a carrot soup already gurgling away in the soup maker, I decided to have another go.  This time I used a recipe from Mary Berry's Baking Bible, the latest edition thereof.  There were no spices or dried fruit in this recipe, unlike some of the others I had tried.

It turned out really well, delicious in fact.  I then discovered that the same recipe appears in some  of Mary's previous books with one principle difference; this most recent recipe says to use one teaspoon of baking powder and all the others say two!  How odd!  However, it rose well so one is clearly enough!  Also, the instructions say to bake for 50-60 minutes.  Mine was done in 50 minutes and if anything was slightly over.  I would check after 40 minutes next time.  

It's a pity I hadn't spotted this Mary Berry recipe before as I would have made dozens of them by now, especially as they are immensely popular at cake sales, especially it seems with the French.

I made this one as an uniced traybake for ease of cutting and handing round.  I decided that the next time I would try adding a little mixed spice, and for a cake sale I would definitely ice it, but it was really good just as per the recipe.  Very simple to make and delicious.

~~~~~~~~~~~~~~~

I have a tip for grating carrots.  Weigh slightly more than you want and grate as far down as you dare until you have a short stump which you can do something else with (such as chomp on it while you grate the next carrot). That way you get the amount of grated carrot you want with your fingers intact!

~~~~~~~~~~~~~~~~

As is the way of things here, the opportunity arose to make the cake again for a cake sale at an event in the next village a few weeks later.  This time I added a teaspoon of mixed spice and iced it as per Mary's recipe, decorating it with chopped walnuts and banana chips.  It looked the business and sold out early in the day.

I would happily have used the little marzipan carrot decorations that identify it immediately as a carrot cake but the only place I could find them in France was online and the price worked out at 1€ per carrot!  I resisted, as the cost of a pack of decorations would have been more than the cost of making the whole cake!

As an aside, it’s amazing how much the French seem to love English cakes, considering their reputation for fine patisserie.  On the cake stall this time we were asked by a French couple if we ran a course on how to make them!  Now there’s an idea……..

This is the recipe for the iced version with a little added spice.

Ingredients

For the cake

225g self raising flour, sifted

1 level tsp baking powder

1 tsp mixed spice (optional)

150g light muscovado sugar

50g chopped walnuts

115g carrots, peeled and coarsely grated

2 ripe bananas, mashed

2 eggs

150ml sunflower or vegetable oil

For the icing  (if using)

175g full fat cream cheese

55g softened butter

115g icing sugar, sifted

To decorate

banana chips 

2 tblsp chopped walnuts

(or mini carrot decorations if you can get them)

Method

Preheat the oven to 180°C / 160° fan / gas mk 4.  Butter a 20cm square or round springform cake tin and line the base with baking paper. 

Put all the cake into a large bowl and beat until smooth.

Spoon into the tin and level the top.  Tap a couple of times on the worktop to dispel any air bubbles.

Bake for 50-60 minutes but check after 40 minutes as mine was well done by 50 minutes and a square cake may also be done sooner.

Cool in the tin for 5 minutes then turn out, remove the baking paper and leave to cool on a wire rack.  Once cool it can be frozen by wrapping tightly in foil.

To make the icing, put all the ingredients into a bowl or food processor and beat well until smooth.  Make sure the cake is completely cold (or thawed if it's been frozen) and spread the icing over the top.  Decorate with the chopped walnuts and banana chips (or any decoration of your choice such as purchased sugar paste carrots).

Cuts into 10-12 slices.

November 1, 2024

BOEUF CARBONNADE (beef in beer or Iron Maiden stew)

Many years ago I frequently used to make beef cooked in Guinness, to a Delia Smith recipe using braising steak, and delicious it was too.  I had long forgotten about it but with guests coming for dinner and it being very much casserole weather, I wondered about revisiting the old favourite.  Guinness is not for the faint hearted and not to everyone’s taste so I looked around for other "beef in beer" recipes.

In France beef in beer is a stew called "boeuf carbonnade" and eventually I found a recipe I could adapt by Mary Berry in her book "Everyday".  I decided to use a fairly light local Touraine beer.

The ingredients are simple, pretty much what you would expect in a beef stew, and the end result was utterly delicious! A really tasty, satisfying dish with a thick, glossy sauce and tender, melt in the mouth chunks of beef.  A perfect supper for what had been a disappointingly grey, cold and miserable day.  

The grotty weather continued so I made it again using something with a bit more punch, more like a stout.  It was called Iron Maiden, purchased from our local branch of Noz.  

Noz is a chain of shops in France that look like a jumble sale and sell end of line or unsold items of just about anything and everything.  It’s a good place to find and try foods that you may have never heard of, the downside being that you will probably never find it for sale anywhere again.  Once it's gone, it's gone!

Ingredients

750g braising or stewing steak, cut into bite sized pieces

2 tblsp oil

6-8 small shallots, peeled and cut in half 

2 carrots, peeled and sliced

150g button mushrooms

2 tblsp plain flour

330 ml pale ale (or Iron Maiden or other stout for the darker version)

150 ml beef stock (I used an Oxo cube)

2 tblsp caramelised onion chutney

1 tblsp Worcestershire sauce

2 bay leaves

Method

If you have a flameproof or cast iron casserole dish you can use it for frying as well as in the oven.  Otherwise use a frying pan and transfer the ingredients to a regular heatproof casserole dish for the oven stage of the cooking.

Preheat the oven to 160°C / 140° fan / gas mk 3.

Heat the oil in your pan and brown the meat in batches so as not to crowd the pan.  Remove each batch and set aside.

Add the mushrooms, shallots and carrots to the pan and fry for 4-5 minutes, adding a little more oil if the pan seems dry.

Put the flour into a bowl and stir in a little of the ale to make a smooth paste.  Then gradually whisk in the rest of it, making sure there are no lumps.

Return the meat to your frying pan and stir in the flour mixture and stock.  Heat until it thickens, stirring all the time.  Add the chutney, Worcester sauce and bay leaves and bring to the boil.  (Add more stock if it looks a little too thick. or a little flour mixed with stock or water if it looks too thin.)  At this stage transfer to a casserole dish if using.

Cover and cook in the oven for 2-2½ hours until the meat is tender.

Makes 6 generous servings.


January 14, 2024

VICTORIA SPONGE


I very rarely make a Victoria sponge, just once every few years.  To me there always seem to be so many other, more interesting cakes, I could make.  I have made exactly three in the last ten years and all were as a special request.

Ten years ago I made one for the charity cake stall at work.  I had retired but still helped out with the cake stall and the ladies running it asked for a Victoria sponge, specifically with no cream or buttercream filling, just jam and a sprinkling of caster sugar on top.  It was sold out within the first hour.

The next was for a picnic which was being held in summer 2022 for Ukranian refugees that have come to live in our part of France.  The request was for people to bring food that represented their own part of the world.  That was fascinating as the area is home to so many different nationalities.  There was a huge amount of food but most of my cake got eaten.


The third and latest time I made a Victoria sponge was last autumn for the English tea rooms at the annual craft and food fair in the next village to us in France.  It was requested by the lady who runs it and when I asked about the filling she said she always puts cream in hers so I did too.

I delivered the cake along with several others at 9am and when I went back at 2pm to help with the washing up was told it sold out very quickly and had received several compliments.

So what does that tell you?  Obviously a Victoria sponge is very popular even though it is, in my book, rather a plain cake.  People love it.

I used a Mary Berry recipe for an all in one method.  I toyed with the idea of using the creaming method (which my mum always did) and even the "weigh the eggs" method where you use the weight of the eggs to determine the weight of the other ingredients.  In the end, I went for the quickest method as I had several cakes to make.  I have to say, it looked the part and by all accounts ticked all the boxes. 

If I am invited to bake for this year's tea rooms I shall make two Victoria sponges, so that the people who come in the afternoon still have that as a choice.  And it was, after all, so easy and quick to make and is clearly very popular!

Ingredients

225g each of

    baking spread

    caster sugar

    self raising flour

4 large eggs

1 level tsp baking powder

For the filling

strawberry or raspberry jam

150ml double or whipping cream*

Method

Preheat the oven to 180°C / 160° fan / gas mk 4.  Grease and line the base of two 20cm sandwich tins.

Put all the cake ingredients into a large bowl and beat well with a hand held electric whisk until thoroughly smooth and creamy.  You could also use a stand mixer.

Divide the mixture evenly between the two sandwich tins and level the tops.  Bake for about 25 minutes until golden brown and done.  (See the tip on my sidebar on how to tell if a cake is done.)

Leave in the tins for a few minutes then remove carefully onto a wire rack to finish cooling, removing the base lining paper.

When cold, put one cake upside down on a serving plate and spread generously with the jam.  Spread the whipped cream over this and place the other cake right way up on top.

Sprinkle a little caster sugar on top before serving.

Cuts into 8-10 slices.

*You could, alternatively, fill with buttercream instead of real cream as per the picture below.  Some would say this is not the right thing for a Victoria sponge but I know it is still very popular!  For my  next Victoria sponge I used 50g softened butter mixed with 100g sifted icing sugar.

December 21, 2023

BEEF CANNELLONI


We have really enjoyed the most recent TV series by Mary Berry called "Mary makes it easy".  Her guests were all sweetie-pies too and the dishes she cooked all looked very "tempting" - a word she uses herself frequently.  

She’s such a good teacher, scattering useful little hints and tips here and there like sprinkles on a trifle and above all her recipes do work!   She really is a national treasure.  I could happily cook most of them from this series and the book is on my Christmas wish list. 

We are now back in the UK for Christmas.  We had invited a couple of  friends round for dinner a few days before we left France as we won't see them again for a while.  I had planned to serve this cannelloni.  Sadly, one them developed a bad cold and they cancelled, which was very considerate, as for us to catch it before travelling back would have spoiled our Christmas.

However, I had bought a pack of cannelloni tubes and the other ingredients and we were very keen to give the recipe a go.  So I scaled it down for just the two of us and it was delicious!  Another winner from the marvellous Mary Berry and destined to become a family favourite.  The quantity I made would have easily served three but we scoffed the lot between us.  It will be on our table on Christmas Eve as that’s how many of us there will be this year, just us and my brother.  Thank you Mary!

You can see the recipe here.  I didn't have any fresh herbs available but dried herbs worked fine.  This is how I adapted it for two (really three) servings:

Ingredients

8 cannelloni pasta tubes (or the right number to make a single layer in your dish)

1 ball mozzarella, sliced

30g grated parmesan cheese (I used the ready grated packet cheese)

a splash of olive oil for frying

1 small onion, chopped

1 clove garlic, peeled and grated or finely chopped

200g low fat minced beef

1 tblsp plain flour

150 ml beef stock, made with half of a stock cube

a splash of Worcestershire sauce

2 tblsp tomato purée

2 tsp dried thyme

For the sauce

a splash of olive oil for frying

1 onion, chopped

1 garlic clove, grated or chopped

1 400g tin chopped tomatoes

a squeeze of tomato purée

a pinch of sugar if needed

2 tsp dried basil

Method

To make the beef filling for the tubes, fry the onion in hot oil until softened then add the garlic and mince.  Fry until browned.

Sprinkle over the flour, add the stock, W sauce, thyme and tomato purée and stir until well mixed.  Cover and leave to simmer for about 30 minutes while you make the sauce.  Add a splash of water if it looks a bit too thick or solid.  Once cooked set aside to cool.

For the sauce, heat the oil in a saucepan and fry the onion until soft.  Add the garlic and fry briefly before adding the chopped tomatoes and purée.  Add 100ml water (rinsing out the tomato tin) and season with salt and pepper.

Stir well, cover and simmer for 30 minutes.  Taste the sauce and add the sugar if it seems too sharp.  Stir in the basil.

Preheat the oven to 200C / 180 fan / gas mk6.

Put roughly a third of the sauce in the bottom of your ovenproof dish.

Using a teaspoon, fill each pasta tube with the cooled beef mixture and arrange them in a single layer on top of the sauce.  Spoon the remaining sauce evenly over the top.  Scatter the slices of mozzarella and the parmesan over the sauce and cook in the oven for 35-40 minutes until the cheese has melted and browned and the pasta tubes are soft.

Serve immediately with a nice green salad.

Serves 3 (or 2 very greedy/hungry people).

December 3, 2023

BROWNIES

I wanted to bake something for the walking group that was quick and easy, preferably a traybake, and brownies came to mind.  I hadn’t made brownies for years and looked for a recipe that didn't require melted chocolate as I didn't have any real chocolate to melt except for a bag of chocolate chips.  This one by Mary Berry has to be the easiest recipe ever.

They turned out to be really good with a crusty top and a squidgy middle.

What more could you want?!

Ingredients

275g softened butter

375g caster sugar

4 large eggs

75g cocoa powder

100g plain flour

100g dark chocolate chips

Method

Preheat the oven to 180°C / 160° fan / gas mk 4.  Grease a large baking tin or roasting tin measuring about 30 x 23cm and line with baking paper.  

Put all of the ingredients except for the chocolate chips into a large mixing bowl and beat together using an electric mixer or a wooden spoon and a hefty amount of muscle power! I started with the wooden spoon but resorted to a hand held mixer which was working very hard.  Next time I will use my Kenwood food mixer.

Add the chocolate chips and stir in.  Transfer to the tin and level the top.  Tap on the worktop a few times to settle the mixture and dispel any air bubbles.

Bake for 30 minutes then cover loosely with foil.  Bake for a further 10 minutes until just done.  Over baking will cause the brownies to lose their gooey centre.  Cool in the tin.

Cuts into 24 generous squares. 

November 27, 2023

PLUM AND APPLE CRUMBLE also apple, orange and apricot crumble


Never in a million years did I think that I would need to consult a recipe for a crumble.  I have, after all, been making crumbles for about sixty years, ever since I first started helping my mum to make the Sunday dinner.

Crumbles in those days were very basic, either apple or rhubarb, using Bramley cooking apples bought from the greengrocer van that came round on Friday evenings, or rhubarb from the rhubarb patch at the top of the garden behind the greenhouse.  At the right time of year there would be wild blackberries to add to the apples.

They would be made the same way as pastry, half fat to flour, usually margarine, rubbed in by hand.  There were no embellishments, just fruit and crumble topping served with Bird's custard.  They were not fancy, just plain home cooked fare.

I made my crumbles like this for decades and always had some block margarine in the fridge for that purpose.  When I got my first food processor I made my pastry and crumble mix in that which saved a bit of time.

Latterly I have become extremely lazy.  Fruit chucked into the bottom of the dish with - quelle horreur - shop bought crumble mix on the top.  Maybe sprinkled with a few flaked almonds.


With friends coming round for supper I had decided to make a crumble and thought it was time I should up my game.  Hence the hunt for an actual recipe and the first one I liked the look of is by Mary Berry which you can see here.  The main difference is that the proportion of butter to flour is greater than half and the sugar used for the topping is demerara.  I had plenty of time so even rubbed the butter into the flour by hand!  

A crumble is a popular dessert in restaurants in this part of France I had noticed that the topping is often fairly thin, sometimes barely covering the fruit layer.  Quite different from my home made crumbles which had a good thick layer of topping.  Having decided to use a small bag of my cinnamon baked plums (see here) from the freezer, I supplemented it with a few apples and then wondered if the quantity of crumble in the recipe might be too much.  So, I made 1½ times the quantity, used half and put the other half in a bag in the freezer ready for another day.

It was lovely, deep golden and fudgy and the demerara sugar sprinkled on top gave it quite a sparkly, glamorous appearance.  This is the way I will be making my crumbles in future.  

Ingredients

For the fruit layer

About 12oz plums (or try gooseberries)

2 tblsp soft light brown sugar

a sprinkling of cinnamon

3-4 eating apples

For the crumble topping

9oz plain flour

6oz cold butter, cubed

3oz demerara sugar (plus extra for sprinkling)

*I have used imperial weights, i.e. ounces instead of grams, because that was easier when calculating the increased quantities compared to the original recipe! 

Method

Preheat the oven to 200° C / 180° fan / gas mk 6 and butter a suitable shallow baking dish.  Mine was about 20cm square.

My plums were ready cooked and in the freezer (see text) but if you are using fresh plums, wash them, cut in half and remove the stones then cut into quarters.  Put into a large saucepan with a tblsp of water, the brown sugar and cinnamon.  Peel the apples, slice them straight into the pan with the plums (discarding the cores) and cook gently until just soft.  Add a little more water if necessary and stir often.  Set aside to cool while you make the crumble topping.

To make the crumble topping, put the flour, butter and sugar into a large mixing bowl.  Rub together using your fingertips until you have the appearance of breadcrumbs.  A few larger clumps will be fine.

Tip the fruit into the baking dish and spread it out evenly.  Sprinkle roughly half of the crumble topping over the fruit and bag the other half for the freezer.

Sprinkle a little extra demerara sugar over the top and bake for 20 minutes.
Then lower the oven temperature to 180° C / 160° fan / gas mk 4 and continue baking for a further 20 minutes by which time the topping should be golden brown and the fruit bubbling slightly at the edges of the dish.  Keep your eye on it and check after 10 minutes to make sure it's not overcooked or burning.

Serves 6 portions.  Plus the extra crumble mix which is frozen for future use.  Thaw at room temperature for an hour or so before using.  

Update: I have since made the crumble using the food processor instead of rubbing in by hand, stopping before the crumbs were completely even in appearance.  In other words, left a few lumpy bits.  It was just as good!


For APPLE, ORANGE AND APRICOT CRUMBLE:

Replace the plums in the filling with:

a handful of dried apricots, diced
3-4 small oranges, peeled and divided into segments

Put all the prepared fruit in the baking dish and microwave on high for 4 minutes then stir together before adding the cinnamon, demerara sugar and crumble mix.

Proceed as with the apple plum and apple crumble.

~~~~~~~~~~~~~~~

I feel compelled to mention here the plate!
At our local déchèterie (council tip or recycling centre) there is a large table where people can put unwanted items that are still good.  You can simply help yourself.  There were huge piles of crockery the other day and tea plates like this are very useful for the larger gatherings that I sometimes host, or to lend out to others for theirs.  They are very pretty so I took six of them.

July 20, 2023

PLUM FRANGIPANE TART


A friend in the village has a tree loaded with very small plums and invited us to help ourselves.

I don’t know what variety they are but they’re about the size of a large cherry.

They are slightly sharp, not quite sweet enough to eat like cherries, but are excellent when cooked.  The only problem is the stones.  Plums make a delicious pudding but the stones take the edge off the pleasure of them I think and more so when the fruit is small and the number of stones even greater.  (I also love damsons but the zillions of little stones definitely spoil a damson pie or crumble for me!)

With over a pound of them in the bowl I decided to try using my pink cherry stoner. It worked a treat and I whistled through the whole bowlful in no time at all.  (I put the egg in the picture so you could gauge the size of the plums.)

I decided to use some of them for a favourite recipe by Mary Berry and the rest went into the freezer.

The base is made from slices of brioche and a basic ready sliced brioche loaf from the supermarket is ideal.  It creates a slightly cakey base that has a definite patisserie style to it.  (If a brioche loaf is not available you can use brioche finger rolls.)

The frangipane (almond) filling is quickly made using a food processor but a stick blender and mixing bowl would work.  Then you arrange the fruit on top as randomly or precisely as you fancy.


It looks good when it comes out of the oven but brushing it all over with melted apricot jam to give it a nice glaze is the finishing touch which definitely makes it look the business.  

I have made this recipe many times, or at least my own adaptation of it, using various different fruits.  It makes a great large dessert to feed a crowd and always goes down well.  Hence I make no apology for re-posting it and giving the recipe again.

Here are a few more versions:


I made it recently using apricots.

You can see how the brioche turns into a nice cakey base.


I made it with rhubarb, which you can see here.


It was very good when I accidentally made it upside down - see here.


It was delicious when I made it using apples as per Mary Berry's original recipe - see here.

Ingredients

4-5 slices of a brioche loaf
175g spreadable butter or baking spread
175g caster sugar
1 tsp almond extract
150g ground almonds
3 eggs
50g plain flour
300-400g small plums, stoned and halved
2 tblsp apricot jam for glazing the pie

Method

Preheat the oven to 200° C / 180° fan / gas mk 6.  Butter a large, shallow baking dish about 28cm dia.

Press slices of brioche into the bottom of the dish, filling in gaps but not overlapping.  (You could also use 5-6 brioche rolls, in which case slice off the top and bottom crusts then slice in half horizontally.)

Put the butter and sugar into a food processor and whizz until light and fluffy.  Add the extract, almonds, eggs and flour and whizz again until nice and smooth.  

Spread the mixture evenly over the brioche base and arrange the fruit on top.  

Bake for about 40 minutes until golden brown and the centre is firm.  Warm the jam in a small saucepan to make it runny then brush it all over the top of the pie to glaze.  

Serve warm or at room temperature, with cream, ice cream or custard.

Cuts into 10-12 slices.