July 30, 2012

GLUTEN FREE CHERRY BAKEWELL CAKE

I decided to make a cake for my friend Elizabeth’s birthday and it needed to be gluten free.  I liked the look of the cake in this recipe on the Good Food website for cherry bakewell cake.  I loved the way the icing dribbled over the top of the cake in the picture !!

pink cake

In the end I used a recipe from a book called “the gluten-free baker” by Hannah Miles, which I borrowed from the library.  I adapted the recipe for Victoria sponge cake, which contains lots of ground almonds anyway, by substituting the vanilla extract in the original recipe for almond extract.  I then used cherry jam in the filling instead of strawberry and decorated the top with pink icing and cherries.

pink cake2

I had never used gluten free flour before and because there were a lot of ground almonds in the recipe I beat the butter and sugar really well as this was going to lift them and make the cake light and not dense.  I also had to put a lot of effort into beating the cream.  Being in France I used crème entière, which seems to need a lot more whisking to become thick than the English double cream I am used to.

pink cake3 I was also very careful to avoid accidental contamination of ingredients, for example using an unopened bag of sugar and a new block of butter.  It only takes a little gluten to cause a problem, such as from lazily dipping the spoon used for taking ordinary flour into the sugar bag, or a few toast crumbs in the butter.  It just isn’t worth the risk.

pink cake4 Believe it or not, the colour of the icing is exactly what I wanted.  After all if a girl can’t have pink on her birthday it’s a poor do !!  The icing was quite runny and drizzled nicely over the edge of the cake.

pink cake5 However, it was possibly a little too runny as it continued to dribble down the sides of the cake, forming a pink puddle on the cake plate.  This was lucky in a way as we had a 50-minute drive to Elizabeth’s house and with the cake firmly glued to the plate with icing all I had to worry about was the top half sliding off the bottom half as we made our way along the twisty lanes !!

pink cake6 I carried the cake wedged into a box on my lap and it arrived in one piece.  I could have taken it off the plate, cleaned the icing from the plate and putting the cake back but Elizabeth liked the look of the puddle of pink icing so we served it just as it was.  A girl can never have too much pink !!

Ingredients

For the cake

185g softened butter

185g caster sugar

4 eggs

200g ground almonds

125g gluten free self raising flour

150ml crème fraîche

½ tsp almond essence

For the filling and icing

3 tblsp cherry jam

250ml double cream or crème entière

4 fresh cherries

2-3 tblsp icing sugar

2 drops liquid pink colouring

pink sugar crystals

Method

Preheat the oven to 180°C/160°fan/gas mk 4.  Grease and base line 2 x 20cm sponge tins.

Put the butter and sugar in a large mixing bowl and beat or whisk until light and fluffy.

Add the eggs one at a time and beat well with each addition.

Add the other cake ingredients and fold in gently until evenly combined.

Divide between the two tins and bake for 25-30 minutes until the cakes are firm and golden and pass the skewer test.  Remove from the oven, turn out and cool on a wire rack.

Whip the cream until firm and spreadable.  Spread the jam on one of the sponges and spread the whipped cream on top.  Put the other cake on top.

Sift the icing sugar into a bowl and add 2 drops of pink colour, or enough to achieve the right depth of pink.  Add water, a teaspoon at a time, and mix together until a runny icing is formed.

Spoon the icing onto the top of the cake, somewhere in the middle and, using a small spatula or back of a spoon, push the icing towards the edge so that it dribbles down over the sides.  Sprinkle some sugar crystals on top and decorate with the fresh cherries.

Cuts into 10-12 slices.  Keep refrigerated because of the fresh cream.

July 24, 2012

CHOCOLATE AND BLACKCURRANT CAKE

Quite a few moons ago, I spotted a recipe in one of the blogs I read regularly for “chocolate pudding cake with raspberries”. 

blackcurrants6I apologise sincerely to the writer of the blog but try as I might, wracking my poor old brain, I cannot recall whose blog it was.  Suffice it to say, I was so taken by the recipe at the time that I recklessly bought the book that it came from, ordering it from Amazon - “Eat, drink, live” by Fran Warde.eat, drink, liveThis is, I suppose, no more daft than buying a CD on the strength of one track heard on the radio.  As it turns out, it is a beautiful book, full of promising recipes to tempt me into the kitchen.

We_Should_Cocoa_Logo So, when I read that this month’s We Should Cocoa challenge, organised by Choclette of Chocolate Log blog and Chele of Chocolate Teapot blog, was for something combining chocolates with blackcurrants, this recipe sprang to mind.

clumber1 clumber2 That very same day, a miserable and rainy Sunday, Nick, Lulu and I decided to brave the chilly drizzle and go to Clumber Park for a walk and an ice-cream.  We visited the walled kitchen garden, which was an absolute delight and I would recommend to anybody and everybody.  At the entrance there were punnets of blackcurrants on sale, freshly picked that morning.

I love blackcurrants.  The sight of them takes me back to my childhood, picking them from the bushes in my grandmother’s garden and watching her make them into jam on her green enamel stove with the big knobbly taps.

clumber3The original cake recipe uses lots of dark chocolate and a spoonful of instant coffee.  I checked my storecupboard and I didn’t have enough plain chocolate but did have a bar of Espresso dark chocolate which would make up the quantity.  So I decided to use that and omit the addition of the instant coffee.

blackcurrants1 blackcurrants2

There is an awful lot of chocolate in this cake !!  It makes a chocolate torte style of cake, definitely a dessert cake and not the afternoon tea variety.  The blackcurrants looked lovely on top of the mixture before it went in the oven and I’m pleased to say looked just as beautiful when the cake was done, like little jewels studded on the top.  They didn’t sink and weren’t crozzled either.

blackcurrants3The recipe suggests dusting the cake with icing sugar, which I dutifully did, then regretted immediately, as the jewel-like effect of the lovely little currants then disappeared.

blackcurrants4 blackcurrants5It was not a cake for the faint-hearted.  It had an intensely chocolate-overload kind of flavour which contrasted really well with the tartness of the blackcurrants.   The hint of coffee in the background was just right.  It would make a stunning centrepiece for a dinner party, served in very slim slices with a little cream or ice-cream. 
I imagine it would also be delicious with raspberries as an alternative to the blackcurrants – the same kind of sharpness but not such an extreme contrast in flavour.

Here’s my adaptation of the original recipe:

Ingredients

150g dark chocolate, 70% cocoa content

100g espresso flavoured dark chocolate

200g butter

5 eggs

100g caster sugar

75g plain flour

150g blackcurrants (I washed and topped and tailed mine)

icing sugar for dusting (optional)

Method

Preheat the oven to 170°C/150° fan/ gas mk 3.  Grease and line a 23 cm springform cake tin.

Break the chocolate into pieces and put it with the butter in a small saucepan.  Stir over a low heat until melted together and smooth.  Set aside.

Whisk the eggs and sugar together in a large bowl using an electric whisk, until light and fluffy, which may take about 5 minutes.

Gently fold in the flour and the chocolate mixture until well combined. 

Poor into the tin and sprinkle the currants on top.

Bake for 40 minutes, or until firm and coming away from the sides of the tin.  Cool in the tin for a few minutes then remove to a wire rack.

Serve dusted with icing sugar and a little whipped cream or ice-cream.

Serves 10-12 portions – a small slice is plenty !!

July 22, 2012

CHOCOLATE CUPCAKES

chocolate cupcakes4Quite a while ago, what seems like eons in fact, and on some other planet, I opted to take part in an ingredient swap organised by Ruth at Makey Cakey.

I was paired with Sarah, of the lovely blog, The Cupcake Architect.

I sent Sarah some mystery ingredients and at about the same time a little parcel of mystery ingredients plopped through my letterbox from her.

chocolate cupcakes1a

There was some organic cinnamon flavoured chocolate, a little packet of crystallised rose petals and a packet of mini love hearts.  Now what on earth should I make out of them ??

chocolate cupcakes5Cupcakes of course !!

Then things got busy at home and at work and my poor scrambled brain could not get to grips with mystery ingredients.  So I brought them on holiday with me to France - hoping for the time and lack of distractions I needed to bake something a bit special.

And that is where I am as I write this now, sitting outside on our little terrace which overlooks the rooftops of the village.  The church bells have chimed their last chime for the evening at ten o’clock and all is quiet.  The swifts and swallows have long since finished swirling overhead and the bat formation team has gone to bed too.  The only things which break the silence are the occasional hoot of an owl and the murmur of a distant harvester as the farmers work late in the fields.  The night air is pleasantly cool and we will no doubt still be sitting here for another hour, finishing our wine and enjoying the peace and quiet and the view of the roofs and chimney pots of our neighbours. 

This is what I mean about another planet.

chocolate cupcakes2 To make the cupcakes I used Stork Baking Liquid, adapting my strawberry cupcakes recipe, but only put in a little cocoa powder so that the delicate flavour of the cinnamon milk chocolate in the icing would not be overpowered.  They were yummy – the rose crystals added a lovely crunch and unusual flavour to the topping.

chocolate cupcakes1I baked them in the afternoon when it was gloriously sunny but the light was fading by the time they were finished, so I took them down to the cellar where it was cooler, to cover them up and leave them until the morning to take their pictures.  But they looked so pretty on our brand new cellar shelves that I photographed them there and then.

chocolate cupcakes3Before long these shelves will be covered with cobwebs and all the stuff that we keep in the cellar……..

Here’s my recipe for chocolate cupcakes, decorated with cinnamon chocolate, crystallised rose petals and love hearts.  And a huge thank you to Sarah for sending me such lovely ingredients and inspiring me to bake something I wouldn’t usually bake.

Ingredients

For the cakes

115g Stork Baking Liquid (or margarine or butter, softened)

115g caster sugar

2 eggs

140g self raising flour

½tsp baking powder

30g cocoa powder

For the icing

100g cinnamon flavoured milk chocolate (or any milk chocolate)

100g unsalted butter

125g icing sugar

your own choice of decorations or sprinkles

Method

Preheat the oven to 180°C/165°fan/gas mk 4.  Put 10 cupcake cases into a muffin tin.

Put the Stork liquid, sugar and eggs into a large bowl.  Sift in the flour, baking powder and cocoa and beat until smooth and creamy.

Divide between the cupcake cases and bake for 25 minutes until firm to the touch.   Cool on a wire rack.

To make the icing, break the chocolate into squares and put into a heatproof bowl.  Place the bowl over a pan of gently simmering water, making sure the bowl does not touch the water,  and leave until the chocolate is melted, stirring once or twice.  Remove from the heat and set aside to cool.

(A good tip here is that it is important to make sure the inside of the bowl is dry and no water gets into the chocolate or it will spoil.)

Put the butter in another bowl and sift in the icing sugar.  Beat until light and fluffy.  Add the cooled chocolate and beat again until smooth.

Pipe or spread a swirl of the chocolate icing onto each cake, sprinkle with the rose crystals and dot a few love hearts here and there.  There are no rules about what you should do with the remaining love hearts if you don’t use the whole packet………..

Makes 10 cupcakes.

July 4, 2012

NECTARINE, PLUM AND BLUEBERRY TART

Taking part in some of the baking challenges organised by other bloggers each month is quite…….a challenge !!  I find myself cooking things I would otherwise never cook and using recipes that I wouldn’t normally give a second look.  Another delight is seeing what other people have cooked for the same challenge, which has given me loads of ideas that I would love to try.

nigella tartIn the round up of last month’s entries for Tea Time Treats challenge, hosted by Kate of What Kate Baked, there was an entry for easy summer fruit tartlets from a blog called Fabulicious Food.  The idea came from a recipe in the book “Nigella Express” and I thought to myself, “I think I might have that book”.

nigella tart1aAnd sure enough, there it was, on the shelf, amongst all my other Nigella Lawson cookbooks, most of which are consulted fairly frequently, and I had completely forgotten about it.  In fact I don’t remember buying it at all and certainly have never cooked anything from it.  I feel slightly guilty about that.  How can anyone have such a good cookbook in their collection and have never used it or even noticed it was there ??

Anyway, I looked at the recipe the little tartlets originated from, called “nectarine and blueberry galette” and decided to have a go.  What a revelation !!  This has to be the quickest and easiest fruit tart I have ever made and it was lovely.  Not the most glamorous or the most elaborate, but dead easy to make and it turned out beautifully in a “rustic chic” kind of way.

nigella tart1 nigella tart2

I happened to have some nectarines, plums and blueberries in the house so I made it pretty much as described. 

Except that, anyone who buys ready-made and ready-rolled pastry in France will know that it comes in a circle.  The pastry you get in the UK comes in an oblong – or at least it does in my experience.  And in fact, in the January sales I treated myself to an oblong loose-bottomed tart tin which is the exact size to fit the ready-rolled pastry you get here, and it works a treat.  It was such a bargain that I nearly bought a second one to take to France but then I remembered that there was no point because the French pastry comes in circles.  (I could always make my own pastry to fit the oblong tart tin but……..when in France we are on holiday after all !!)

The point of all this is that I used a pack of ready-rolled pastry that we had brought back from France and put in the freezer, so it was a circle.  In any case, you don’t need a tin at all for this recipe, you just unroll the pastry onto a lined baking sheet.  I even used the baking paper that the pastry came rolled up in as the liner for the baking sheet.  How easy is that?

nigella tart3 You mix some apricot jam with some double cream, spread it onto the pastry, arrange fairly thin slices of fruit on top, sprinkle some sugar over and bake.  I used two nectarines, three plums and a good handful of blueberries.

It was done in next to no time, the fastest tart I have ever made and it was yummy.  It looked great too.  The possibilities are endless I think, sliced apple and strawberry, apricots and flaked almonds……..lots of combinations spring to mind, including the little tartlets that gave me the inspiration in the first place.

I can’t believe I have never tried anything like this before !!

Ingredients

1 pack ready-rolled puff pastry (about 375g)

2-3 nectarines

2-3 plums

a good handful of blueberries

2 tblsp apricot jam

2 tblsp double cream

2 tsp demerara sugar

Method

Preheat the oven to 220°C/200°fan/gas mk 7. 

Unroll the pastry onto a lined baking sheet.  Using the point of a sharp knife, score a circle (or oblong) about 2cm inside the edge of the pastry to form a border, being careful not to cut all the way through.

In a small bowl, mix the apricot jam and double cream together until evenly combined and spread it over the pastry within the scored circle, using the back of a spoon.

Remove the stone from the nectarines and slice each one thinly into about 16 wedges.  The plums should be sliced into 6-8 wedges so that they are about the same thickness.  Arrange the fruit in concentric circles on the pastry, inside the scored border, or in rows if your tart is oblong.

Scatter the blueberries over the fruit and sprinkle the sugar within the outer border.  This border will rise to form a crust.

Bake for 15 minutes until the pastry is golden brown and the jammy mixture is bubbling slightly.  Serve warm with cream, ice-cream, or whatever you fancy.

Cuts into 6 - 8 good slices.

nigella tart4Here’s a savoury version.  I used two tablespoons of confiture d’echalotes (caramelised onion marmalade or chutney in the UK) mixed with two of double cream for the base and piled on smoked salmon pieces, goats cheese, tomatoes, a lightly cooked sliced leek, slices of pepper and mushrooms.  I forgot to photograph it when it was cooked but it was yummy – you will have to use your imagination !!

This is one of those versatile recipes that is so useful I think.

June 28, 2012

HOT FRUIT SALAD

I have tried very hard over the decades to like fruit salad – you know the sort I mean, chopped apples, pears, bananas, grapes - because it’s good for me, but really – I just can’t get excited about it.  I always enjoy it if someone else has made it for me but for some reason my own home-made fruit salad just doesn’t hit the spot – maybe I’m fed up with it by the time I have finished all that peeling and chopping !!  And I would rarely order it as a dessert if we were eating out – especially if things like sticky toffee pudding or crème brulée were also on the menu – there would be no contest !!

hot fruit salad1

However, this hot fruit salad is one I have made over and over again and always enjoy.  I copied the recipe from a magazine many years ago.  The title is misleading as it should really be “warm fruit salad” or “spiced poached plums” – because essentially that’s what it is – plums poached in wine with sugar and cinnamon.

hot fruit salad2

It works really well with any stone fruit, and with all those punnets of lovely nectarines, plums, apricots and cherries in the shops at the moment the timing was just right.

My own youngish victoria plum tree is struggling this year.  It’s smothered in hard little green fruit and if we ever get enough sunshine to make them ripen I should be in for a good crop, but everything is struggling in the garden just now, in this horrible warm, grey and muggy weather that we are having.

 hot fruit salad3

Quantities are listed in the recipe below but what I usually do is to choose a baking dish according to how many I have to feed, cover the bottom with prepared fruit, pour on one or two glasses of dry white wine – although this time I used rosé wine because that’s what we had open and it worked really well – sprinkle on 3-4 tablespoons of light muscovado sugar, add a cinnamon stick and bake.

hot fruit salad4

It’s a very versatile and forgiving recipe and works perfectly with any stone fruit.  This time I used (roughly) 6 apricots, 6 plums, 4 nectarines and a handful of cherries. 

According to the instructions you should baste the fruit a couple of times during cooking but I rarely remember to do this and it doesn’t seem to matter.  It’s a great pudding to throw together and leave in the oven whilst you get on with everything else.

  hot fruit salad6hot fruit salad5

We usually have it warm with a little cream or some crème fraîche.  It’s also good with ice-cream, yoghurt, cold rice pudding (I know, I know !!) or just by itself.  It is also delicious cold the next day, especially if you strain the fruit and warm the liquor to serve with it.

It works as a rustic pudding or a fancy dessert – if you serve it in pretty dishes on a plate with a spoonful of ice-cream and a piece of home-made shortbread on the side.

“Hot” fruit salad

Ingredients

1kg mixed stone fruits such as plums, nectarines and apricots

110g light muscovado sugar

150ml dry white wine

1 cinnamon stick

Method

Preheat the oven to 180°C/160°fan/gas mk 4.

Wash the fruit, cut each one into half and remove the stone.  Cut the larger fruits into quarters so the pieces are roughly equal in size (this doesn’t matter too much).

Choose a suitable baking dish large enough to hold the fruit in a single layer – some overlapping is fine but it shouldn’t be piled up.  Butter the dish and arrange the fruit in it.

Sprinkle the sugar evenly over the fruit and pour over the wine.  Tuck the cinnamon stick into the dish somewhere near the middle.

Bake for 20-25 minutes until the fruit is cooked and knife-tip tender, basting once or twice during cooking.

Serve warm with cream, ice-cream or crème fraîche.

Serves 4-6.

June 26, 2012

POTTED CRAB

I spotted this recipe in a 2011 copy of Delicious Magazine, which was in a pile of stuff ready for recycling.  Which just goes to prove you should never recycle a magazine until you have looked at every recipe on every page in case there is one you can’t live without.

potted crab4

You can see the original recipe here.

As it happens, crabs were half price in Tesco a few weeks ago ~ £2.50 ~ which actually seems like the right price for a small crab to me.  Anyway, I bought one thinking Nick would enjoy bashing the crab out of the shell after a long week at work and we could do something with the crabmeat afterwards.  It was obviously fate as I spotted the recipe that very evening.

We had almost everything we needed in the house already.  Instead of the crème fraiche listed I used Philadelphia Light, which is fast becoming my favourite ingredient for all sorts of things.  It worked brilliantly.

potted crab1 potted crab2

It could hardly be easier to make.  Apart of course, from the process of extracting the crabmeat from the shell.  That’s a messy and fiddly job but very therapeutic for someone who has had a chewy week at work.

potted crab3

You simply mix all the ingredients together, cover with a layer of melted butter and chill in the fridge until needed.

potted crab5

It was quite delicious and would make an impressive starter or a nice light lunch.  Well worth the effort involved and we will certainly be making it again – I say “we” because bashing a crab is obviously a job for the man of the house !!

Potted Crab

Ingredients

Approx 300g fresh crabmeat, about two thirds white and one third brown

4 tblsp Philadelphia Light

2 tsp horseradish sauce

2 spring onions

½ tsp ground cayenne pepper

50g butter, melted

1 tsp pink peppercorns

Method

Finely chop the spring onions and mix with the crabmeat, Philly, horseradish, cayenne and half of the melted butter.

Divide between large or small individual ramekins, depending on how you want to serve the crab.

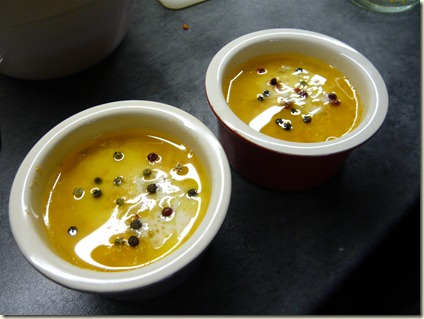
Pour a thin layer of the remaining melted butter on top of each ramekin and drop a few peppercorns on top of each one.

Chill for at least one hour before serving.  Can be made the day before it is needed.  Or wrap in baking paper and cling film and freeze for up to one month*.  (Thaw overnight in the fridge before serving.)

Serve with toast and lemon wedges or with a small salad as a starter.

This quantity will make 6 very small starters or 4 more substantial ones.  We used 2 larger ramekins and shared each between two people.

*The crabs that are for sale in our local Tesco are previously frozen.

June 21, 2012

CAPPUCCINO CAKE

Last Sunday all our plans for Father’s Day went pear-shaped for one reason or another so my dad decided he would go to his model engineering club as usual.  He phoned to tell me his plans and hinted that some cake would probably go down well with his mates.  So at ten o’clock in the morning I was leafing through recipe books to find something I could make from what I had in the house that wouldn’t be too ordinary, it being Father’s Day after all.

cappuccino cake1 cappuccino cake2

In one of those excellent little Good Food books I found a recipe for CAPPUCCINO CAKE and with a little improvisation with the ingredients I was able to rustle one up without having to go to the supermarket – which I didn’t have time for.

 cappuccino cake3 cappuccino cake4

It was an all-in-one sponge recipe, made as a traybake.  I didn’t have enough butter at room temperature so I used some Flora Buttery instead.  I didn’t have any natural yoghurt so used my last two cartons of “fromage blanc” which we brought back with us from our recent trip to France – they were on their last day before the throw-away date.  I used Camp coffee essence instead of strong instant coffee and omitted the bit about drizzling extra coffee over the cake when it was cooked.  I didn’t have any mascarpone for the topping so I switched to a Mary Berry recipe and used Philadelphia cream cheese.

Other than that I followed the recipe precisely !!

cappuccino cake6 Although I did use a baking tin slightly larger than specified, thinking a slightly shallower cake would cook a little quicker and cut into more pieces !!

It was beautifully moist and the coffee and chocolate flavours came through just right.  The cream cheese topping was scrummy and it looked lovely with a sprinkling of cocoa powder on top – just like a cappuccino in fact.

It was also perfect for entering in this month’s We Should Cocoa challenge, hosted by Lucy, The Kitchenmaid.

My dad took a boxful to his club and brought it back empty with a complaint – it disappeared so fast he didn’t get a piece himself.   Luckily the box only holds twelve pieces which means there were another twelve left over !!

Here’s my version of Cappuccino cake:

Ingredients

For the cake

250g softened butter (or Flora Buttery)

300g self-raising flour

250g caster sugar

½tsp baking powder

4 large eggs

150g natural yoghurt

1tsp vanilla extract

1tblsp cocoa powder

2tblsp Camp coffee essence

For the topping

100g icing sugar

50g softened butter

175g full fat Philadelphia cheese

Method

Grease and line the base of a baking tin, 20 x 30 cm.  Preheat the oven to 180°C/160°fan/gas mk 4.

Put all the cake ingredients into a large bowl and beat until smooth and creamy.

Tip into the prepared tin and level the surface.  Bake for 25-30 minutes until the cake is risen and golden and passes the skewer test.  Leave in the tin to cool.

Whilst the cake is in the oven, make the frosting.  Put the icing sugar into a food processor and blitz briefly to remove any lumps.  Add the soft cheese and butter and blitz again until smooth and creamy.

(Or, sift the icing sugar into a bowl, add the cream cheese and butter and beat together by hand.)

Put into a small bowl to chill in the fridge until you are ready to ice the cake.

Remove the cake from the tin and when it is completely cold spread the icing over it evenly.  Run a fork over the cake to make a pattern.

Cut into squares and sift a little sprinkling of cocoa powder over each one.

Makes 24 squares and will keep for a few days in an airtight box in the fridge.