February 25, 2014

CARROT, ORANGE AND GINGER SOUP

carrot soup

Cooking has been somewhat chaotic at home lately, largely because we have spent more time sorting our belongings and cleaning than we have shopping.

Once the agent had been and taken the photos of the house for the website we were able to sit back and take a breather.  Also to take stock of what we had in that we could eat.  Inspection of the veg drawer revealed quite a lot of carrots but not much else.  Nick was feeling in need of baking some bread (therapeutic kneading) so we decided to treat ourselves to home made soup and bread for lunch the next day.

 carrot soup2

The recipe comes from a slim volume of the “Best Kept Secrets of the Women’s Institute” series of books and is actually described simply as carrot and ginger soup.  The orange flavour actually comes through quite strongly so I have re-named it for myself.

To be truthful, I didn’t have any oranges but there were two largish clementines in the drawer so I used those.

carrot soup3

It’s quick and easy to make, a glorious colour and, like all home-made soups, immensely satisfying.  Eating a bowl of home-made soup is always such a tremendous pleasure.  It tastes a million times better than the tinned stuff and even the carton stuff.  Knowing that it has been rustled up from a few leftovers makes me feel very virtuous too.

It’s gluten free if you use home-made vegetable stock or a gluten free stock powder such as Kallo or Marigold.

Ingredients

500g carrots, peeled and sliced

2 large onions, peeled and sliced

a 25cm knob of fresh root ginger

Flora Cuisine (2 good squirts) or 40g butter for frying

1tsp ground ginger

the zest and juice of 1 medium orange (or 2 clementines)

800ml vegetable stock (made from a stock cube or powder)

Method

Bash the knob of ginger to crush it and put it in a pan with the carrots and stock.  Bring to the boil and simmer for 15 minutes.

While the carrots are cooking, put the sliced onions into a large pan with the butter or oil and fry until soft.  Stir in the ground ginger and orange zest.

Remove and discard the piece of ginger from the carrot pan and pour the carrots and stock into the onion mixture.  Bring back to the boil and simmer for 10 minutes.

Allow to cool slightly then purée the soup either by transferring to a food processor or by using a stick blender in the pan.  Blitz until the soup is the consistency you like.  If it seems a little thick, thin it with a spoonful or two of water or milk.  Season to taste.

Add the orange juice and reheat.  Add a swirl of double cream if you like before serving.

Makes 4 servings.

February 23, 2014

BAKED EGGS WITH SMOKED HADDOCK AND SPINACH

cupboards

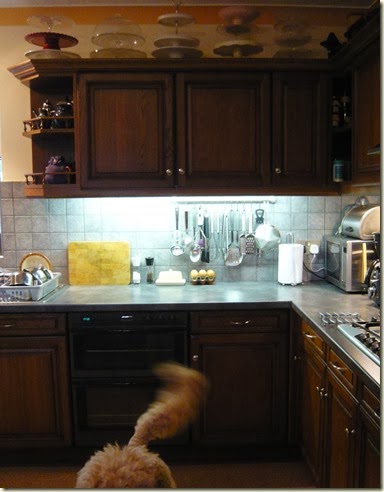
The kitchen “before”.

We are beginning the process of selling our house in Derbyshire.  Our intention is to downsize in England and upsize in France, spending more time there.  I try not to think too hard about the reality of selling two houses and buying two houses as the idea is just likely to send me into freefall but we have made a start.

This start involved making our house in England look like a show home for the photos that will appear on the agent’s website.

kitchen after

The kitchen “after”.

We are now functioning with about half of our cooking equipment, the other half being temporarily moved to the garage then ultimately to be deposited in my dad’s garage so that anyone wanting to view the house can see the size of the garage beyond the stuff that used to be in the kitchen.

baked eggs with haddock and spinach Cooking has been limited and even more haphazard than usual during this initial process but we have managed to make a few things that we were pleased with (baked beans and scrambled egg don’t fall into this category, however much we love them) including this dish which is ideal for lunchtime (or a starter perhaps). 

It’s adapted from the Hairy Bikers book “The Hairy Dieters” which my brother gave us for Christmas the other year.  (He also gave us their second dieting book last Christmas - cheeky monkey.)

baked eggs with haddock and spinach2 baked eggs with haddock and spinach3

It’s basically smoked haddock baked in crème fraîche with spinach and eggs and it’s absolutely delicious.

baked eggs with haddock and spinach4 We followed the recipe almost to the letter and for personal consumption I would do it again and again with no changes.  If I was to serve it to guests I think I would follow the tip given by Rachel Khoo when making her croque madame muffins and pour out some of the egg white.  It would simply make it look prettier and a tad more professional.

Instead of smoked haddock (we used the tail end of a piece we had the day before) I think it would be lovely made with smoked salmon, smoked ham or even a bit of fried bacon.

baked eggs with haddock and spinach5 Ingredients (for two people)

½ bag spinach leaves

75 - 100g approx smoked haddock, skinned and snipped into small chunks

75g crème fraîche

2 spring onions, washed, trimmed and sliced

1tsp cornflour

2 eggs (preferably fridge cold)

Method

Preheat the oven to 220° C / 200°fan / gas mk 7.  Lightly grease two large ramekins and put them onto a baking tray.

Put the spinach into a pan with about a tablespoon of water and cook until wilted, about 2-3 minutes.

Drain in a sieve or colander and remove as much water as possible by pressing with the back of a ladle or large spoon.

Put the spinach, fish, crème fraîche, cornflour and spring onions into a medium bowl and mix together.  Season with salt and pepper. 

Divide the mixture between the ramekins, cover with oiled foil and bake for 15 minutes.

Remove from the oven, slip off the foil and break an egg into each ramekin.  Replace the foil and bake for a further 8 minutes, by which time the egg whites should be cooked but the yolks still runny.

Remove from the oven again but leave with the foil on for a further 2 minutes.

Serve hot with toast on the side. (And a glass of chilled sauvignon blanc if desired.)

Serves 2.

February 7, 2014

ZESTY ORANGE AND POPPY SEED CAKE

zesty orange and poppy seed cake This cake was Nick’s contribution to the December CCC meeting.  The theme for the meeting was festive cakes from the three counties of Derbyshire, Nottinghamshire and Yorkshire.  We were hard pressed to find any cakes at all that you could say were uniquely from the three counties, let alone festive ones. 

I did find a recipe for a “Kedleston marmalade cake”.  After a bit of further internet research Nick found an orange and poppy seed cake on the food network website and decided to make that instead.  You can see the recipe here.

zesty orange and poppy seed cake2 It is essentially a gluten free whole orange cake.  Boiled oranges, blitzed to a pulp, ground almonds and poppy seeds go into the cake and sliced tangerines form the topping.

zesty orange and poppy seed cake3

I think his choice of cake was influenced a bit by the video.  If a bloke is going to make a cake it’s good if it’s a bloke’s recipe!  Typically he followed the recipe to the letter and it turned out perfectly. zesty orange and poppy seed cake4It was a very moist cake, more like a dessert cake than an afternoon tea offering.  A lot of its moistness came from the orange syrup drizzled over it after baking.  If we were to make it again we would probably use about half of the quantity stated in the recipe.  But it was delicious, the flavour of the oranges and the almonds coming through with a little bit of crunch from the poppy seeds.

zesty orange and poppy seed cake5Of course he then had to connect it somehow to the three counties for the CCC event.  He called it the “Rufford House Welcome Cake” and told the story of visiting monks from foreign lands bringing exotic foods as gifts to Rufford Abbey and the host monks baking a cake to welcome them.

It was all nonsense of course, but it sounded good.  I wonder how many people believed it and how many thought “I bet he made that up”!  We didn’t let on, naturally !!

alphabakes

I am submitting this recipe to this month’s Alphabakes Challenge, organised by Ros of The more than occasional baker, and Caroline of Caroline Makes.  The letter this month is “Z” and you can see the details here.

I confess that when Nick announced that he was making a “zesty orange and poppy seed cake” for his CCC contribution my first thought was that it sounded lovely and the second was that I might just save it for a future post as it could come in very handy.  The letter Z was bound to turn up sooner or later ~ and now it has !!

Ingredients

For the cake

2 medium oranges

3 large eggs

250 soft brown sugar

290g ground almonds

1 rounded tsp baking powder

1 rounded tsp poppy seeds

For the syrup

juice of 1 medium orange

4 tangerines or satsumas

150g golden syrup

Method

First, make cook the oranges by boiling them in water for about thirty minutes until tender.  Drain and place in a bowl of cold water to stop them from cooking any further.  Cut into chunks, remove any pips and reduce to a pulp in a food processor.

Preheat the oven to 180°C / 160° fan / gas mk 4.  Grease and line (bottom and sides) a 23cm round springform cake tin.

In a food mixer (or by hand), beat the eggs and sugar for 4-5 minutes until pale and thick.  Fold in one third of the ground almonds, then add the rest along with the baking powder, orange pulp and poppy seeds.

Spoon the mixture into the prepared tin, level the top and bake for 45-50 minutes until the cake is golden brown and passes the skewer test.  Cool in the tin for 10 minutes then turn out onto a wire rack to cool completely.

While the cake is in the oven, make the topping.  Slice each tangerine into 8 or 9 slices, discard the ends and put them into a saucepan with the orange juice and golden syrup.  Boil for 12-15 minutes until the skins are tender and the syrup has reduced a little.  Transfer to a dish to cool completely.

When the cake is cool, prick with a skewer and drizzle the orange syrup over.  Decorate with the tangerine slices.

Cuts into 12-14 slices.

February 2, 2014

FUDGE AND RASPBERRY MINI MUFFINS

fudge muffins

I made these to take with us when we visited Nick’s mum this afternoon.  She hasn’t got much of an appetite and these little mini cakes can often tempt someone to eat when they would be over faced by a normal sized muffin. fudge muffins2I wanted to use up some buttermilk left over from another day and I adapted the recipe for basic muffins in this excellent little book by Susan Reimer.  I also used a handful of raspberries and some wrapped pieces of fudge received at Christmas.

This was actually my second attempt at using up the fudge and some raspberries.  We like to have a few raspberries on our cereals or porridge but at this time of year they hardly keep at all and within a couple of days they have often gone mouldy, so I am always thinking of ways to use them up quickly.

fudge muffins7

My first attempt was to bake a cake using my new Bundt tin.  Disaster struck when I tried to turn it out.  I couldn’t decide whether the problem was that I had tried to do it when the cake was too warm, or whether I didn’t grease the tin enough, or whether it was the fudge that was the culprit. 

Although the cake looked a mess it tasted delicious. I didn’t risk making the Bundt cake again but really wanted to do something with the fudge and raspberry combination because it was lovely.

fudge muffins3 fudge muffins4

On removing the little muffins from their tins, some of them were well stuck where the fudge had melted, gluing them very efficiently to the non-stick coating, even though I had buttered the tins thoroughly.  So that confirmed my suspicions, the fudge was the culprit.

fudge muffins5

They were delicious.  Mini muffins are little marvels.  They take no time at all to make ~ this time I used my mini chopper to chop the fudge into tiny pieces, which took a lot less time than chopping them by hand.

They also look cute and irresistible and are a perfect single mouthful.  Once you have eaten the first one it’s impossible not to eat at least one or two more! fudge muffins6

Ingredients

280g plain flour

2tsp baking powder

½tsp bicarbonate of soda

¼tsp salt

1tsp ground cinnamon

55g raspberries, halved

55g fudge, chopped into small pieces

1 egg

100g golden caster sugar

200ml buttermilk

2 tblsp raspberry yoghurt (plain will do)

70ml milk

90ml vegetable oil

Method

Preheat the oven to 190°C / 170° fan / gas mk 5.  Grease the holes of two 24-hole mini muffin tins.*

Sift all but a tablespoon of the flour, baking powder, bicarb, salt and cinnamon into a large bowl.  Put the tablespoon of flour into a cup or small dish, add the fudge pieces and toss to make sure they are all coated and not sticking together.

In another bowl, beat the egg then mix in the sugar, yoghurt, milk and oil.

Pour the wet mixture into the flour mixture and combine until there is no dry flour but do not over-mix.  Add the fudge pieces and raspberries and mix briefly.  The mixture should be a dropping consistency so add a little more milk if necessary.

Divide between the holes in the muffin tin ~ a mini ice cream scoop is ideal for this.

Bake for 10-15 minutes until risen and golden.  Transfer to a wire rack to cool.

Makes 48 mini muffins. 

*You could instead make 12 standard muffins, in which case bake for 5-10 minutes longer.

January 25, 2014

CHOCOLATE AND GINGER PUDDLE PUDDING

  chocolate ginger beer pudding3

This is a recipe I found in one of the series of little books by the Women’s Institute, called “Chocolate Success”.

It’s for one of those self saucing puddings where you end up with a sponge on top and a sauce underneath.  The interesting thing about this one is that ginger beer is one of the ingredients.

chocolate ginger beer pudding1

I haven’t bought ginger beer for donkey’s years and it took some finding in our local supermarket.  This was the only brand I could see.

chocolate ginger beer pudding2

I have made a similar chocolate pudding dozens of times before, using a recipe given to me by a friend decades ago, but this was the first time I had used ginger beer in it.  The mixture was extremely runny, much more so than I remember, and I had serious doubts that it would turn out right.  But it did!

I liked the texture of the sponge and that it was not too sweet, much less sweet than my previously favourite recipe.  There was a hint of ginger from the ginger beer.  I might be tempted to add a little ground ginger to the mixture to make it even more gingery next time.

chocolate ginger beer pudding4 It’s best to serve the pudding soon after it comes out of the oven.  As time ticks by the sauce thickens and eventually solidifies, in the same way as a custard sets as it cools.

We served ours with some cream but it would be nice with ice cream or even custard.  I have to admit that I also like the pudding cold with the sauce quite set too.  It microwaves well but the sauce doesn’t really become liquid again.

We_Should_Cocoa_Logo I am submitting this post to the current We Should Cocoa Challenge, the brainchild of Choclette of Chocolate Log Blog and hosted this month by Linzi of Lancashire Food.  You can see the details here.

The theme for January is “new ingredient” and as I have never used ginger beer in anything before, this seems to qualify !!

Ingredients

For the sponge

100g softened butter or margarine (I used Lurpak spreadable)

100g light muscovado sugar

125g self-raising flour

25g cocoa powder

½tsp baking powder

2 eggs

150ml semi-skimmed milk

For the sauce

100g light muscovado sugar

25g cocoa powder

150ml boiling water

300ml ginger beer

Method

Grease a deep pie or casserole dish of about 1.4 litres.  Preheat the oven to 180°C / 160°fan / gas mk 4.

Put all the sponge ingredients except for the milk in a food processor and process until smooth.  Gradually add the milk and process to combine.  Pour the mixture into the prepared dish.

To make the sauce, put the sugar and cocoa into a medium bowl, add the boiling water and mix until smooth.  Stir in the ginger beer.

Gently pour the sauce over the sponge mixture so that it is completely covered and bake for 40-45 minutes until the sponge is firm.

Serve within ten minutes to ensure the sauce remains runny.

Serves 6.

January 18, 2014

PEAR AND ALMOND TART

I have made a pear and almond tart to Laura Washburn’s recipe quite happily many times ~ I wrote about it here.  Then I stumbled across a different version by Michel Roux which you can see here.  I liked the sound of it because you cook the pears in a vanilla and cinnamon flavoured syrup.

pear and almond tart

I didn't quite follow the recipe to the letter!  I didn’t have a vanilla pod so omitted it.  I didn’t use his recipe for making the pastry as I am really happy with the Mary Berry sweet pastry that I have made several times recently and used that instead.  I also used Amaretto in the frangipane topping instead of rum.

pear and almond tart2

I expected the step of poaching the pears to be a bit of a faff but it wasn’t.  While they’re cooking gently you can get on with the pastry and almond topping, which is no bother at all.

I used four large pears and put a few leftover slices in the fridge with the poaching syrup, serving them separately.  They were yummy too and we had the last few slices with some yoghurt for dessert a couple of days after the tart had all gone.

pear and almond tart3

I was convinced I had taken a photo of the finished tart but apparently not so this one of half of it will have to do!  I glazed it with apricot glaze but didn’t scatter any flaked almonds on the top ~ I thought it looked better without.

pear and almond tart4

This is a stunningly good dessert and excellent served cold with a cup of tea too.  The almond topping is delicious and looks very chic with its shiny glaze.  I gave a slice to our French neighbour, Mme André and she loved it, which is always a good sign!

Tea-Time-Treats-Logosmall[1]

I am submitting this post to this month’s Tea Time Treats Challenge, hosted by Karen at Lavender and Lovage and this month Janie at The Hedgcombers blog. 

Ingredients

For the poached pears

3-4 large pears, peeled, halved and cored

300ml water

1 cinnamon stick

1 vanilla pod, split (optional)

250g caster sugar

For the pastry

200g plain flour

100g cold butter, cubed

25g icing sugar

1 egg, beaten

For the almond topping

125g softened butter or spreadable butter such as Lurpak

125g caster sugar

125g ground almonds

3 eggs

2 tblsp Amaretto liqueur (or rum)

2tbslp sieved apricot jam (or use Sainsbury’s apricot glaze, which is essentially sieved jam)

Method

Put the pear halves in a large saucepan with the water, sugar, cinnamon stick and vanilla pod (if using).  Bring slowly to the boil and simmer gently for 20 minutes until the pears are tender.  Drain the pears and leave to cool.  (Discard the spices but reserve the liquid for another purpose if, like me you hate to waste it.)

Make the pastry by blitzing the flour, icing sugar and butter in a food processor.  Use the beaten egg to combine it then wrap in cling film and chill in the fridge while you make the almond topping.

Preheat the oven to 200°C / 180°fan / gas mk 6.  Grease a 23-25cm flan tin or dish.

Without washing the food processor bowl, put the butter and sugar into it and process to a cream.  Add the ground almonds and combine briefly.  Add the eggs and Amaretto and process again until well combined.

Roll out the pastry to fit the tin or dish, prick the base and blind bake for 20 minutes.

Spoon the almond mixture into the pastry case and level the top.

Cut each pear half into three slices and arrange the slices on top of the almond mixture, pointed end towards the middle.  Bake for about 40 minutes until the the filling is golden brown and passes the usual skewer test for a cake.

Warm the apricot jam in a small pan with a little water and brush over the finished tart. 

Serve warm with cream or crème fraîche.  Also nice served cold with a cup of tea.

Cuts into 8-10 slices.

January 9, 2014

YORKSHIRE CURD TART (with cranberries)

Yorkshire curd tartI have not  made any New Year Resolutions this year.  It has finally dawned on me that setting myself up for failure and disappointment every year is a waste of energy and does no good at all.  The only thing I thought I would try to do is to fully grasp the practise of not wasting food, or at least wasting as little as possible.  This is not so much a resolution (therefore doomed to failure) as an expansion of current housekeeping methods.  Which brings me to a little conundrum that occurred last week. 

Yorkshire curd tart2

Our friends Tim and Pauline introduced us to the delights of the above product, which is similar to a clotted cream, very naughty and perfectly delicious on puddings.  So every time we come to France it’s one of the basic items in our first shopping basket.

Yorkshire curd tart3So we were a little put out when, on opening the jar, we found that it had curdled and looked nowhere near as appealing to dollop on our puds as it should have done. ( The jar on the right is the offending product, the jar on the left is a fresh one we bought to replace it.)

It was our fault, of course.  The little fridge in our little French kitchen was the cheapest we could get when we equipped the place and the temperature control is not the most effective to say the least.  Somehow the fridge had been set to be extra cold and we think this caused the crème fraîche to split.

So I looked at it and thought that it looked like curds and whey.  Wondering what on earth I could do with it, I thought of a Yorkshire curd tart, something I haven’t eaten for an awfully long time, and have certainly never made.  Partly because you can’t buy curds in our local supermarkets, or at least, none that I have ever seen.

Yorkshire curd tart4I found several recipes on the net but most of them had instructions for manufacturing your own curds from milk and lemon juice.  In the end I found one that used real curd cheese but for tarlets.  I followed the recipe but made it into one large tart instead, using the Mary Berry pastry recipe from my frangipane mince pies!

The other change I made was that I didn’t have any currants (I have never seen currants in a French supermarket) but I did have a few dried cranberries, the leftovers purchased for some long forgotten recipe, lurking at the back of the cupboard and slightly past their sell-by date. 

Yorkshire curd tart6The tart turned out to be delicious.  We had invited our friends Tim and Pauline round and, as former residents of Yorkshire, they declared that it was fairly authentic in both flavour and appearance compared to a proper Yorkshire curd tart.  Except for the cranberries of course.

alphabakes

I am submitting this recipe to this month’s Alphabakes Challenge, organised by Ros of The more than occasional baker, and Caroline of Caroline Makes.  The letter this month is “Y” and you can see the details here.

Also to the “no waste food challenge” organised by Elizabeth of Elizabeth’s Kitchen Diary.  This monthly challenge is devoted to making us all think about how to use food in a way that avoids waste and you can see the details here.

Yorkshire curd tart5 So here’s how I made my Yorkshire curd tart ~ you can see the original recipe that I followed loosely here.

Ingredients

For the pastry:

200g plain flour

100g cold butter, cubed

25g icing sugar

1 egg, beaten

For the filling:

250g curd cheese

2 eggs, beaten

75g caster sugar

the finely grated zest of 1 lemon

70g dried cranberries

1 tblsp brandy (an ingredient I was not expecting to find in a curd tart)

freshly grated nutmetg

Method

Make the pastry in a food processor, using just the egg to bind it.  Chill in the fridge while you make the filling

Preheat the oven to 180°C / 160° fan / gas mk 4.  Grease a 23cm (approx) flan dish or tin.

Beat the cheese in a medium bowl to soften it a little.  Add the eggs, sugar, lemon zest and brandy and beat together.  Add the cranberries and mix well.

Roll out the pastry to line the flan dish or tin.  Spoon the filling into the pastry and level the top.  Grate a little fresh nutmeg on top.

Bake for 40-50 minutes until lightly browned and almost completely set, but check after 35 minutes. 

Cool in the dish and dust with icing sugar if you like.  Serve warm or cold with cream or crème fraîche.

Serves 6-8.