April 20, 2023

RASPBERRY CREAM HORNS


In France there is a chain of shops called Centrakor which sells a huge range of goods from buckets and saucepans to curtains and fancy dress party wear, similar to what you would find in The Range in the UK.  It's a very handy group of shops and I was there recently to buy a new washing up rack.  As I breezed past the bakeware section I spotted some cream horn moulds, three in a pack so I lashed out all of 6€ on two packs.


As it happens, I had also set eyes on a pack of the right kind of pastry in the freezer when hunting around for something for dinner a couple of days before.  A roll of ready made, ready rolled puff pastry in an oblong shape.

I have never made cream horns before but they remind me of happy childhood days when Mum would come back from town on the bus with shopping and a selection of cream cakes as a special treat, carefully folded into a cardboard cake box by the lady in the bakery.  A cream horn was one of my favourites.


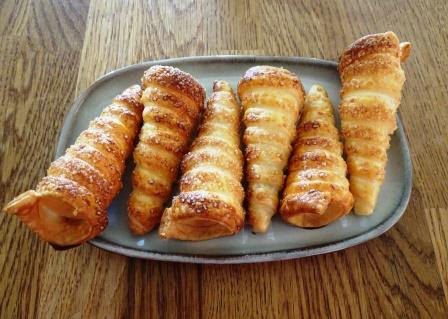
They were incredibly easy to make, although very messy and a little time consuming.  My worst fear was that having gone to all the trouble of making them they would stick to the moulds and come apart in bits but in fact they slipped off each one with no effort at all.

Just a word of warning though - these moulds are made of thin metal and in twisting them to release the pastry I managed to cut my finger.  Another point to note is that even though I oiled the baking sheet they stuck slightly and had to be eased off gently.  I would line with baking paper next time.


I followed a recipe on the Tesco website as a guide for what to do with the finished horns - in France they are called "cornets".  I whipped up some cream, stirred through a handful of crushed raspberries and some caster sugar as a filling and decorated each one with a sprinkling of freeze dried raspberry chips which I also spotted in my cupboard.  

The pack of pastry made twelve cornets (there was enough pastry to have made two more but I ran out of time) and they were a huge hit with a group of friends who volunteered to taste them.  They were dainty and pretty and I shall definitely be making them for our garden party next month when some of us get together to celebrate the new king's coronation.

Ingredients

1 pack of ready made, ready rolled pastry, oblong (paté feuilletée rectangulaire) removed from the fridge 30 minutes before using

vegetable oil for oiling the moulds

1 egg, beaten

250 ml double or whipping cream

a handful of fresh raspberries (I'm sure frozen would work) crushed

2 dessertspoons of caster sugar

a few teaspoons of freeze dried raspberry chips to decorate

Method

Put some oil on your hands and slather it all over each cornet mould.  Oil a baking sheet and line with baking parchment.  Preheat the oven to 200°C / 180° fan / gas mk 6.

Unroll the pastry and cut it into 1 cm strips along the longest edge.

Take one strip and starting at the pointed end wind it diagonally around the first cornet mould, each ring overlapping the previous one slightly.  Make sure there are no gaps.

Brush each cornet all over with beaten egg and sprinkle all over with demerara sugar.

Arrange on the baking sheet and bake for 10-12 minutes until crisp and golden brown.

Leave until cool then lift each one carefully off the baking sheet as they are quite fragile.  To release the cornets, hold one in one hand and with the other give the mould a little twist and it should slip out.  Always a nervous moment.  

Depending on how many moulds you have, repeat the process until the pastry strips are used up.

To make the filling, put the cream into a medium bowl and whip until thick.  Stir through the crushed raspberries and caster sugar.

Fill a piping bag or tube that has a star nozzle and gently squeeze the cream into the cornets.  I found that pushing the nozzle right in ensured that the cream went all the way to the pointy end.

Sprinkle a few bits of freeze dried raspberries onto the open end for decoration.  You could instead use a whole raspberry and even go further by dipping the point into melted chocolate.

Makes 12-14 cream horns.

April 10, 2023

ARTICHOKE SOUP (soup maker recipe)


I spotted this recipe on Phil's blog "As Strong as Soup" a good while ago where it is called Palestine soup.  Finding myself in front of a box of Jerusalem artichokes in SuperU recently, and with guests coming for dinner, I felt compelled to buy them and make it.  I don’t think I have ever seen them for sale in an English supermarket.  In France they are known as "topinambour".


They are peculiar looking things with a reddish brown knobbly skin (but then what vegetable doesn’t look peculiar if you are not familiar with it). They have a texture similar to a turnip and discolour rapidly once peeled so dropping them into water with a splash of lemon juice in it helps to stop that if necessary.  

Nick was very sceptical when I announced that I had bought some.  He has less than fond memories of some of the meals served up when he was a child.  He had an unhappy recollection of what his mother made with a box of Jerusalem artichokes that his father either won in a raffle or got for sixpence at an auction.  He is not sure which but it was not a popular vegetable with the family!

As Phil explains, the soup has nothing whatsoever to do with Palestine, a name given to it because of the belief that the artichokes come from Jerusalem, which they don't.  I read somewhere else that the misunderstanding arose because the plants look like sunflowers and the Italian word for sunflower is "girasole".  They taste nothing at all like artichokes either!

While in the supermarket I tried to recall Phil's recipe and forgot that it also included toasted hazelnuts.   Living out in the sticks in the middle of France, popping to the nearest shop that might or might not have any is a one hour round trip and in any case nuts are limited on my diet so I decided it would be ok to leave them out.

The next dilemma was whether or not to make it in the soup maker.  This machine has been my kitchen friend in my weight loss plan and I’ve had very few disappointments with it.  Some soups have turned out a bit thicker or thinner than expected and some a bit bland.  The texture can be adjusted by including more or fewer potatoes in the ingredients and the risk of blandness by using the right stock.  Jerusalem artichokes have a strong, distinctive flavour so I didn’t think there was any risk of this soup being bland.  The worry was that I had never used either milk or rice in the machine before.  However I was running out of time to look up whether or not they might not work so I decided to go for it and it worked fine.  

However I did find a small burnt patch in the bottom of the machine when I washed it out.  This has happened very occasionally with other soups and is easily remedied by putting a dishwasher tablet or powder in the machine with a small quantity of water and leaving it to stand until the tablet dissolves.  The burn mark then wipes away effortlessly leaving a pristine shiny machine.  


The soup was delicious.  A glorious colour, just the right thickness and a hit with everyone, including Nick.  I had adapted Phil's recipe for the soup maker but you can see his original post here.

Ingredients

1 onion

2 medium carrots

450g Jerusalem artichokes

1 medium potato

150ml milk

1 heaped tablespoon of basmati or long grain rice, rinsed well

300ml vegetable stock, home made or from a stock pot or cube

Method

Peel and prepare the veg as usual and add to the machine.

Add the rice, milk, stock, salt and pepper and enough water to fill to the top line.  Give it all a good stir (this may prevent the burning).  White pepper (canteen pepper) is recommended so that the soup retains its beautiful colour.

Cook on smooth.  Check and adjust the seasoning to taste before serving.

Makes 4 generous portions.

April 4, 2023

STICKY TOFFEE PUDDING (WITHOUT DATES)

I am republishing this post (which I first published in 2015) because, like so many others, the links which give credit to the original source, have been changed.  One leads just to the home web page, not the actual recipe, and the other links to something much more evil, a Chinese (I presume) porn site.  Eek!

I suppose this means that I will simply have to trawl through all my previous posts and remove the links.  Groan.

Anyway, this problem was drawn to my attention because I had a comment to moderate which simply said "rubbish recipe" from "unknown".  I half remembered that it wasn't all that bad!  Also that several other people had said they enjoyed it.  

I deleted the comment but then wish I hadn't and had instead replied "rubbish comment"!  One of the sad things about the internet is that it gives voice to people without the manners to say who they are or why they hold their opinions.  They hide behind their anonymity to say things they probably wouldn't dare say directly to someone's face.  Or maybe they would.  I have to admit that a number of recipes that I have tried from blogs have turned out to be disappointing, even rubbish, but I haven't felt the need to leave a rude comment.

I suppose that with over 14,000 page views one duff comment is not too bad!

STICKY TOFFEE PUDDING3

The other weekend I was feeling the need to bake something.  Not just any old thing but something really indulgent and wicked.  The post Christmas abstinence from baking and sweet stuff had caught up with me and I was having serious withdrawal symptoms.

However, I couldn’t be bothered to drag myself to the shops in the horrid weather – we were out walking our dog Lulu when I announced my urge to Nick and there was a bitterly cold wind stinging our faces.  Thinking about what we had in our cupboards at home that I could use, I mentioned sticky toffee pudding, something I have never actually made before, and Nick’s eyes lit up.  He often orders it when we go for a meal out so I knew he would be pleased.  I then said “I think we have a pack of chopped dates somewhere” and he looked rather less pleased.  He doesn’t like dates, apparently.  Something else I hadn’t known about him for the last twenty years!

Now I’m pretty sure that most sticky toffee puddings do contain dates but he assured me that the one he normally gets at our favourite restaurant absolutely doesn’t.  Hmmm…….  Maybe the dates are so squidgy that he doesn’t realise they’re there.  Anyway, I found myself consulting my cookbooks and eventually the internet for a recipe for a dateless sticky toffee pudding and found one on the allrecipes website (the link having now disappeared).

STICKY TOFFEE PUDDING1

STICKY TOFFEE PUDDING2

I followed the recipe exactly – it wasn’t difficult – and ended up with a nice sponge over which was poured a lovely toffee sauce.  The sauce was delicious but overall the pudding was just ok.  Not sticky enough for either of us and disappointing having read some of the reviews of the recipe.

Then I read further down the reviews and spotted that someone else had found a similar recipe elsewhere but with an interesting difference. 

STICKY TOFFEE PUDDING4

Instead of serving the sauce with the pudding, on removing the sponge from the oven you had to prick it all over, smother it with the sauce rather like a lemon drizzle cake, and let it seep into the cake.

Now this was much more like it!  What a transformation from the rather dull to the incredibly wicked and indulgent!  It was very, very sweet but totally gorgeous and I will most definitely be making it again – but not too soon………

Ingredients

For the sponge

190g plain flour

1½ tsp baking powder

pinch of salt

120g dark soft brown sugar

120ml milk

2 eggs

80g butter, melted

2 tsp vanilla extract

For the sauce

120g butter

200g dark soft brown sugar

250ml double cream

Method

Preheat the oven to 170°C / 150° fan.  Butter a suitable baking tin or dish, approx 21 x 18 cm.

Sift the flour, salt and baking powder into a large bowl.  Add the sugar and mix well.

In another bowl whisk together the milk, eggs, vanilla and melted butter, until a light frothy foam appears on top.

Add the liquid to the flour mixture and mix together until smooth and well blended.

Pour into the baking dish and bake for 20-30 minutes until the the sponge is firm and golden brown.

While the sponge is baking, make the sauce by putting all the ingredients into a large saucepan and heating gently, stirring all the time, until smooth and dark brown.  Set aside to cool slightly until the sponge is done.

When the sponge is cooked, remove it from the oven and prick all over with a skewer or fork, going right through to the bottom of the cake.  Then pour the toffee sauce over it to allow it to seep into the sponge.  There will be plenty of sauce left over to serve separately with the pudding.

Serve warm with the reserved toffee sauce, plus cream or ice cream for that extra indulgence – might as well be hung for a sheep as a lamb as my dear mother used to say !!

Serves 6 generously, would easily stretch to 8 servings.