February 22, 2019

CARROT UPSIDE DOWN CAKE


Nick is rarely fazed by a recipe and abides by the theory that as long as you can read you can do anything.  Consequently he frequently tackles cakes that I would have ruled out as too complicated or fiddly.  This one, which he baked for a CCC meeting last year, required caramelised carrots.


I like a good carrot cake but never thought I would be married to someone who was prepared to slave over a hot stove for ages in order to caramelise carrots for a cake.
 
 
It was worth the effort, although I'm glad it was his effort, not mine.  As a carrot cake it was delicious and the sweetness of the carrots on top made it even more so.  It looked amazing, too.  You can see the recipe on the BBC website here.

Ingredients
For the cake
200g light soft brown sugar, plus 3 tblsp
150ml light rapeseed oil (or vegetable oil)
100g natural yoghurt
3 eggs
2 tsp vanilla extract
3 oranges
300g self raising flour
1 tblsp mixed spice
1 tsp ground cinnamon
250g coarsely grated carrot

For the caramelised carrots
225-250g small or baby carrots, peeled and halved lengthwise
juice of 1 of the oranges above
25g butter
4 tblsp light soft brown sugar

Method
First make the caramelised carrots.  Put them in a single layer in a large saucepan or frying pan.  Add the juice of 1 orange, the butter, sugar and enough water to cover them by just 1 cm.

Bring to the boil and cook until the water has almost evaporated and the carrots are left in a sticky syrup.  Keep an eye on the pan so that the carrots don't catch.

To make the cake, preheat the oven to 160 C / 140 fan / gas mk 3.  Grease a 23cm round cake tin.  Gently lift the carrots out of the pan and arrange cut side down in the base of the tin.  Reserve the pan and syrup for later.

In a medium bowl, whisk together the brown sugar, oil, yoghurt, eggs, vanilla and the zest from 2 of the oranges.  In a large bowl, sift in the flour and spices, then add the grated carrot and mix together.  Stir in the liquid ingredients and mix until smooth.  Spoon carefully over the carrots in the tin, being careful not to disturb their arrangement. 

Bake for 45-50 minutes until done.  Leave in the tin to cool for 20 minutes before turning out onto a plate or stand. 

While the cake is cooling in the tin, add the juice of 2 of the oranges to the pan containing the reserved syrup with the 3 tblsp brown sugar.  Simmer until slightly reduced then stir in the zest of the third orange.  Spoon the syrup over the cake once it has been turned out. 

Cuts into 8-10 slices.

February 13, 2019

GINGER VALENTINE CAKE


It was my sister-in-law's wedding anniversary yesterday and she phoned to say that she and her husband were going out for lunch and would like to pop in and see us on their way home.  As it is also Valentine's Day tomorrow it seemed appropriate to bake a Valentine cake.  When I asked my own Valentine, Nick, what kind of cake he would like he asked for a ginger cake.  No surprise there.

 
I needed to bake a cake that would be ready to eat in just a few hours' time.  This made choosing the recipe a challenge as many of them say that the cake improves with keeping, being at its best a few days after baking.  I found one that didn't, the recipe by Delia Smith for her preserved ginger cake, which you can see here.  In her recipe the cake is baked in a square tin and decorated with fondant icing and chopped preserved ginger.  I have made it before which you can see here but this time I wanted to bake mine in my heart shaped ring tin instead.  The quantities seemed about right so I decided to risk it.
 
 
The tin is actually a silicone mould that I bought in a sale a few years ago and only comes out of storage once a year for Valentine's Day.  I have had mixed success with silicone moulds in the past in that the cake doesn't always come out in one piece.  However, by using my own homemade cake release paste it slipped out clean as a whistle with just a little shake.  Marvellous!
 
I obviously omitted the fondant icing and drizzled a simple lemon water icing over the cake instead, which worked really well.  Mind you, I had to put the cake outside to cool so that I could ice it and it was done in the nick of time.  It landed on the cake stand as the happy couple rang the doorbell!
 
 
This was an excellent cake!  I have given it two stars in terms of faff factor as personally I find chopping stem ginger really fiddly and time consuming.  However, it was well worth it.  It's a truly gorgeous ginger cake, very gingery with a lovely texture.  You can't really go wrong with a Delia Smith recipe, can you?!
 
Ingredients
225g self raising flour
1 slightly rounded tsp baking powder
175g spreadable butter
175g golden caster sugar
3 eggs
1 tblsp black treacle
2 tsp ground ginger
2 tblsp milk
1 heaped tblsp ground almonds
5 pieces preserved stem ginger
2 tblsp ginger syrup from the jar
50g icing sugar
juice of half a lemon
 
Method
Grease a ring tin with cake release paste, or melted butter.  Or butter and line a 20cm square tin.
 
Put your tin of treacle into a dish or pan of boiling water.  This makes it runnier and easier and less messy to measure out. 
Chop the pieces of stem ginger fairly small.
 
Preheat the oven to 170C / 150 fan / gas mk 3. 
 
Sift the flour and baking powder into a large bowl.  Add the butter, sugar, eggs, treacle and ground ginger and beat with an electric whisk for about a minute until light and creamy.
 
Add the milk, ground almonds and ginger syrup and mix to combine.  Finally mix in the chopped stem ginger.
 
Spoon into the prepared tin and level the surface.  Bake for 40-50 minutes until done. 
 
Cool in the tin for 10 minutes then turn out onto a wire rack to cool completely. 
 
Make a runny icing by mixing the sifted icing sugar with enough lemon juice until it's roughly the thickness of single cream.  Drizzle over the cake in whatever pattern you like.
 
Cuts into 10-12 slices. 

February 10, 2019

BANANA, PEAR AND MAPLE SYRUP CAKE


I made this cake after spotting a recipe on the Delicious Magazine website which you can see here.  In the original recipe it's a loaf cake with extra maple syrup drizzled over it.  As you can see, I made mine in one of my favourite "round" tins (a purchase from Ikea a few years ago).

 
It was one of those recipes that I felt compelled to make instantly!  With the right number of bananas going brown in the fruit bowl and some pears that would soon be past their best, I found that for once I had all the right ingredients in the house.  Well almost.
 
 
We are gradually working our way through a large box of windfall walnuts that we brought to the UK from France last October.  The recipe calls for pecans but with all those walnuts in stock there was no way I was going to go out purposely to buy some.  I do realise, of course, that pecans taste different from walnuts but - waste not, want not.  And I am a fan of walnuts, especially when they're fresh and sweet like the ones we have.


The other change I made is in giving my cake a very light dusting of icing sugar before serving, rather than drizzle more maple syrup over it.  As it turned out it was quite sweet enough and I think the extra maple syrup might have made it too sweet and possibly a bit sickly.  I will have to make it again and add the maple drizzle just to check!
 
As it was it had a lovely texture, a nice crunch from the walnuts which I had deliberately not chopped too small - and it didn't last long.  I'd like to be able to say that it kept well but it was gone in a couple of days!
 
Ingredients
100g unsalted butter, melted
3 (about 250g) really ripe bananas
100g golden caster sugar
2 ripe but still firm pears, cored, chopped and dusted in a little flour
1 tblsp maple syrup
1 tsp vanilla extract
1 large egg
150g plain flour
½ tsp bicarb
50g  walnuts (or pecans), roughly chopped
Method
Preheat the oven to 180C / 160 fan / gas mk 4. Grease and line the base of a 20cm round tin, or a 900g loaf tin, base lined with baking paper or a paper liner.
Mash the bananas in a large bowl, stir in the melted butter and sugar until well combined.  Stir through the pears, maple syrup and vanilla then beat in the egg.
Sift in the flour and bicarb and fold in with the nuts.  Transfer to the prepared tin and bake for 45 minutes until done.
Leave in the tin for 10 minutes then lift out onto a wire rack to cool. 
Drizzle some extra maple syrup over before serving if you like.
Cuts into 8-10 slices.

February 6, 2019

BEETROOT, ORANGE AND GINGER DRIZZLE CAKE


I had had my eye on this recipe for some time and eventually got around to making it for one of our last CCC meetings last year.  It comes from a book called "Freeze and Easy" by Sara Lewis, who writes for magazines such as Sainsbury's magazine and has a number of other book titles published including "Gluten Free and Easy" as well as "The Complete Slow Cooker".  I have cooked recipes from all of these books with great success including Sharon's Hotpot which you can see here.

 
The recipe suggests sprinkling pumpkin and sunflower seeds on top of the cake before baking but I didn't because I didn't have any so I just went with the chopped crystallised ginger instead.  The instructions were for an oblong tin but I wanted a round cake so used a 23cm round one.
 
It was lovely and interesting.  Beetroot cakes are not to everyone's taste as they have an earthiness which not everyone likes.  I have friends and relatives who recoil from the very idea of beetroot in any shape or form but we love it.  Maybe because we were brought up on pickled beetroot in salads for Sunday tea when we were small.  Cheese and beetroot sandwiches (on sliced white "wonderloaf" style bread of course) are still regarded as a special treat in this house!
Anyway, it had a lovely texture with a slight purpleness to it and of course with ginger and orange in it, what's not to love?
 
Ingredients
3 eggs
150ml sunflower oil
175g light soft brown sugar
225g self raising flour
1 tsp baking powder
3 tsp ground ginger
1 orange, zest and juice
175g cooked beetroot (cooked without vinegar), coarsely grated
40g preserved ginger, drained and finely chopped
140g granulated sugar
 
Method
Preheat the oven to 180C / 160 fan / gas mk 4.  Grease and line a 23cm round springform tin with baking paper.
 
In a large bowl, whisk together the eggs, oil and sugar, briefly.  Sift in the flour, baking powder and ginger and whisk in until just mixed.  Add the orange zest and beetroot and mix until smooth.
 
Pour the mixture into the prepared tin and bake for 30-35 minutes until brown and done.
 
While the cake is cooking make the drizzle by combining 3 tablespoons of the orange juice with the granulated sugar.  As soon as the cake comes out of the oven, prick all over with a skewer and spoon the syrup over the top.  Dot with the chopped ginger and leave to cool in the tin.
 
Cuts into 8-10 slices. 

February 3, 2019

SALMON PUFFS


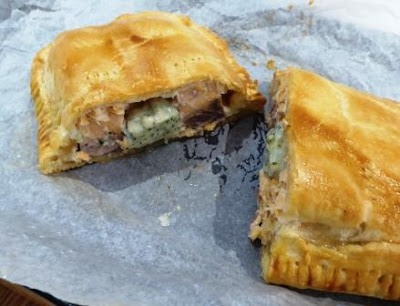
This is a recipe of my own invention, if you can call it a recipe.  It's more like a guide for using leftovers.  Leftover salmon, that is.
 
It came about because I bought a pack of four salmon fillets in the reduced section in the local supermarket.  With three of us for dinner that evening, me, Nick and my dad, I cooked them all and that left one piece of cooked salmon to use later.  I had ideas to use it in a salad or pasta dish but a trip to Ikea intervened.
 
For some time we have been buying the pouches of lemon and dill sauce that you can buy in Ikea's food department every time we visit.  They have a good shelf life and can be kept in a cupboard so don't take up space in the fridge.  You can see them here and they also do a tomato and herb version.  You simply pour the sauce over four salmon fillets and bake to get a delicious meal.  I have also used it with chicken pieces and it is just as tasty.  Mostly we use half of a pack for two pieces of salmon (as normally there are only two of us for dinner) and the rest on some chicken a few days later.  I know that this is a cooking cheat but sometimes we can't always be bothered to cook entirely from scratch - plus the fact that this is quick, easy and not too guilt-ridden.
This time I had one cooked salmon fillet and almost half a pack of sauce left in the fridge.   Also part of a pack of puff pastry in the freezer.


And so a recipe idea came to mind.  I cut the pastry into two oblongs about the right size to enfold a half of the cooked salmon fillet, dolloped the leftover dill sauce on top, created a parcel and baked.  It was absolutely delicious!
We had ours warm with some new potatoes and greens but it would have been just as good cold with a salad.  Or anything you like....baked beans, ratatouille, you name it, the possibilities are many.  I wondered about experimenting by making it into little open tartlettes baked in a mini muffin tray to be served with aperitifs...…..

Ingredients
One cooked salmon fillet, cut into two equal portions
half a pack of puff pastry (ready rolled or otherwise)
half or a third of a pouch of Ikea lemon and dill sauce
1 egg, beaten, to glaze.

Method
Preheat the oven to 180C / 160 fan / gas mk 4.  Line a baking sheet with baking paper.

Roll out or cut the pastry into two oblongs about double the size of each piece of salmon fillet.  Place each piece of salmon on one half of each oblong.  Put spoonfuls of the sauce on top of each piece of fish.

Dampen the edges of the pastry and fold it over to form a parcel.  Press the open edges together and seal by pressing with the back of a fork.  Brush with beaten egg to glaze.

Bake for 20-25 minutes until the pastry is golden brown and crisp.  Serve with salad or veg.

Serves 2 as a main meal.  (Smaller parcels could be made to serve more as a starter.)