August 22, 2019

SLOW ROAST LEG OF LAMB AND A LAMB SALAD

 
Last weekend we treated ourselves to a leg of lamb.
 

It was a last minute idea to do slow roast shoulder of lamb for Sunday dinner but when Nick got to the butcher's shop late on Saturday afternoon, the person in front of him bought the last shoulder joint.  There were a couple of leg joints left so he picked the smallest which weighed about 2kg.

It's interesting to think that when I was a child my mum would cook a shoulder of lamb most Sundays because it was the cheapest joint she could buy.  Pork was an occasional treat and we rarely had a joint of beef because she couldn't afford it.  The only beef we normally had was skirt or shin beef made into a delicious beef stew.  Chicken was served only for special occasions, just a few times a year for Christmas, Easter and sometimes Bank Holidays.  How things have changed.  Chicken is now an everyday meal and lamb is a treat.

 
We studded the lamb joint with some garlic cloves and sprigs of rosemary and cooked it for about 5 hours, after which it was juicy, tender and fell off the bone.  Delicious.
 
The next question was - what to do with the leftovers?
 
 
I would normally make shepherd's pie with leftover lamb but this time there was a lot of it, more than for just one pie.  Another favourite is "Sunday dinner pie", where all the leftovers, including the veg and gravy, are put in a pie dish under a pastry lid and baked in the oven.  Sadly we had eaten all the veg, the gravy was destined for the shepherd's pie and the only other thing left was a small dish of new(ish) potatoes.  So I settled down with a mug of coffee and a pile of my cook books to look for ideas.
 

This River Cottage book was a recent purchase from a charity shop (where else?) for just £1. 
 
In this book, amongst the ideas for leftover lamb there was a recipe for lamb salad.  We don't often have salad in the evenings, Nick especially being a "salad for lunch, hot meal in the evening" kind of traditionalist.  I decided to go wild and make the salad, or at least a variation of Hugh's recipe.  Essentially it was a pile of lettuce, the potatoes coated in mint sauce, lamb and peas.  Delicious.
 
Slow roast leg of lamb
 Ingredients
 
2 kg joint of leg of lamb
1 bulb of garlic
4-5 sprigs of rosemary
1 glass of red or white wine
1 pint of lamb or beef stock
1 large onion
2 large carrots
 
Method
 
Peel the onion and carrots and slice thickly.  Put them in a single layer in a roasting tin with a lid.
 
Stab the joint several times to make slits in the skin.  Tuck peeled cloves of garlic and small tufts of rosemary into each slit and sit the joint on the veg.  Drop the remaining unpeeled cloves of garlic into the tin beside the meat and lay a couple of twigs of rosemary over the top.  Pour the wine and stock into the tin, season with salt and pepper.
 
Put the lid on and cook in the oven at 140 Fan for about 5 hours until the meat is tender and cooked through.  Remove the meat from the oven and from the tin and rest on a board, covered in foil to keep warm, while you make the gravy in the roasting tin.
 
Serves at least 8, with veg, gravy and mint sauce.
 
Lamb salad  
Ingredients
 
3/4 of a romaine lettuce (or any other you prefer), shredded and washed
a good few cooked new potatoes, cut into large chunks
2 heaped tsp mint sauce from a jar (or home made of course)
1 large or 2 small spring onions, sliced
2 handfuls frozen peas, cooked
1 small avocado, peeled stoned and cut into wedges
strips of cooked leftover lamb from the joint, as many as you like according to appetite
Chopped herbs (parsley, chives) (optional)
 
Method
 
Pile the washed, shredded salad leaves into a large bowl.
 
Put the potato chunks into a small bowl with the mint sauce and stir until the potatoes are coated in the sauce.
 
Scatter the peas, potatoes, lamb, avocado and onions over the salad leaves, season with salt and pepper, add some chopped herbs if using, toss lightly and serve with chunks of bread.
 
Serves 2-3.

August 21, 2019

RASPBERRY AND COCONUT CAKE, be careful what you wish for and a demon banished.


It has been a strange summer.  While in France we have had to endure not one, but three heatwaves.  They only ever last for a few days when at their worst but either side of those three days it can still be unbearably hot.  During the last heatwave we had temperatures of 38 - 43C and either side of that it was well over 30C for days on end.  Consequently we were glad to return to the UK for a couple of weeks to cool off a bit.

 
And so, back in the UK, we're getting typical school holiday weather.  A few sunny days in between pouring rain.  In years gone by I would have been spitting nails about the lousy summer weather but this time, having experienced how strangulating such heat can be, I'm glad to be able to get out and about as much as I like, albeit with an umbrella. However, having wished to be a bit cooler, when it was tipping it down the other day I wondered if I should have been more careful what I wished for!  Hopefully it will not continue to rain every day until we return to France. 
 
 
Last week was, apparently, "afternoon tea week". 
Who would have thought it?  Everything one does now has its own week!  Still, with visitors coming, at least it presented an excuse to be indoors, while it poured down outside, and bake a cake.  I chose to make a raspberry and coconut cake because there were boxes of beautiful raspberries being sold off very cheaply in the supermarket - a casualty of the cool, wet weather no doubt.
 
I'd been hankering after a good coconut and raspberry cake recipe for a while and found this one on the Waitrose website.  It looked very promising so I decided to risk it, although adapting it slightly to make a round cake rather than a loaf cake.


It was delicious!  Moist, with a perfect balance of the sweetness and texture of coconut and the sharpness of the raspberries.


I cheated a bit, having spotted a bottle of coconut flavouring in Waitrose (on one of our occasional pilgrimages to our nearest shop which is about an hour away).  I have no idea how much it actually enhanced the flavour of the cake but I would use it again anyway.
 
 
These pictures were taken outdoors the day after I made the cake, when the sun was shining.  I had to be careful not to leave my one last slice of the cake unattended as I seemed to be being watched!


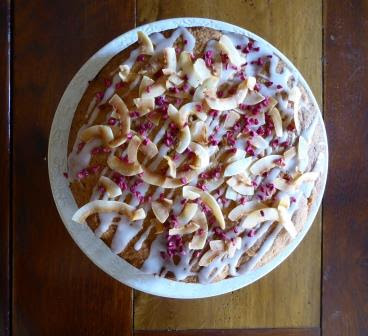
The cake recipe is definitely a keeper.  Instead of decorating it with coconut yoghurt and raspberries as per the recipe I added a drizzle of plain water icing, a scattering of toasted coconut flakes and a sprinkling of freeze dried raspberry pieces.  It looked pretty glamorous I thought. 


The cake looked and tasted just as good the second time I made it, for a Macmillan coffee morning which we held in France.  (We raised £150.)


As well as the cake I decided I would have another bash at scones in honour of the concept of "afternoon tea week".  The visitors had been prewarned of my track record in the scone department and promised to bring a saw!  I used a recipe for ordinary fruit scones in the National Trust Book of Scones and......they worked a treat!  Maybe my scone demon has finally been banished - at last - I was pretty chuffed.  I have finally triumphed over my fear of scones after more than fifty years!
 
Ingredients
 
175g unsalted butter, softened
175g golden caster sugar
3 eggs
1/4 tsp coconut flavouring
175g self raising flour
100g dessicated coconut
150g raspberries, halved
2-3 tblsp icing sugar, sifted
a handful of coconut flakes
a sprinkling of freeze dried raspberry pieces
 
Method
 
Butter and line the base of a 20cm round cake tin.  Preheat the oven to 180C /160 Fan / gas mk 4.
 
In a large bowl, cream the butter and sugar using a hand mixer, until light an fluffy.  Beat the eggs in a jug with the coconut flavour and add a dribble at a time along with a little flour, beating well with each addition.
 
Fold in the remaining flour, then the coconut and raspberries.  Spoon into the tin and level the top.
 
Bake for 50-60 minutes, covering with foil after 30 minutes, until done.  When you remove the cake from the oven leave the heat on, scatter a handful of coconut flakes onto a baking tray and put in the oven for 3-5 minutes until nicely browned at the edges.
 
Leave the cake to cool in the tin for 10 minutes then turn out onto a wire rack to cool completely.
 
When the cake is cold, transfer to a plate or stand, mix the icing sugar with a little water to make a runny icing and drizzle it over the cake in a diagonal pattern.  Scatter the toasted coconut over the cake and sprinkle with the dried raspberries.
 
Cuts into 6-8 generous slices.  (Leftover slices are nice served warm as a pudding with pink custard!)

~~~~~~~~~~~~~~~~~~~~~~

I have since made this cake in a 2lb loaf tin with strawberries instead of raspberries. Decorated with a layer of a thick plain water icing made with 3 tablespoons of icing sugar spread over the top and some sliced strawberries to disguise the inevitable split down the middle!

My latest version was as a COCONUT AND LEMON LOAF CAKE, omitting the fruit and adding the zest of one lemon instead. I decorated it with thick water icing made with the juice of the lemon, decorated with strips of lemon peel and a sprinkling of coconut. Edible flowers (violas) added along the cake to disguise the crack in the middle.  You can see that version here

August 14, 2019

A CRAFTY CHOCOLATE CAKE

 
These have to be some of the worst photos of a cake that I have ever put up in this blog but the cake is one of the best.
 
 
Some time ago Phil of "As Strong as Soup" blog posted about Michael Barry's Crafty Chocolate Cake and ever since then I have been meaning to bake it. It's hard to believe that I have waited seven years to make this cake! (So many cakes, so little time.)  You can read Phil's post about it here.
 
Michael Barry had the cooking slot in the old Food and Drink series on the BBC and I remember enjoying his no nonsense style.  Phil gives more information about him in his post and a link to the recipe on the Oxfam website.  Sadly the link no longer works so I googled the cake and came across it posted as a contributor's recipe on Nigella Lawson's website.  Something about this version of the cake somehow didn't quite ring true and at the back of my mind I thought it was not the same as the original.


Luckily, not long ago I acquired a copy of  the book that it comes from, Michael Barry's Food and Drink Cookbook, published in 1991. (From a charity shop for £1, where else?)  There are subtle differences between his recipe and the one on Nigella's website so I decided to go with the original.
 
 
The cake was destined for a birthday get together of just five ladies and I was dismayed when the cream I intended to fill it with would simply not whip up stiffly enough to use it.  Glurpy cream oozing out of the middle of an otherwise acceptable cake just will not do for a birthday so I left it out and just filled it with a good layer of cherry jam instead.  I was equally, if not more dismayed when the second sponge cracked as I placed it on top of the first.  A good dense dusting of icing sugar was not enough to hide the crack but nobody seemed to mind.
 
Cracked top and lack of cream notwithstanding, this was an excellent cake.  Phil waxes lyrical about it and quite rightly so.  In the book Mr Barry boasts that his cake was quicker to make and preferred by the Food and Drink team over a similar recipe by the WI! 
It is a doddle to make, (although it takes longer to bake than other all-in-one sponge cakes) has a lovely light texture and good chocolate flavour.  What more could you want from a recipe?
 
Ingredients
 
175g self raising flour
4 heaped tblsp cocoa powder
1 heaped tsp baking powder
100g caster sugar
1 dessert spoon black treacle
150ml sunflower oil
150ml milk
2 large eggs
 
For the filling
 
4-5 tblsp cherry jam
approx. 200ml double cream
 
Method
 
Grease and line the bases of two 18cm sandwich tins.  Preheat the oven to 160C / 140 Fan.
 
Put all the cake ingredients into a food processor and blend until you have a dark brown creamy batter.
 
Divide between the two tins and bake for 40-45 minutes.
 
Remove from the tins and cool on a wire rack.
 
To serve, sandwich the cakes together with a good layer of jam and some whipped cream.  dust thickly with icing sugar on top.
 
Cuts into 8-10 slices.

August 9, 2019

LEMON MADEIRA CAKE

 
I was asked to make some cakes for a charity cake sale that could be frozen until the day of the sale.  Loaf cakes and traybakes are easy to freeze but can look a bit plain and not sell as well as the more fancy cakes on the stall.
 
Then I stumbled across a blog with a recipe for Madeira cake made in a Bundt tin.  What a great idea thought I - much more appealing.  Just to be on the safe side I decided to make one for home consumption beforehand to check that it would work.  It worked.


A friend had asked her visitors from America to bring me a Nordic Ware Bundt tin that I coveted which was called a "blossom pan".  They are so much cheaper to buy over there and I thank this mystery person from the bottom of my heart for bringing it in her luggage.  When you look closely at Nordic Ware pans (tins) you just have to admire the design.  All those intricate curves designed so that the cake will come out with a beautiful shape.  Then when you consider the hefty material they're made of and the superb non stick coating, there's no wonder they're so expensive.


It occurred to me that with this particular tin the cake would still look right if some of the design was missing from the bottom.  Judging from the quantity of flour and other ingredients in the recipe I realised that there would not be enough mixture to fill the tin - or up to two thirds as is usually recommended - so some of the pattern would be missing when the cake was turned out.  This would look odd with some of the Nordic Ware designs I have, but fine with this one.
 
I also learned a new trick from the recipe.  To make a channel in the top of the mixture would produce a flatter top to the cake which was very handy when the cake was turned out.  I have often had to remove a bulge from the top in order to get the cake to be level when inverted and this solves that problem.  It's such a simple solution that I feel rather silly that I never thought of it myself before. 


Anyway, the cake looked gorgeous and tasted lovely.  This will be my go-to lemon cake recipe in future I think.  Nice and moist and just lemony enough, with an excellent crumb.  It kept really well in an airtight tin for several days.  A keeper in more ways than one.  Even in a loaf tin.  You can see the recipe here.
 
Ingredients
 
175g softened butter (I used Lurpak Spreadable)
175g caster sugar
finely grated zest of 1 large lemon
3 large eggs
1 tsp almond extract
1.5 tsp baking powder
150g plain flour
75g ground almonds
splash of milk
icing sugar to dust (optional)
 
Method
 
Prepare the Bundt tin (or use a 1kg loaf tin) by brushing with melted butter and dusting with flour, or using home made cake release paste.  (See sidebar.)  Preheat the oven to 170C / 150 Fan.
 
Using a stand mixer, beat the butter until pale and creamy then beat in the sugar.  Beat in the lemon zest. 
 
Whisk the eggs with the almond essence in a jug and pour into the mix a dribble at a time, thoroughly mixing between additions.  Add a spoonful of the flour if it begins to curdle.
 
Remove the bowl from the stand mixer and sift in half of the flour and baking powder.  Fold in carefully and repeat with the other half then the ground almonds.  Add enough milk to get a soft dropping consistency.
 
Transfer to the tin, level the top and run the spoon around the centre to make a shallow channel.  Tap the tin a few times on the worktop to help remove any trapped air bubbles.
 
Bake for 40-50 minutes (mine was done in 40) until golden brown and coming away from the sides of the tin.  Cool for 10-15 minutes before turning out onto a wire rack to cool completely.
 
Dust with icing sugar if you like.  Cuts into 10-12 slices.