November 29, 2021

SMOKY SWEET POTATO SOUP (soup maker recipe)

This soup was very much inspired by a post in Phil's blog, "As Strong as Soup", which you can see here.  It flashed through my mind as I breezed through the root veg section in Sainsbury’s so I did an about turn and bought some lovely sweet potatoes. 

As I put them in my trolley it occurred to me that I ought to buy them more often.  For a start they make great addition to mash and traybakes, the fabulous colour being a delight now that summer is a distant dream and we have the miserable months (weatherwise) to get through.

I adapted Phil's ingredients largely because I can no longer eat anything other than a very small hint of chilli.  I then totally disregarded his quantities because I was using my soup maker!  (Sorry, Phil!)  I tend to use the basic rule of enough prepared veg (washed and peeled as you normally would, then chopped into fairly large chunks) to fill the machine to the lower 1300 ml line then add the stock or flavourings and enough water to the 1600 ml line.  This seems to work perfectly well every time for my machine.

Looking in my cupboard for an alternative to the chillies that would add an equally warming and interesting spiciness, I spotted an unopened jar of smoked garlic paste and one of sweet smoked paprika.  Thinking I only had ground ginger in stock, Nick reminded me that we had a pack of chopped ginger in the freezer and although we had no limes we had a bottle of lime juice in the spare fridge in the garage.  Which is also where he found the bottle of white wine that I won in the golf club raffle on their quiz night last week!  As I reached into another cupboard for the olive oil my hand settled on a bottle of walnut oil and I thought "why not?".  So all the stars were aligned and a mere thirty minutes later we had the most gloriously orange coloured and utterly yummy soup!

On a practical note, the soup maker generally makes four very generous portions of soup, ideal for two lunches for the two of us.  Because it's best to clean the machine as soon as it has finished cooking, I have experimented with ways of dealing with the second half of the hot soup once the first two helpings have been poured out.  I have tried plastic boxes and poly bags with mixed success but as luck would have it I happened upon an offer for this Pyrex jug on Amazon.  It's a standard one litre jug but with a very handy lid.  I can pour half of the soup into two bowls for lunch, pour the rest of the very hot soup into the jug and take a couple of minutes to rinse out the machine before the residue begins to become dry and caked on the inside of it.  By that time the soup served in the bowls has cooled slightly but is still hot for eating.  I leave the jug on one side with the lid ajar for the contents to cool before putting it into the fridge where it will keep for a couple of days or so.  

The smell of the soup seemed to linger in some of the plastic boxes I tried but another good find was a square glass storage box with a locking lid that I found in Tesco.  They're not expensive and stack well when in the fridge or not in use.  Ikea also have something very similar but the jug appealed to me more because I could use it for other things.  And I needed a big jug!

Ingredients

1 large leek

2 medium sweet potatoes

2 medium white potatoes

1 tsp frozen chopped ginger

1 tsp smoked garlic paste

1 tsp sweet smoked paprika

1 small glass (100ml) dry white wine

1 soup spoon lime juice

1 soup spoon walnut oil

1 chicken stock pot

Salt and pepper to season

Method

Prepare enough veg to fill the machine to the lower line.  Add the other ingredients, water to the upper line, a little salt and pepper and cook on the smooth setting.  Adjust the seasoning to taste before serving.

Makes 4 generous lunch portions (or 6 as a starter).

November 27, 2021

GLUTEN FREE DATE AND WALNUT CAKE


Some time ago I had a request for a gluten free cake of my choice.  There is a vast number of recipes for gluten free cakes on the internet, many of them being quite exotic and requiring special ingredients that as a regular baker I would not use again, if ever.  But I got the feeling that the person that requested this cake would probably welcome a GF version of an old favourite that she used to eat before developing her intolerance to gluten.  She's a date and walnut loaf kind of person, I thought.

I already had a bag of Doves Farm gluten free white self raising flour so I looked first at the Doves Farm website.  There spotted a recipe for a wholemeal date and walnut cake using ordinary (not GF) wholemeal flour.  You can see it here.

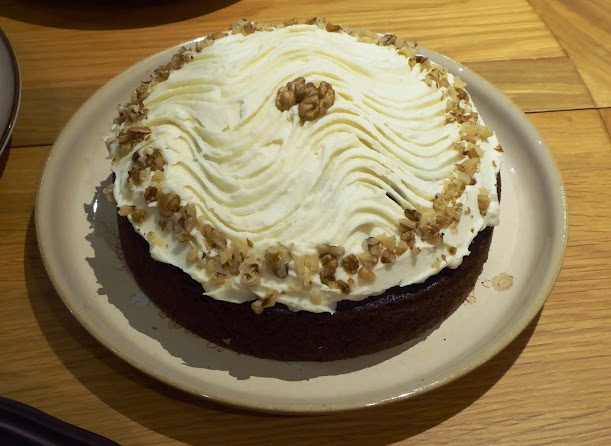
I decided to adapt the recipe using the GF flour that I had in stock, to make it in a round tin not as a loaf, and decorate it to glam it up a bit.  I added a cream cheese icing and some walnuts for decoration and it looked the bees knees!  (It would also have been good with a butter icing topping.)

Sadly I did not get to taste it!  However, I'm giving the recipe here because the lady concerned was thrilled with the cake, declared it to be moist and delicious and a real treat.  (Also so that I don't forget about the recipe altogether!)  One day I will make it again using just ordinary self raising or wholemeal flour as per the recipe - I shall add it to my "tweaking list" for future consideration!

Ingredients

For the cake

200g chopped dates

150ml water

½ tsp bicarb

3 eggs

100g soft light brown sugar

100g sunflower oil

200g gluten free white self raising flour

50g chopped walnuts less 1 tblsp

For the topping*

150g full fat cream cheese

75g icing sugar

60ml double cream

the reserved tblsp of chopped walnuts (or walnut halves)

Method

Put the chopped dates into a small saucepan with the water and bring to the boil slowly.  Remove from the heat, stir in the bicarb and set aside to cool.

Preheat the oven to 180°C / 160° fan / gas mk 4.  Grease and line the base of a 20cm round springform cake tin.

Put the eggs and sugar into a large bowl and using an electric whisk beat until light and airy.  Add the oil and flour and mix together until well combined.

Add the chopped nuts less one tablespoon, plus the prepared dates and mix well.

Transfer the mixture to the prepared tin and level the top.

Bake for 55-60 minutes until done.  Cool in the tin for 20 minutes before turning out onto a wire rack to finish cooling.

While the cake is baking, make the cream cheese icing by beating the cream until fairly thick, then sift in the icing sugar, add the cream cheese and beat together until smooth.

When the cake is completely cold, spread the icing over the top and decorate with the chopped nuts, or walnut halves, or both.  Sift over a dusting of icing sugar before serving if you like.

Cuts into 8-10 slices.

*If you prefer make a half quantity of butter icing for the topping, using 75g butter and 150g icing sugar.

November 22, 2021

PYREX REJUVENATION

Something very peculiar happened in the oven the other day.


Well truthfully, not my oven but my sister-in-law's.

She uses her forty year old Pyrex mixing bowl every time she bakes and after washing it she normally puts it in the warm oven (turned off after baking) to dry.  

One day last week she turned on the oven to a fairly high heat, 190° - 200°C she said, and after a few minutes remembered that the Pyrex bowl was still in there.  She grabbed the oven gloves and pulled the bowl out to find what she said was a kind of gooey, gluey puddle of a clear substance in the bottom of it.

Fearing the worst she dashed outside with the bowl and left it to cool down, thinking that she had had this bowl as a wedding present and would be sad to see the end of it.  A few minutes later, it looked like the picture above.


The goo had solidified so she gingerly lifted it out and to her surprise discovered that the bowl, which was very scratched and worn, now appeared to be in immaculate, like new, condition.  The substance she lifted out was a kind of solid ring of something that felt much like plastic.

I'm tempted to buy one of those worn out Pyrex bowls that are for nuppence in the local charity shops and try it myself to see if I can rejuvenate it in the same way.  She says she tried it with her pudding basin but it didn't work because she thinks the oven wasn't hot enough.  

I wouldn't recommend trying this at home yourself but any explanations would be welcome !!

November 12, 2021

BANANA AND WALNUT LOAF


It was the usual story, a small bunch of bananas gradually going past their best in the fruit bowl and whispering "banana cake" every time I walked by!


Browsing through my collection of cook books, I remembered a recipe that I fancied but had put on the back burner some time ago, years ago in fact.  I'm not a huge fan of loaf shaped cakes, preferring to make a round cake (or even square) for totally illogical reasons, but this one looked so rustic that a loaf seemed the right way to go.

I have made many a banana cake in the past, most requiring bananas that are mashed to a pulp, some where the bananas are left a bit more lumpy and one almost a purée before adding to the mixture.  All have been good.  This one was slightly different, saying that the bananas should be added whole and then mashed into the mixture to leave them a bit more lumpy.  


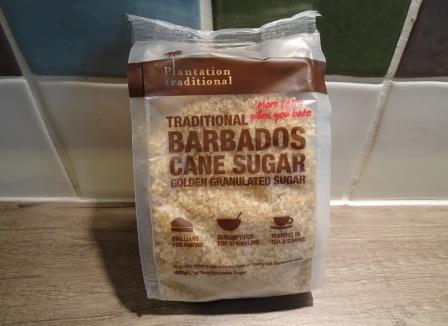
The recipe also suggested sprinkling demerara sugar on top before baking to add a bit of crunch.  I decided to use this sugar which I had stumbled upon in our fairly new branch of "Home Bargains" and is described as "golden granulated sugar".  It has the texture of very coarse demerara and I sprinkled a fair bit over the top.  It worked really well, providing a very crunchy topping and adding a bit of extra sweetness to the cake.


I have to confess that I don't know why cakes like this are called banana "bread".  Are they meant to be served toasted or buttered rather than au nature?  In any case, this one was not overly sweet and benefited from the sugary topping.  It was also very rustic in appearance and flavour - not a bad thing at all.  From the colour you would almost think it had been made using wholemeal flour, not white.  It kept really well and if anything was better and even more moist a couple of days after baking.  I might be tempted to add a little cinnamon or ginger to the mixture next time but all in all it's probably my favourite banana cake so far.

Ingredients

2 medium eggs

170g light soft brown sugar

80ml sunflower oil

80ml milk

3 smallish ripe bananas

170g plain flour

1 tsp bicarb

60g walnuts, roughly chopped

1-2 tblsp demerara sugar for sprinkling on top (optional)

Method

Butter and line a 900g (2lb) loaf tin or use a paper liner.  Preheat the oven to 180°C / 160° fan.  

In a large bowl, whisk the sugar and eggs until pale and thick.  Whisk in the oil and milk.

Add the peeled bananas and mash roughly with a potato masher or fork so that there are still some lumpy bits.

Add the bicarb to the flour and sift into the mixture in two halves, folding in each half.  Then fold in the walnuts.

Pour the mixture into the prepared tin and sprinkle the demerara sugar on top.  Bake for 60-70 minutes until done.

Cool in the tin for 10 minutes then transfer to a wire rack to finish cooling.

Cuts into 8-10 slices.