December 27, 2019

FRESH PINEAPPLE UPSIDE DOWN CAKE

 
It's not that long since I made my first upside down cake, only about forty years since they were fashionable!
More recently I found myself with a fresh pineapple that hadn't been used for its intended purpose so I looked on the internet for suitable cake recipes and stumbled upon this recipe on the Tesco website*.  It looked incredibly straightforward, but see note at the end of the recipe.

 
In fact it could hardly have been easier, simply arranging the sliced pineapple in the tin and spooning the cake mixture on top.  No caramel topping to leak out of the tin and the easiest possible sponge cake mixture which I made even quicker using Stork soft margarine and the all in one method.  I didn't have a 25cm tin as specified in the recipe so used my 23cm tin and it was fine, just the right depth I thought.
 
 
In place of the caramel topping on the fruit you simply drizzle runny honey over the finished cake.  I didn't have any in stock so used golden syrup instead.  It was yummy!
 
 
The sponge was light, tasty and altogether delightful, the pineapple was sharp and delicious, offset by the subtle taste of the golden syrup which was not overly sweet.
 
 
It was such a success that I decided to make it again for this year's alternative to Christmas pudding, decorating the finished cake with a few glacé cherry halves and sprigs of rosemary from the garden for a festive touch.  It was quickly rustled up on Christmas Eve, the longest part of the preparation being to trim and slice the pineapple!  It went down really well, enjoyed with a little cream, custard, or home made brandy butter, or in some cases, all three!
 
Ingredients
1 medium fresh ripe pineapple
175g Stork soft margarine for cakes (or softened butter if you prefer)
175g caster sugar
3 eggs
175g self raising flour
2-3 tblsp milk
1 tblsp runny honey (or a good squirt of squeezy golden syrup)
 
Method
Preheat the oven to 180 C / 160 fan / gas mk 4.  Butter a 23 cm springform tin and line the base with baking paper.
 
Prepare the pineapple by removing the top and bottom and slicing off the outer skin and tufts.  Cut in half vertically and remove the woody core with an apple corer or sharp knife Slice into thinnish slices about the thickness of a £1 or 1€ coin.  Arrange the slices in the bottom of the tin, covering as much area as possible.  (You may have some pineapple left over.)
 
To make the sponge beat together all the remaining ingredients except for the golden syrup in a large bowl until smooth and well combined.  Add enough of the milk to loosen the mixture but not make it too soft. 
 
Spoon the mixture carefully over the fruit and level the top.  Bake for about 45 minutes until done.
 
Leave in the tin for 5 minutes then release the clip and leave to cool.  When cool, remove the ring, put a plate or cake stand upside down on top and invert the cake.  Remove the circle of baking paper and drizzle a little honey or golden syrup over the top.
 
Cuts into 10-12 slices.

* Since I first wrote this post Tesco have changed the recipe on their website and it now uses tinned pineapple, which is a shame.

December 15, 2019

SMOKED HADDOCK AND LEEK RISOTTO


Whoosh, where did the last few weeks go?
 
It's certainly not that there has been no baking going on chez nous.  Indeed, there has been an above average amount of baking, cooking and entertaining and consequently a shortage of time to write about it.
 
We returned to the UK at the end of October and immediately turned the house here upside down to have two bedrooms decorated, one upstairs and one downstairs.  (It's a bungalow with a dormer extension.)  So far we have done all the decorating ourselves but by now are thoroughly fed up with it so this time wielded the wallet instead of the paint brush.  Paul the decorator was a joy to have in the house (he is very house trained and totally unlike any workmen we have ever had the displeasure to meet before).  He did a brilliant job of first the upstairs bedroom then the downstairs, on consecutive weeks.  All very good but it still meant moving furniture yet again from one room to another then back again.  I swear I never ever want to do that again.
 
With the furniture still displaced we then put Daisy into the cattery, loaded Hugo into the car to return to France for just one week to "close up" the house there and say goodbye to it until next Spring.  When we got back to the UK we then had to restore the house here to something like habitable and get back to normal life.  Not that I can actually remember what normal is like. 
 
 
You may wonder what any of this has to do with a risotto but I have to say that this recipe is a joy to have discovered.
 
Our nephew and his girlfriend cooked this for us when we went round to theirs one evening last week to meet their new cat and dishwasher.  They bought their very first house a couple of months ago and Nick went round soon after to put in place the plumbing and electrics for a dishwasher - their first one of those too.  Having only ever previously lived in rented houses they haven't had the opportunity to gain DIY skills, all repairs having to be done by landlords, or, more often than not, put up with undone.  The dishwasher finally arrived and was successfully installed at about the same time as they got their own cat, having not been able to have one of those before either.
 
The cat Mavis is adorable, the risotto was delicious and rustled up in no time at all and the dishwasher worked brilliantly.  They are busy people, often getting home from work quite late, so having a repertoire of quick dinners is essential.  I asked for the recipe and couldn't wait to try it myself. 

You can see it here on the BBC Good Food website.  Curiously, some of the reviews describe it as bland.  Well, au contraire, for me/us it was packed full of flavour, utterly delicious, rich and creamy.  I made it myself this evening and even my dad enjoyed it too, it being the first risotto he has ever eaten (at the age of 91).  I used a Tesco fish stock pot (little plastic thing) and skinless, boneless smoked cod as that was what was available.  I am also looking forward to adapting the recipe using bacon and mushrooms instead of the smoked fish.
 
Ingredients
 
a small knob of butter
1 large leek, washed and thinly sliced
300g risotto rice
700 ml fish or veg stock
250 ml whole milk
375g (approx) smoked cod or haddock, skinned, boned and cut into large chunks
3 tblsp crème fraiche
100g baby spinach
 
Method
 
Preheat the oven to 200C / 180 fan / gas mk 6.
Melt the butter in a large ovenproof dish or casserole over medium heat and cook the leek slices for 4-5 minutes, stirring, until just tender.  Add the rice and stir for two more minutes.
 
Add the stock and milk, bring to the boil and bubble for 5 minutes.  Remove from the heat and sit the fish chunks on top.
 
Cover with a lid (or foil) and bake in the oven for 18 minutes until the rice is tender.
 
Remove from the oven and stir through the crème fraiche and spinach.  Season with salt and pepper and cover with the lid again.  Leave out of the oven for 3 minutes by which time the spinach will be cooked.  Serve immediately.
 
Makes 4 generous portions.

October 25, 2019

PUMPKIN, APPLE AND WALNUT SPICE CAKE

 
I made this cake for our latest cake and bake club meeting where the theme was "autumn".
 
It's a variation on a favourite recipe that uses tinned pumpkin purée.  You can see that recipe here.  I replaced some of the pumpkin with grated eating apple and some of the vegetable oil with walnut oil.
 
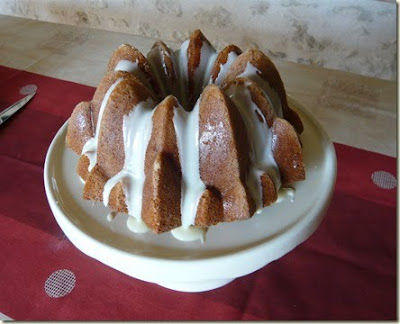
I used my "fleur de lys" Nordic Ware Bundt pan and the cake release recipe I posted recently.  The cake slipped out of the tin perfectly and in fact I could even tell that it was completely loose on picking it up and before turning it upside down.  It's such a relief when the cake doesn't stick.


This was my last meeting as club organiser and I was delighted that most of the bakes on the table were cakes (not quiches) just like the old days.  My cake looked good without the maple syrup glaze I had planned to drizzle over it.  The tin makes a fairly plain cake look gorgeous and I thought it best not to detract from the design with any kind of icing.  It tasted good too and was sweet enough without any added icing sugar.  If anything I would add a little more spice next time, maybe a teaspoonful of ginger or mixed spice.
 
 
It had a nice texture, moist and soft without falling apart when cut.
 
 
Ingredients
 
200g plain flour
4 tsp baking powder
1 tsp bicarbonate of soda
½ tsp salt
2 tsp ground cinnamon
1 tsp ground nutmeg
250g soft brown sugar
50g walnuts, roughly chopped
3 eggs
100ml sunflower oil
90ml walnut oil
1 tsp vanilla extract
300g pumpkin purée from a tin
1 large eating apple, peeled and grated

Method

Grease and flour a large Bundt tin, or use cake release paste.  Preheat the oven to 175˚C / 155˚ fan. 

In a medium bowl, mix together the flour, salt, spices, baking powder and bicarb.
In a large bowl, beat the eggs lightly then add the oils, vanilla, sugar, pumpkin and apple.  Mix well then add the dry ingredients and the nuts.  Mix well to combine then pour carefully into the prepared tin.

Tap the tin on the worktop a few times to release any trapped air bubbles then bake for 40 minutes or until done.  Remove from the oven and cool in the tin for 10 minutes before turning out to cool completely.

Dust with icing sugar or drizzle with a simple water icing when cold.

Cuts into 12-16 slices.

October 22, 2019

COURGETTES ON TOAST


By this time of year we are usually well an truly courgetted out and running out of ideas how to eat our way through a glut of them. However, this year our courgette plants have not done so well, mainly because of the drought here in France.  We had a few yellow courgettes earlier in the summer, then the heat stopped the plants in their tracks.  The green courgette plant produced a few tiddlers then in the strong hot winds in August the top of the plant broke off and that was the end of that.

The weather has finally returned to something like normal and in fact for the whole of October we have had plenty of rain.  The grass has turned from a crozzled and desperate brown to a lush green and you could almost hear the flower beds sigh with relief as they soaked up the rain and started to grow again.  And now we are getting enormous yellow courgettes.


I was actually browsing my cook books for recipes using plums when I happened upon this one for courgettes. 
 
It's in a book by a lady called Fran Warde who you may not have heard of.  She co-wrote the cookery books of French recipes along with Joanne Harris, she of the "Chocolat" novels and film.  Those cook books are worth having just for the pictures alone and I have passed many an hour poring over the pictures of sunny French markets in darkest February, when the weather outside in Derbyshire was at its most foul.


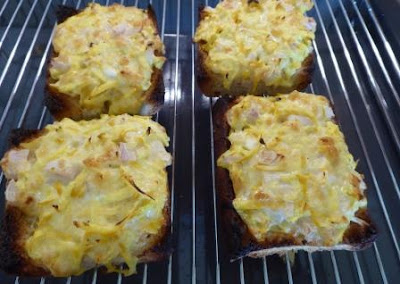
The idea of courgettes on toast did seem like a strange concept but I couldn't resist having a go.  You make a mixture of grated courgette, egg, shallot and cheddar cheese, pile it on toast and grill until golden brown.  The most similar thing I can think of would be a tartine - toast with various fillings served here in France.
 
 
I also happened to have three quarters of a pain in the freezer - a pain is a large baguette and makes beautiful toast.  We need to use up as much of the fridge and freezer contents as possible before we go back to the UK for the winter so this recipe ticked several boxes - also using up an egg, some cheddar (which has already crossed the channel once), a stray shallot and a yellow courgette straight from the vegetable patch.
 
It was delicious.  Nick expressed a certain amount of scepticism but was immediately won over after the first mouthful.  We will definitely be having these again.
 
Ingredients.
 
4 chunky slices of bread
1 large courgette
1 shallot, finely chopped
1 small egg
about 50g grated cheddar cheese
a good dash of Worcestershire sauce
salt and pepper
 
Method
 
Toast the bread on both sides.
 
Grate the courgette and pile it into a clean tea towel.  Gather the tea towel up and squeeze as much liquid as possible out of the courgettes.
 
Put the courgette into a bowl with all the other ingredients and mix well.  Divide the mixture between the pieces of toast, piling it on top then pressing down slightly with a fork.
 
Place under a hot grill and cook until the filling is lightly browned and the cheese bubbling.  This will take about five minutes depending on the heat of your grill so keep your eye on it.
 
Serve immediately.
 
Serves two.
 
For more ideas on using a glut of courgettes:

October 18, 2019

HOME MADE CAKE RELEASE - NO MORE BUNDT DISASTERS!

 
I find preparing Bundt tins fiddly and time consuming.  Getting melted butter into all those nooks and crannies, then dusting with flour, is a messy job and it's easy to miss a bit.  Turning them out is always stressful and I have had to disguise many a damaged cake with crafty icing in the past.
I have had success with shop bought cake release in spray or liquid form but have been somewhat unsure about some of the ingredients and frankly some of them smell slightly unpleasant.
Home made cake release paste is a revelation and easy to make from storecupboard ingredients.  Simply put equal quantities of each ingredient in a mini chopper and blitz them to a paste.


Brush the paste carefully into all the crevices of your Bundt tin using a pastry brush.
 
 
Store the remaining paste in a jar in the fridge, bringing it out shortly before you need to use it each time.  Mine usually keeps in the fridge for several weeks.
 
 No more Bundt disasters!
 
Cool the cake in the tin for about ten minutes (turning it out too early can still result in disaster) and it should slip out easily and cleanly.  No more shaking, tapping or cursing needed!
 
 
Perfect Bundts every time!

 
Cake release
 
50g plain flour
50g vegetable oil
50g white cooking fat (I use Trex)
 
Measure the ingredients into the bowl of a food processor or mini chopper.  Process until smooth.  Or you could simply beat together in a bowl with a wooden spoon until smooth.  Store unused paste in a jar in the fridge.  Bring it out of the fridge a few minutes before you next want to use it.
 
**********************
 

Mind you, nothing is ever completely certain as you can read here !! 


October 17, 2019

GINGER, RUM AND SPICE CAKE

 
Nick made this cake for our Macmillan charity coffee morning.
 
Ginger cakes are his favourite both to eat and to bake and he's always on the lookout for something a bit different.  This recipe comes from a book called "Make, Bake and Celebrate" by Annie Rigg and it includes instructions for decorating the cake with slices of candied pineapple.  I confess that we did buy a pineapple but decided that making the candied slices was a faff too far.  (We ate the pineapple for dessert another day.)  Instead, Nick decorated it with chopped crystallised ginger.


The cake was pretty faffy as it was, involving the making of a syrup and a cream cheese icing - the recipe for which was annoyingly on a different page (having to flip back and forth from one recipe to another is something I find very annoying).  In fact the recipe was exactly the kind of thing that Nick loves to get stuck into, remembering that he is a man who was prepared to caramelise carrots for a previous cake.  Myself, I just don't have the patience, always having a number of other things that need doing at the same time, such as ironing some jeans or hanging out the washing while the weather is good.  Nick has the knack of concentrating on one task at a time to the exclusion of all others.  (A well known male characteristic I suspect.)
 
 
Regrettably, I completely forgot to take a picture of a slice of the cake.  It was delicious with a hint of rum and plenty of spice.  It had a nice, even crumb and kept well for a day or three (in the fridge because of the cream cheese icing).  It got plenty of praise at the coffee morning and, basking in all the attention, Nick said he would definitely make it again AND would tackle the candied pineapple to go with it.  Brave man.
 
Ingredients
 
For the syrup
* measure half of the syrup ingredients for one cake as these quantities provide enough syrup for baking the pineapple slices, which we didn't make. Alternatively the leftover syrup keeps well in the fridge for several days.
 
100g caster sugar
juice of 1 lime
4cm fresh ginger, peeled and roughly chopped
3 tblsp dark rum (we used spiced rum)
1 cinnamon stick
3 tblsp water
 
For the cake
 
150g butter
75g golden syrup
75g dark treacle
175g plus 2 tblsp dark muscovado sugar
3 balls stem ginger in syrup, finely chopped (half will be used for the frosting)
3 tblsp dark rum (we used spiced rum)
½ tsp bicarbonate of soda
100ml boiling water
200g plain flour
1 tsp baking powder
3 tsp ground ginger
1 large tsp ground cinnamon
¼ tsp ground allspice
¼ tsp grated nutmeg
pinch of salt
3 medium eggs, lightly beaten
 
For the cream cheese frosting
 
150g good quality full fat cream cheese
25g softened butter
1-1½ tblsp maple syrup (or you could use clear honey)
½ tsp vanilla extract
 
1 tblsp crystallised ginger, chopped for decoration (optional)
 
Method
 
First make the rum and ginger syrup by putting all the ingredients into a small saucepan over medium heat.  Bring to the boil, stirring to dissolve the sugar.  Simmer for 3-4 minutes until thickened (ours took much longer than this).  Remove from the heat and set aside to cool.
 
Preheat the oven to 170C / 150 fan / gas mk 3.  Grease and line a 900g loaf tin with baking parchment, or use a paper liner.
 
In another small saucepan, put the butter, golden syrup, treacle and sugar and heat gently until melted and dissolved.  Add half of the chopped ginger, the rum and boiling water and mix to combine.  Stir in the bicarb, which will cause the mixture to foam, and set aside.
 
Sift the dry ingredients into a large bowl and make a well in the middle.  Add the eggs and the syrup/butter mixture in thirds, beating well with each addition.  Stir well and pour into the prepared tin.  Tap the tin a few times on the worktop to release any large bubbles.  Bake for 45-50 minutes until done.
 
Leave the cake in the tin while you strain the rum and ginger syrup.  Prick the hot cake all over with a skewer and slowly drizzle 1-2 tblsp syrup over the top, letting it soak in.  Cool in the tin.
 
To make the cream cheese frosting, put the cheese and butter into a bowl and mix together until smooth.  Add the maple syrup or honey to taste.  Mix in the vanilla and the chopped ginger.
 
Turn the cake out onto a serving dish and spread the frosting over the top.  Sprinkle the chopped crystallised ginger over the frosting (if using).
 
Cuts into 8 - 10 slices.

October 1, 2019

APPLE AND BLACKBERRY CAKE


A while ago recipes for something called a hedgerow cake seemed to be turning up everywhere I looked.  There were numerous variations of the cake around but most had blackberries in there somewhere and also on the top as decoration. 


With friends coming round for a birthday tea and a few of my hedgerow blackberries going spare I decided to make my own version.  It's another adaptation of Mary Berry's apple and lemon sandwich cake which you can see here. 
When I made this cake before, I filled and topped it with lemon buttercream.  This time I filled it with a layer of bramble jelly and whipped cream and decorated it with cream and blackberries just like the hedgerow cakes I saw on Facebook.  I later added a light dusting of icing sugar to the top before serving.

This really is a nice sponge cake recipe, very moist with the grated apple in it and hugely adaptable.  I love recipes that I can change easily to use what I have in the fridge and can imagine an elderflower and gooseberry version, or apple and raspberry.  Lovely.

Ingredients

For the cake
225g each of baking spread, caster sugar and self raising flour
1 tsp baking powder
4 large eggs, beaten
2 eating apples, peeled, cored and grated*

For the filling and decoration
a few tblsp bramble (blackberry) jelly
150ml double cream
a few blackberries

Method

Butter two 20cm sandwich tins and line the bases with baking paper.  Preheat the oven to 180C / 160 fan / gas mk 4.

Put all the cake ingredients into a large bowl and beat with an electric hand whisk until well combined.  Fold in the grated apple and divide the mixture evenly between the two tins.

Bake for 25-30 minutes until done.  Cool in the tins.  Turn out and fill with the jam and whipped cream, reserving a little of the cream for piping rosettes on the top of the cake.  Place a blackberry onto each rosette.  Dust lightly with icing sugar if you like before serving.

Cuts into 8 -10 slices.

*Mary's tip for grating the apple is a good one:  Cut the unpeeled apples in half and remove the cores.  (I find it easy to do this with a melon baller.)  Hold each apple half by the skin to grate it and as you do so you will be left with the skin only in your hand to discard.