August 27, 2013

NOTABLOCKER GLORY

notablocker1I was stuck for something nice for dessert the other day, didn’t have time to bake anything and there was nothing much in the cupboards, what with being in France at the moment.  We don’t keep the amount of stuff here that we have in the UK and what we hadn’t already run out of had been used up by my brother when he was chez nous with his daughter for a holiday until a few days before we arrived.

However, one of the advantages of having family use the house in our absence is that they leave miscellaneous things behind to make up for the stuff they have used.  Hence I had a huge bag of lime flavoured Doritos and a box of cheese footballs to enjoy when we arrived ourselves !!

notablocker2

So I had a bit of a rummage and turned up a few boudoir biscuits (leftover from the making of a tiramisu in June), a tin of peach halves that someone else had left here, a jar of apple purée (we stock up and take plenty home with us after every trip), some squirty cream and a carton of apricot yoghurt in the fridge, a little box of mini marshmallows that I swooped on in Sainsburys before we came to France, thinking they might come in handy.

So I took a couple of tall sundae glasses and built something that almost but not quite might be a bit like a knickerbocker glory !!

This is what I would do if I would do it again:

Break the boudoir biscuits into pieces and drop into the bottom of the glass, moisten with a teaspoon or so of juice from the can of peaches.

Add a layer of chopped peaches, followed by a spoonful of apple purée and a good dollop of yoghurt.

Repeat the layers until the top of the glass is reached.

Chill in the fridge for at least thirty minutes then add a good squirt of cream and decorate with a slice of peach and a sprinkle of mini marshmallows.

Obviously the fruit variations are endless, and I could easily use bits of leftover cake of any kind if I didn’t happen to have made a tiramisu recently !!  In fact imagination is the only limitation when creating a notablocker glory !!

Tea_Time_Treatrs_logo

Not only that, but I am actually having the cheek to submit this to this month’s Teatime Treats Challenge !!  The theme this month is chilled desserts, organised by Kate of What Kate Baked in conjunction with Karen of Lavender and Lovage.  You can see the details here.

August 25, 2013

BUTTERNUT SQUASH AND RED ONION TART

When Dom of Bellau Kitchen announced the theme for this month’s Random Recipe Challenge, “Grab and Run”, I knew straight away which book I would choose.  The idea is to choose within ten seconds which recipe book you would most like to keep above all others. 

popina1

I did hesitate for a second, wondering whether I might prefer Annie Bell’s “Gorgeous Cakes” but no, the Popina Book of Baking was definitely “The One” for me.

randomrecipes

Then I had to open it at random and cook the recipe in front of me, assuming it was one I hadn’t made before.  Now that could be a problem as I have made lots of the recipes in this lovely book, but I was in luck.
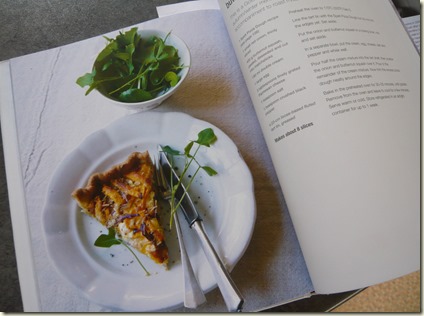
popina4

I had never made this butternut squash tart before.  The interesting thing about it is that the pastry is not a regular shortcrust, not even wholemeal pastry, but is made from pizza dough, which meant using yeast.  Now that would be first for me, having never made bread or used yeast for anything before, except of course in our bread making machine.  Nick is the bread maker in the house these days.
popina2 popina3 

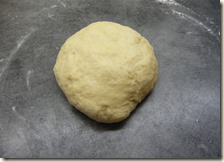
The recipe specifies using a spelt pizza dough but unfortunately when I opened the packet of spelt flour there was not enough left so I made a normal white pizza dough instead.  It was easy enough and gave a fairly businesslike crust to what is a very meaty meatless tart.

popina5

In the end I modified the recipe slightly.  The idea is to put half of the cream mixture in the tart, pile the vegetables on top and pour over the other half.  I did this and the remaining liquid did not cover the huge amount of veg.  So I decided to make another batch of the cream mixture and pour that on as well.  The alternative would have been, I suppose, to remove some of the filling.

popina6

Consequently the tart took much longer to cook than the time stated, more like 45-50 minutes rather than 30-35.  Even then it was still a little runny when I cut a slice so I shoved it back in the oven for a bit longer !!

popina7

So it turned out to be a monster of a tart !!  Very tasty and very filling.  I would definitely make it again and also possibly add some spices for interest, possibly cumin or some ginger.  We had ours on its own with some salad, but it would make an interesting side dish to go with a roast, or possibly chops or sausages.  It took us several days to eat our way through it and it kept well in a box in the fridge.

I give here my adaptation of the recipe.

Ingredients

For the pastry base:

220g strong white flour

1tsp quick dried yeast

½tsp salt

2tblsp olive oil

1egg, lightly beaten

80ml warm water

For the filling:

1 small red onion

400g butternut squash

250ml double cream

2 eggs

4tblsp grated parmesan cheese

1tsp salt

½tsp black pepper

Method

Preheat the oven to 170°C / 150° fan / gas mk 3.  Grease a 23cm loose-bottomed tart tin.

To make the pastry base, mix the dry ingredients in a bowl, make a well in the centre and pour in the wet ingredients.

Using clean hands, bring everything together and work into a soft dough.  Turn onto a floured surface and knead for two minutes.  If the dough is still sticky, add a little more flour.

Roll out to 3mm thickness and use to line the tin but leave the edges untrimmed.

To make the filling, peel the onion and slice thinly.  Peel the squash, discard the seeds and cut into matchsticks.  Mix together in a bowl.

In a large jug, whisk together the cream, eggs, cheese, salt and pepper.

Pour half the cream mixture into the tin, spread the vegetables on top, then pour over the rest of the liquid.  Run a rolling pin over the tart to trim off the excess pastry.

Bake for 40-50 minutes until golden brown and set, but check after 30 for browning.

Allow to cool slightly before serving.  Serve warm or cold, with salad, or warm as a side dish to a roast.

Serves 8 generously and keeps for a few days in an airtight container in the fridge.

August 12, 2013

REDCURRANT, ROSE AND RASPBERRY BUNDT CAKE

redcurrant jelly8

Bundt cakes, or rather, the tins you make them in, fascinate me.  You can get Bundt tins in such an enormous variety of shapes and designs that virtually anything is possible when it comes to fancy cakes.  If you want to make a cake shaped like a steam train, or a Christmas tree, there is a Bundt tin for it.  No longer is it necessary to carve up cakes and glue them back together in the shape you want.

The thing that has always puzzled me is what recipe to use.  I wondered if you could bake any recipe in a Bundt tin and it would turn out right.  I suspect not.  Then I stumbled upon a blog called Dolly Bakes written by Rachel, who makes all kinds and flavours of Bundt cakes and gives a basic, completely adaptable recipe that she says works every time.

It certainly worked for me when I was deciding what to do with the few redcurrants I had left over from making jam, jelly and relish.

redcurrant jelly3I use a recipe from Delia online for redcurrant jelly, which is incredibly quick and easy and works really well.  You can see it here.

redcurrant jelly4I had so many redcurrants this year that I decided to branch out and make strawberry and redcurrant jam.  It’s a recipe I had not tried before but the jam is delicious.  You can see the recipe here.

redcurrant jelly5I used just a few redcurrants for this relish which is absolutely gorgeous.  There are still some redcurrants to ripen on the bush and with those I think I will make some more of this.  You can see the recipe here.

So that just left a handful of redcurrants from my harvest so I decided to mix them with strawberries and make a cake.  Then I noticed that I had used all the strawberries so I used a few raspberries instead!

redcurrant jelly6 redcurrant jelly7 

I used a traditional Gugelhupf cake silicone mould that I got recently and very reasonably from Sarah at Silicone Moulds.  I still feel slightly nervous about using silicone.  Putting cake mixture into something so wobbly and then into a hot oven just somehow seems wrong!  But it worked perfectly.  I expect that sooner or later I will get used to silicone and learn to trust it!

I greased and floured the mould and the cake turned out fine with hardly a crumb left behind stuck to the mould.  But the shape was not as I expected.  The finished cake was not the dome shape of the mould but flatter.  I suppose logically this makes sense.  If you put that amount of cake mixture into a flexible object the weight of it is bound to make it sag or flatten.  I don’t know if there is a way round this, but the cake looked nice anyway.

redcurrant jelly9In fact, not only did it look nice, it tasted lovely.  Here’s the link to the recipe on Rachel’s blog:

http://www.dollybakes.co.uk/2012/10/BuildaBundt28.html

I followed the recipe exactly except for the following adaptations:

I substituted strawberry yoghurt for the plain yoghurt

I substituted 2tsp rose water for the 1tsp vanilla

I added 100g of mixed raspberries and redcurrants.

redcurrant jelly2 The cake was huge, cut easily into thick slices and had a lovely crumb.  It would be great for a party, special event or cake stall as it looks so good and would probably serve 20 people.  It was still perfect three days later when we had the last slice made into a raspberry trifle.  So a great big “thank you” to Rachel for a great recipe that I shall no doubt be using over and over again.

As I used my few remaining redcurrants and a handful of slightly tired raspberries I am entering this cake into Kate of Turquoise Lemons “no waste” food challenge, currently hosted by Elizabeth of Elizabeth’s Kitchen Diary.  You can see the details here.

Calendar Cakes Challenge

Also, because it is full of the tastes of summer, I am also linking it to Rachel’s own Calendar Cakes challenge on her blog Dolly Bakes.  You can see the details here.

August 7, 2013

GOOSEBERRY AND ALMOND STREUSEL CAKE

gooseberry and almond streusel squares6 I acquired a small quantity of gooseberries recently and thought I would like to do something a bit different from the usual crumble.  After no time at all I came across this recipe on the Good Food website.

The result was something like a cross between a pudding and a cake.  A dessert cake in fact.

It reminded me of school dinners. When I was a junior I went home for dinner but once I went to the “big school”, on the bus, I had school dinner every day. They were mostly delicious, cooked fresh at school from scratch every day by a small team of ladies, who would beam at us from the serving hatch. The puddings they made were wonderful. Apple pie, Manchester tart, baked ginger sponge, chocolate pudding with chocolate sauce, fruit trifle in summer and a sort of baked currant pudding which we affectionately called “millstone grit”.

They were all delicious, served with huge jugs of custard if appropriate (fights almost broke out over whose turn it was to have the skin) and the ladies would beam again as we scraped every morsel from our bowls. The empty bowls would be piled up on the hatch and the ladies set to tackling the washing up in the happy knowledge that they had fed us properly.

Happy days.

gooseberry and almond streusel squares5 So although I don’t remember having this exact cake for pudding at school it is very much the kind of thing that might have appeared on the table.  The introduction to the recipe suggests it can be served warm as a pudding or cold with a cup of tea and that reminds me again of the times I walked past the school dining room at the start of afternoon lessons and would see the cooks sitting at a table tucking into a cup of tea and slice or two of cold pudding.

gooseberry and almond streusel squares2gooseberry and almond streusel squares3

gooseberry and almond streusel squares4

For the cake you make a quantity of crumble, press most of it into the bottom of a tin, add the fruit and sprinkle the rest on top.  Easy peasy and absolutely delicious.  Perfect served warm with custard and nice too the day after, served cold and cut into squares, although it’s a little moist to eat with fingers.  Forks are required.

alphabakesI am entering this post into this month’s Alphabakes challenge is to bake something with the letter “G” in it.  Thanks to this month’s host, Ros of The More Than Occasional Baker, and her partner Caroline of Caroline Makes for organising this challenge.

Ingredients

250 self-raising flour

250 cold butter, cubed

125g ground almonds

125g light muscovado sugar

350g gooseberries, topped and tailed and rinsed (frozen fruit works just as well)

2 tblsp caster sugar

50g flaked almonds (optional)

Method

Preheat the oven to 190°C / 170°fan / gas mk 5.  Grease a 27cm x 18cm (approximately) baking or roasting tin and line the base with baking paper.

Put the flour and butter in a food processer and pulse to form breadcrumbs (or rub in by hand).  Add the almonds and muscovado sugar and pulse briefly to combine.

Press two thirds of the crumb mixture into the bottom of the tin and as far up the sides as you can.

Put the gooseberries in a bowl and toss with the caster sugar.  Spread them over the crumb base.  Mix the flaked almonds into the remaining one third of the crumb mixture and sprinkle this evenly over the top.

Bake for 50-60 minutes until golden brown and the fruit is just bubbling around the edges.  Cool in the tin.

Server warm with cream, custard or ice cream, or leave until cold and cut into squares.

Cuts into 8-12 squares, depending on how big you like your squares.

July 27, 2013

CHICKEN WITH LEMON, ROSEMARY AND HONEY

chicken with lemon1

This recipe is based on one from Rachel Allen’s book “Rachel’s Food for Living”.  It’s a very easy recipe and a lovely, simple way to cook chicken.  In her recipe you add the empty lemon halves to the dish after you have squeezed out the juice.  You can see a version of it here.

chicken with lemon2

Chicken thighs are great for a quick, easy and hearty dinner.  They are cooked and on the table in under an hour and form the basis of so many tasty recipes.

This time I adapted Rachel’s recipe slightly and decided to use a large sprig of lemon balm from the garden instead of the empty lemon halves.  I also added a few shallots.

chicken with lemon3

I like this version best I think.  Once the chicken is cooked you thicken the sauce by boiling it for a while then either serve it separately or pour it back over the chicken, which is what I did. 

I will definitely be doing it this way again.

We had ours with some fresh broad beans from the garden and some quinoa. 

Ingredients

4 chicken thighs, or a pack of mixed thighs and drumsticks

2 lemons, juice only

2 tblsp (or two good long squirts) of runny honey

6 shallots, peeled

2 sprigs rosemary

1 sprig lemon balm

Method

Preheat the oven to 180°C / 160° fan / gas mk 4.

Put the chicken pieces in a baking dish or roasting tin, skin side up.  Add the shallots and season with salt and pepper.

Mix the lemon juice and honey together in a bowl and pour over the chicken.  Add the rosemary and lemon balm and bake in the oven for 40 minutes or until the chicken is nicely browned and cooked through.

Drain off the liquid into a small pan and keep the chicken warm.  Boil the liquid until thickened slightly.  Pour back over the chicken or serve separately as a sauce.

Serves 4.

July 24, 2013

CHEESY BAKED EGGS

baked eggsDom’s Random Recipe Challenge this month is to bake the recipe on page 30 of cookbook number 30 on your bookcase.  You can see the details here.  I counted mine out and turned up a recipe for baked eggs in the recent book “John Whaite Bakes”.  This is the charming young man who won the Great British Bake Off last year.

randomrecipes

This book is very much in the style of modern cookbooks, each recipe having its own little story as an introduction and with lots of photos of the author, looking very handsome, nibbling a biscuit, holding a mug, walking down an alley of factory buildings holding half a baguette………..somehow I find it all slightly unnecessary.  I blame Nigella – she started it, I seem to remember, and now they all do it.  Except for Delia, who doesn’t seem to need to.  It’s the celebrity thing, I suppose. 

Having said all that, this really is a lovely book.  The photos are beautiful  and there’s one for most of the recipes – something I appreciate as it is helpful to see what the finished dish should look like.  There are lots of fabulous recipes to try and they are clearly written. 

And – at the risk of revealing here another little bee from my bonnet – at least the food isn’t presented on grotty, grubby, chipped and cracked old crockery that I personally would have thrown out long ago.  This is another cookbook fashion that I really don’t understand.  Shabby chic is one thing, well used and well worn favourite crockery is another, but chipped, cracked dishes, rusty tins and tea-stained tea cloths – no thanks !!

Maybe it’s just me or it’s my age.  I’m now at the age where I can conveniently blame all sorts of things on my age and people accept it – turning 60 and gradually becoming a batty old lady is beginning to seem like fun after all !!

baked eggs2

The nice thing about this recipe is that it is so simple you hardly need a recipe at all.  My mum used to make these for Sunday tea.  They were exactly the same except that she would never have used herbs and made them in a large Pyrex dish for the four of us.  We would have ours with a slice of toast and a few baked beans on the side. ( John apparently has his with some sourdough or freshly baked foccacia!)

To make cheesy baked eggs:

Preheat the oven to 170°C / 160°fan / gas mk 3.

For each person, butter a large ramekin and drop two eggs into it.  Add a tablespoon of cream or milk, season with salt and pepper and sprinkle with a few leaves of thyme.  (I omitted the thyme as it’s growing in the garden and we were in the middle of a thunderstorm, it was chucking it down and I couldn’t be bothered to fetch my mac and wellies.)

Sprinkle with grated cheese and bake for 12-14 minutes if you like your eggs slightly runny, a little longer if you like them hard.  Serve hot with toast, or just on their own.

July 20, 2013

GLUTEN FREE COFFEE, ALMOND AND BLACKCURRANT CAKE

I was really pleased with the regular version of this cake which I made a few weeks ago.  You can see the post here.  I liked the contrast between the sweetness of the coffee sponge and the sharpness of the blackcurrant jam.  So when I was deciding what kind of cake to make for my friend Elizabeth’s birthday I settled on a gluten free version of the same thing. gluten free coffee, almond and blackcurrant cake2I adapted a Victoria sponge recipe from “The gluten free baker” by Hannah Miles, replacing the vanilla essence with instant espresso coffee dissolved in a little water.

gluten free coffee, almond and blackcurrant cake3 I filled it with whipped cream flavoured with more coffee and sweetened with icing sugar, plus a layer of blackcurrant jam, then decorated with some water icing and birthday candles.

gluten free coffee, almond and blackcurrant cake4I used this recipe last year to make the cherry Bakewell cake, which you can read about here.  It produced a lovely moist and light cake and it’s proved to be a very useful, reliable and adaptable recipe.

Anyone who finds the combination of coffee and blackcurrant a strange idea could of course just omit the jam – it’s definitely not to everyone’s taste – but we like it.  And you could easily replace the cream filling with regular coffee buttercream.

This year I was baking in a heatwave so there was no problem with getting the butter to soften – just leaving it out of the fridge for an hour did the trick.  The only problem was in transporting it on bendy roads for 50 minutes – the top layer started to slide off the bottom layer as we rounded a bend but a gentle shove was all that was needed to replace it!

Ingredients

For the cake

185g softened butter

185g caster sugar

4 eggs

200g ground almonds

125g gluten free self raising flour

¼tsp gluten free baking powder

150ml crème fraîche

2tsp instant espresso powder, dissolved in a little boiling water

For the filling and icing

3 tblsp blackcurrant jam

150ml double cream or crème entière

4 tblsp icing sugar

½tsp espresso powder, dissolved in a little of the cream

sugar crystals, sugar flowers and candles to decorate

Method

Preheat the oven to 180°C/160°fan/gas mk 4. Grease and base line 2 x 20cm sponge tins.

Put the butter and sugar in a large mixing bowl and beat or whisk until light and fluffy.

Add the eggs one at a time and beat well with each addition.

Add the other cake ingredients and fold in gently until evenly combined.

Divide between the two tins and bake for 25-30 minutes until the cakes are firm and golden and pass the skewer test. Remove from the oven, turn out and cool on a wire rack.

Whip the cream until firm and spreadable. Add the coffee powder and one tablespoon of icing sugar and blend in.  Spread the jam onto the base of one of the sponges.  Invert the other sponge onto a cake plate or stand and spread the whipped cream onto it.  Invert the jammy one on top.

Sift the rest of the icing sugar into a bowl and add water, a teaspoon at a time, and mix together until a runny icing is formed.

Spoon the icing onto the top of the cake, spread out evenly, allowing to drip down the sides if you like.  Decorate with birthday candles, sugar crystals, sugar flowers and anything else you fancy!

Cuts into 10-12 slices. Keep refrigerated because of the fresh cream.