February 23, 2012

ORANGE POLENTA COOKIES

I decided I might take part in Dom’s February Random Recipe Challenge which involves choosing a page at random from a randomly chosen cookbook.

randomrecipes2

So I ran my hand along the cookbooks in my collection and picked out this book.

eat me

It’s a beautiful book full of gorgeous looking recipes but  I had never cooked from it before.  So I flipped the pages and it fell open at “orange polenta cookies”.  

Well, fancy that.  I didn’t know I owned a book with another recipe for these cookies.  Having had a disappointing result with the Jamie Oliver recipe, should I or shouldn’t I have another go ??

orange cookies5

My mum always said, if at first you don’t succeed, try, try again.

Einstein said, doing the same thing over and over and expecting different results is the definition of insanity.

My other half said “I don’t know why you keep making stuff like this, it never works”.

That did it.  The next time I had a day off work, the minute he was out of the front door I fetched my pinny !!

In actual fact, this recipe used roughly twice as much flour as polenta, whereas in Jamie’s recipe it was the other way round.  I decided to reduce the ratio of polenta even more to see what happened.  I also decided to use caster sugar instead of granulated and omit the vanilla extract stated in the recipe.

orange cookies1 orange cookies2 orange cookies3 orange cookies4

The butter was at room temperature but was still not very soft so I used a tip taken from a Lorraine Pascale book and grated it to soften it.  Because the quantities of butter and sugar were fairly small, I started out beating the mixture by hand but soon got fed up with that so put it into my Kenwood mixer.

The mixture turned out just the right consistency for biscuits, not too firm or sloppy.  They were easy to shape but it all got a bit messy, which is inevitable really.

orange cookies8They baked beautifully in the maximum time stated in the recipe.  What’s more important is that this time they were delicious.

They had a delicate orange flavour and were not too sweet, with a nice crunch.  There was a suggestion on the polenta packet to substitute some polenta for the flour in pastry or biscuit recipes to give them extra crunch and obviously it does work, if you get the ratio right.

orange cookies7I was very pleased about that.  If I was to serve them with the little chocolate pots I would make them about half this size and probably adjust the cooking time slightly.

orange cookies6 I would definitely make these again and certainly to accompany the little chocolate pots, or maybe ice-cream.

I then found another recipe using polenta for a cake…… marmalade polenta cake…..hmmmmm…..next time perhaps.

Here’s what I used for my version of orange polenta cookies.

85g unsalted butter

140g caster sugar

finely grated zest of 1 large orange

1 large egg

150g plain flour

45g polenta

1 tsp granulated sugar

Here’s what you do.

Line two baking sheets with baking parchment.  Preheat the oven to 170°C/160°fan.

Beat the butter and caster sugar together until light and fluffy.  Add the orange zest and egg and beat again until smooth.

Add the flour and polenta and mix gently until combined.

Take small lumps of the dough, about the size of a walnut, and roll into a ball.  Space them out evenly on the baking sheets to allow for spreading.  Flatten slightly with the heel of your hand and sprinkle with the granulated sugar.

Bake for 12-15 minutes until golden and slightly browned at the edges.  Lift carefully from the trays and cool on a wire rack.

Makes 18-20 cookies.

February 14, 2012

A CAKE FOR VALENTINE’S DAY

success5A This recipe is my very favourite chocolate cake or dessert recipe.  It’s gluten-free, too.  It makes a very moist and dense cake with just the right amount of chocolatey flavour – not too overpowering.

bookIt’s called warm chocolate torte and I first found the recipe in a lovely little book written by Linda Collister called “Heavenly Chocolate”.

success1 success2 success3 success4

It’s fairly rich and you only need a small slice each.  To begin with anyway !!  You have to pace yourself a little for this cake !!  An ideal cake for Valentine’s day and perfect for my entry into this month’s Tea Time Treats Challenge.

The cake is meant to be served warm and the recipe suggests wrapping it in foil and reheating gently if it has been allowed to go cold.  Personally I find it just as scrumptious cold as it is warm.

Recently I served it with pears poached in red wine.  You can read about those here.

Tea Time Treats Blogging Challenge

This is the first time I have entered this particular challenge, which is hosted by Kate of What Kate Baked or Karen of Lavendar and Lovage each month.  This month’s theme is, not surprisingly, Romance.  Which goes perfectly with chocolate I think.  This month, Kate is the host.

I hope you try it, it’s a beauty !!

Here’s my version of warm chocolate torte.

Ingredients

125g plain chocolate

115g unsalted butter

85g caster sugar

4 eggs

115g ground almonds

½tsp vanilla extract

pinch of salt

icing sugar for dusting

Method

First separate the eggs. 

Next, melt the chocolate in a heatproof bowl, gently, over a saucepan of barely simmering water.  Put on one side to cool.

Grease a 20cm springform cake tin and line the base with baking parchment.  Preheat the oven to 200°C.

Beat the butter with an electric beater until creamy.  Add the sugar and beat again until light and fluffy.  Add the egg yolks, one at a time and beat again.

Add the cooled chocolate and vanilla extract and beat them in.  Stir in the ground almonds with a metal spoon.

In a separate bowl, whisk the egg whites with the salt until the soft peak stage.  Using the metal spoon, gently fold them into the mixture, a third at a time, gently so as not to lose any of the whisked-in air.

Spoon the mixture into the prepared tin and level the top gently.

Bake at 200°C for 10 minutes.  Then reduce the oven temperature to 180°C and bake for a further 7-10 minutes until the cake is just set.

Remove from the oven and place the cake on a wet tea-towel for 10-15 minutes.  Leave it in the tin for this time but run a knife around the edge to loosen it.

Then gently turn out the cake, dust with icing sugar and serve warm.

It’s also nice served with some red berries and a little single cream. 

Serves 8-10.

February 8, 2012

COFFEE AND WALNUT CAKE using Camp coffee essence

When it was time for our Children in Need cake stall last year one of our regular “customers” requested a coffee and walnut cake so I volunteered to make it and chose a recipe which used coffee essence rather than granules so I went out and bought a bottle of Camp coffee.

coffee cake1a

I hadn’t had Camp coffee for decades.  It was the coffee we always drank at home when I was a little girl.  I was curious to remind myself how it tasted so I decided to make myself a cup.

The taste took me right back to my childhood.  We would have coffee made with a mixture of hot milk and water, with sugar.  And only on a Saturday or Sunday morning and it would be accompanied by a home-made bun, a chocolate biscuit or, if I was very lucky, a custard tart from the village shop .

coffee cake1 coffee cake2 coffee cake3 coffee cake4

The cake was easy to make.  I used a recipe from the Hairy Bikers “Mums Still Know Best” as the basis but it’s basically an ordinary sponge cake with coffee flavouring. 

The mixture had that characteristic yellowy colour when the coffee essence was added.  It baked beautifully and once the butter icing was on it looked like a proper home-made cake, if you know what I mean.

coffee cake5

It was one of the best sellers and I will certainly make one  again for this year’s cake stall.   It sold out completely so I didn’t get to taste a slice for myself.  But I have gradually been drinking my way through the bottle of Camp coffee and really enjoying it.

coffee cake6 

Some of my cakes at the cake stall, clockwise from the left: fruit cake in a nutshell, coffee and walnut cake, moist coconut sponge, victoria sponge, hummingbird cake. 

(I was not responsible for the scones in the foreground as I am hopeless at baking scones for some reason.)

Ingredients

For the cake

225g softened butter

225g caster sugar

4 medium eggs

225g SR flour

1tsp baking powder

2tblsp coffee essence

65g walnut halves (or ready chopped walnuts)

For the icing *

150g softened butter

300g sifted icing sugar

4tsp coffee essence

* This makes a lot of buttercream!  You probably could use 100g butter, 200g icing sugar and 3 tsp coffee essence and it would still be enough!

To decorate

8 walnut halves

Method

Preheat the oven to 190°C/180°fan.  Grease and line the bottoms of two 20cm sandwich tins with baking paper.

Chop the walnut halves small or blitz them in a food processor.  Put on one side.

Put all the remaining cake ingredients into the processor or electric mixer and combine until creamy.  Add the chopped walnuts and combine briefly.

Divide the mixture between the two tins and smooth the tops.  Bake for 25 minutes or until firm to the touch.  Remove from the oven and leave to cool in the tins for 5 minutes.  Then remove the cakes from the tins, remove the baking paper and leave to cool completely on a wire rack.

Whilst the sponges are cooling, make the icing.  Put the icing sugar, butter and coffee essence in a food processor or electric mixer and combine until smooth and creamy.

When the cakes are completely cold, turn one upside down and spread its bottom with half of the icing.  Put the other cake on top and spread the other half of icing on that.  Swirl some kind of pattern in the icing and arrange the walnut halves on the top.

Serves 8-12, depending on how big you like your slices of cake !!

February 1, 2012

MINCEMEAT ALMOND TARTS AND JUMBLEFRUIT PIE

I have been exploring the depths of my freezer, trying to use up foods that need using up, and throwing out things that have been around a little too long.  All this to make way for the inevitable excess of vegetables from the garden later in the year, the windfalls and hedgerow finds that come our way, and some of the very handy “buy one, get one free” offers that turn up in the shops.

Last weekend my rummaging unearthed several packs of ready-made pastry of all kinds, so I picked out the oldest one - a pack of shortcrust.  I also took out a box of stewed cooking apples (made from the apples left in a wheelbarrow by the farm gate every year), and a small bag of strawberries which were probably the result of a raid on the reduced basket in the supermarket at some stage.

pastry9a

Out of that lot I decided to make some almond mincemeat tarts, a couple of chicken, leek and mushroom pies for my dad and a fruit tart for our Sunday dinner (plus a small one for my dad of course).

pastry9d

The little tarts were inspired by a blog post by Snowy which you can read here.  Her recipe reminded me very much of tarts that my mum always used to make using a recipe from her only cookbook, the Be-Ro book.  Although they were called macaroons they were nothing like what we think of as macaroons nowadays. 

There is a new edition of the book out, the 41st edition, and I sent for one a while ago using the details on a pack of Be-Ro flour.  I was disappointed with it when it came.  A lot of the old recipes that were my favourites and my mother’s have gone, such as the macaroons, which is a shame.  Luckily for me I have a collection of Be-Ro books covering several decades so I have all the recipes, but new bakers would miss out on them.

pastry1 pastry2 pastry3 pastry4

My mum always made these tarts with strawberry jam but I used the remains of a jar of mincemeat (just like Snowy did) and they were lovely – a real old fashioned teatime treat.

pastry5 pastry6

For the chicken pies I used an “emergency” tin of chicken in white sauce which was lurking at the back of the kitchen cupboard and added a few mushrooms sautéed with a sliced leek.  They looked nice when they were done and my dad reports that they are very tasty – one down, one to go !!  (I didn’t confess that the chicken came out of a tin.)

The question is, what do you do with your pastry trimmings?  Do you end up throwing bits away? 

pastry7 I usually screw mine into little balls and bake them for the dog.  Sometimes if I can’t be bothered with that, I throw them away.  Then I spotted a recipe in The Hairy Bikers “Perfect Pies” that suggests you open freeze them (which means spread them out on a tray and put them in the freezer to harden), then put them in boxes and store them to use for future use. 

pastry8 pastry9

You put your chosen fruit in a suitable sized dish, sweeten to taste, scatter the pastry bits in a jumble over the top and bake.  I gave mine an egg wash and a sprinkling of sugar and it looked lovely – a lovely jumble of fruit inside and a jumble of pastry on top.  In fact I will call it jumblefruit pie.  A great success and apologies to the dog but the pastry bits are going in the freezer from now on !!

pastry9c

The pie was delicious.  The topping was lighter than a full pastry crust or even a crumble.  I used apples and strawberries, but I’m sure it would work perfectly well with any fruit that you would normally make a pie or crumble from, such as rhubarb, plum, gooseberry, blackberry……..I shall certainly be making this again. 

Here’s my version of mincemeat almond tarts, based on the Be-Ro recipe for macaroons.

Ingredients

100g shortcrust pastry (ready-made or made with 100g flour and 50g fat)

50g caster sugar

50g ground almonds

1 egg

a few teaspoons mincemeat

a handful of flaked almonds

Method

Preheat the oven to 200°C/180°fan.  Grease a 12 hole bun tray.

Roll out the pastry thinly and cut 12 circles for the tarts.  Put a meagre teaspoonful of mincemeat in each tart.

In a small bowl mix together the sugar, egg and ground almonds to a soft mixture.  Dollop a teaspoonful on top of the mincemeat in each tart.  Sprinkle a few almond flakes on top.

Bake for 15-20 minutes or until golden brown.  Allow to cool for 5 minutes in the tin then transfer to a rack.

Makes 12 tarts.

~~~~~~~~~~~~~~~~~~~~~~

Here’s my version of the jumblefruit pie.

Ingredients and method

Preheat the oven to 200°C/180°fan.

For an apple and strawberry pie, put cooked apple slices and fresh or frozen strawberries in an ovenproof dish of the appropriate size for the amount of fruit.  Sprinkle enough sugar on top to sweeten to taste.

Scatter frozen pastry trimmings in a single layer on top of the fruit.  Brush with beaten egg and sprinkle with a little more sugar.  Bake for 25-30 minutes until the fruit is bubbling and the pastry is golden brown.

Serve warm.  The pie will serve 4-8 people depending on how large you make it !!

January 26, 2012

STEAK AND KIDNEY PUDDING

My dad comes round for his dinner every Sunday evening and often we ask him what he would like to eat.  Usually he wants chicken or lamb but the other week, completely out of the blue, he suggested steak and kidney pudding.  Oh heck.
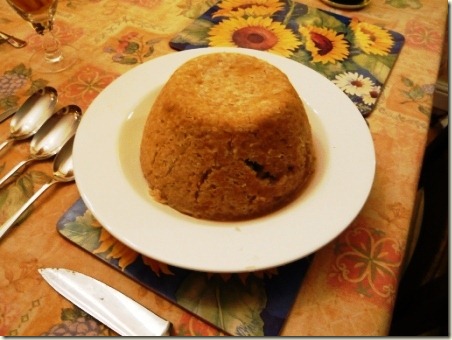
pud9jIt’s donkey’s years since I ate steak and kidney pudding and I have never ever made one.  My first thought was that it was too fiddly and long-winded and would take all day.  Then I thought well, if you’re going to make it at all, a gloomy Sunday in January is as good a time as any – what else is there to do?

So this is why, at the time of year when everyone else is dieting and detoxing, I found myself in the kitchen making one of the most fattening and stodgy dishes of all time.

We consulted a variety of cookbooks and it would seem there are two distinct methods.  Either make the suet pastry, put the uncooked meat inside and steam for 4-5 hours.  Or, cook the meat first before filling the pastry case and steam for 2 hours.

We decided to go with the second method as we thought it would be a good idea to see what the meat looked and tasted like before putting it in the pudding.  When I say “we”, this is because I was still under the weather with the lurgy so Nick did most of the work.  In the end, the preparation didn’t take all that long but you needed to be in the house for the cooking time, totalling 4 hours, to make sure the meat and the pudding don’t boil dry.

pud1 pud2

We used good quality braising steak and four lambs’ kidneys.  Nick chopped the kidneys small as although we like the flavour of kidney, we’re not too keen on chomping on a whole one.  They just melted away to nothing but there was plenty of kidney flavour.

pud3 pud4 pud5 pud6

We didn’t have a pudding basin the right size so Nick went shopping for one.  He found this 1 litre pot basin, exactly the right size and shape, in Tesco.  It didn’t have a price on it and when the assistant rung it up at the checkout it turned out to be 1p !!

First you make the filling, which is effectively a beef stew, and cook gently on the hob for two hours.  Whilst it’s cooking you have plenty of time to deal with the pastry.

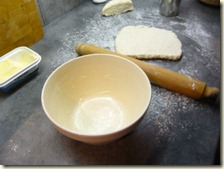
We made traditional suet pastry, using proper Atora beef suet, and it’s easy to make as there’s no rubbing in to do.  He buttered the basin and rolled out the pastry to fit, leaving one third aside for the lid.  (He also reserved a small lump of pastry to make a lid for a separate pie – more about that in a mo.)

pud7 pud8 pud9 pud9a 

The pudding basin was filled almost to the top with the meat mixture and the lid put on, sealing the edges.  Then a layer of baking paper and foil, both with a large pleat in them, were fastened to the top with string, making a loop to act as a handle.  The pleat allows for expansion of the pudding and the string allows you to lift it out of the pan without scalding yourself.

 pud9c pud9b

The whole thing was placed in a large pan on an upturned saucer to act as a trivet, to keep the the basin off the bottom of the pan.  We steamed it for two hours, by which time Lulu was becoming very interested in the proceedings and had to be bribed with a chewy stick to stop fussing round the cook !!

pud9d pud9e pud9f pud9g

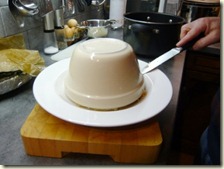
It looked pretty good when we took the foil off and it turned out beautifully – a man’s job of course.

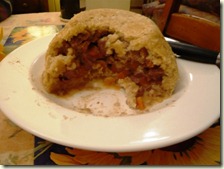
pud9h pud9k

It tasted delicious.  We served it with the liquid left over in the pan when the meat filling was removed, which made an excellent gravy. 

We had reserved some of the filling to create a small, individual steak and kidney pie for my dad to take away with him and enjoy later in the week – hence the need for the extra bit of pastry.  He reported back that it was also scrumptious and has put in a repeat order !!

pud9lHere’s our version of steak and kidney pudding.

Ingredients

For the filling

750g lean braising or stewing steak, cut into 2-3 cm cubes

4 lambs’ kidneys, chopped very small

1 large onion, sliced

1 carrot, peeled and chopped into small cubes

1 tblsp plain flour

salt and pepper

a splash of Worcestershire sauce

1 bay leaf

2 sprigs thyme

oil for frying

For the pastry

350g self-raising flour

175g suet

salt and pepper

water to mix

Method

Heat the oil in a large pan and brown the onion.  Remove from the pan.

Toss the meat in the seasoned flour and add to the hot oil in batches.  Fry until brown all over.

Return the onions and meat to the pan, add the carrot and herbs.  Add seasoning to taste along with the Worcestershire sauce.  Cover with water and simmer gently until the meat is tender, for about two hours, stirring occasionally .

Grease a one litre pudding basin with plenty of butter.

For the pastry, mix the self-raising flour, salt, pepper and suet in a large bowl.  Make a well in the centre and add cold water, a little at a time, stir to combine and make a dough, bringing it together with your hands. 

Reserve one third of the pastry for the lid and roll the rest into a large circle.  It needs to be big enough to line the basin to the top.   Roll out the smaller portion into a circle large enough to form a lid.  Line the basin with the pastry. 

Remove the bay leaf and thyme sprigs from the meat mixture and adjust the seasoning to taste.  Fill the basin with the meat, lifting it out of the pan with a slotted spoon, then add the liquid.  It should be wet but not too sloppy.  Any remaining liquid can be reheated to serve as sauce with the pudding.

Dampen the edges of the pastry with water, lay the lid on the top and press together to seal.  Trim to neaten the edges.

Cut a large circle of baking parchment (or greaseproof paper) and foil large enough to cover the basin with an overlap.  Make a pleat in the middle and lay on over the basin, the paper first then the foil on top.  Tie string around the basin just under the lip and make a double loop over the top to make a handle.  Trim if there is a lot of excess.

Place the basin in a large pan on top of an upturned saucer or small flan ring to act as a trivet.  Pour hot water into the pan to about half way up the basin.  Boil for two hours, topping up with boiling water as often as needed to make sure it doesn’t boil dry.

Lift the pudding out of the pan with the string.  Remove the string, foil and paper and carefully invert onto a large plate, preferably one with a lip in case there is any leakage of hot filling.

Stand back and admire your creation !! 

Serve with green veg and the reheated liquid, which can be thickened and seasoned to taste.

Serves 6-8