October 31, 2023

CHOCOLATE AND BANANA CAKE (with walnuts)


It was the usual story.  Three bananas in the fruit bowl, past their best and whispering "cake, cake" every time I passed by.

I fancied making a banana cake that I hadn't made before and the recipe comes from a little book called "Cakes and Slices".  It's one of those compilation cook books where no one person lays claim to the recipes. 

The cake was a bit of an ugly duckling (very craggy) but very easy and quick to make, and yummy all the same!  I took it to our walking group for the "debriefing" so was able to see how it cut and to taste a slice.  It was very good and I made a second one for a cake stall at a local event where it sold well.

Although it was in principle very easy, I've given it two stars in the faff factor as I find chopping chocolate and walnuts rather tedious!

Ingredients

3 ripe bananas, mashed

170g caster sugar

185g self raising flour

2 eggs

3 tblsp light olive oil or sunflower oil (I used groundnut oil)

3 tblsp milk

100g dark chocolate, finely chopped 

90g walnuts, chopped

Method

Preheat the oven to 180°C / 160° fan / gas mk 4.  Butter and line a 2lb loaf tin or use a paper liner.  A 20cm round tin would also work.

In a large bowl, mix together the banana and sugar.  Sift the flour into the bowl.  Add the eggs, oil and milk and mix well together.  Stir in the chocolate and walnuts.

Pour the mixture into the tin and bake for 50-60 minutes.

Cool in the tin for five minutes then turn out onto a wire rack to finish cooling.

Cuts into 8-10 slices.

APPLE TURNOVERS


Some time ago I made some raspberry turnovers which were delicious (you can see the post here).  In fact I made them several times, taking them to various events where they always went down well.

With a pack of puff pastry lurking in the freezer I had a yen for making them again, looked up my post about them and referred back to the original source; a blog which you can see here.  There I found a really good idea in the comments for making them using apple compote and apple slices.  "Now there's a thing" I thought and, rather than go out and buy some raspberries, I decided to give it a try.  We always have apple compote in the house as we have it most days on our cereal or porridge.

At first I put two wedges of apple onto each square of pastry but soon realised that there was too much filling so removed one wedge from them all.  By the time I had done this the compote was already spreading and every one frankly looked a soggy mess.  Thinking this experiment was not going well and the turnovers were likely to turn out like a dog's dinner I put them in the fridge to chill and firm up a bit in the hope that they might be rescued.

They turned out fine, much better than expected, and definitely worth baking again.  Leftovers had lost a bit of their crispness by the next day but were still delicious.

Ingredients

1 pack of ready made, ready rolled puff pastry
12 tsp apple compote
1 - 2 small eating apples, peeled, cored and cut into thin wedges
milk and demerara sugar to finish
icing sugar to decorate (optional)

Method

Take the pastry out of the fridge and allow to come to room temperature well before using, at least half an hour.  Pastry that is still chilled will crack when you unroll it.

Line a baking sheet with baking paper.

Unroll the pastry and cut in half along its length.  Cut each half into squares of equal size. (The number of squares will be determined by the dimensions of your sheet of pastry as it’s important that the squares are exactly square and not oblong.)

Put a teaspoon of compote and one wedge of apple on a square, slightly off centre.  Dampen the edges of the square and fold it diagonally over the filling to form a triangle.  Press the edges together then seal by pressing a fork into the pastry along the edge.  Repeat with the rest of the squares and make three small slashes in the top of each triangle.  

Brush each puff with milk and sprinkle with demerara sugar.  Arrange the puffs on the baking sheet with a little room between each for spreading and chill in the fridge for 30 minutes.

Preheat the oven to 200°C / 180° fan while the puffs are chilling.  Bake for 15-20 minutes until golden brown.  The compote will leak out a bit but this adds to the charm of the puffs!

Serve as they are, slightly warm or cold, or dusted with icing sugar or decorated with a zig zag of icing made with lemon juice and icing sugar if you like.

Makes approximately 12 turnovers, depending on the dimensions of your pastry sheet.

September 11, 2023

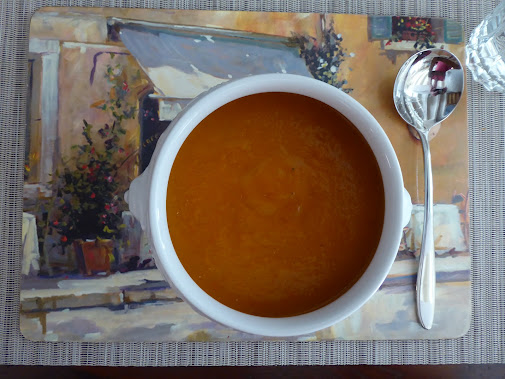
ROASTED TOMATO SOUP (soup maker recipe) and another note to self.


Having got my copy of "Masterchef Kitchen Bible" off the shelf to look for the tiramisu recipe, I flipped through the pages and turned up quite a few recipes that I wanted to try.  One of which was for this soup.  I adapted it for what I had in stock and for the soup maker.


Our tomato plants are still going strong and this recipe uses quite a few of them.

Essentially, you roast fresh tomatoes with onion and garlic and turn it into soup.  I had taken a few pictures of the tray of roasted tomatoes but when I came to review them I found that the SD card was not in the camera!  I had left it in the slot in the laptop and lost quite a few pictures as a result.  The camera does not have a hard memory of its own so they're gone for good.  Oh well, it will teach me to check before I use it next time!

This is an utterly delicious soup.  Like Heinz tomato soup but even better!  Not the quickest to make due to roasting the veg before putting them in the soup maker, but worth it.  (I put mine in the oven to roast while something else was cooking so it wasn't too much trouble.)  It would probably work just as well with shop bought tomatoes as roasting does bring out the flavour of most things that are a bit feeble in that department.  Using my home grown tomatoes I omitted the tomato paste but if using shop bought ones I would probably add it.

Note to self:  check for the SD card before next using the camera!


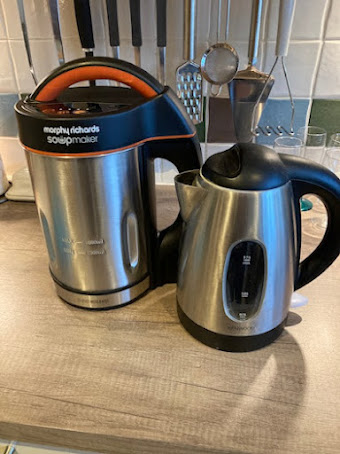
For Diane! A picture of my soup maker (next to the kettle).

Ingredients

6-8 large tomatoes, or a combination of any kind of tomato amounting to about 700g

1 large onion

2 cloves of garlic (unpeeled)

2-3 tblsp olive oil (or Fry Light)

home made vegetable or chicken stock plus one stock pot or cube (or use two stock pots or cubes)

3 small potatoes, peeled and quartered

1 medium carrot, peeled and sliced

2 tblsp tomato paste (optional)

Method

Preheat the oven to 180C / 160 fan / gas mk 4.

Cut the larger tomatoes into quarters, smaller ones in half and lay on a large baking tray.  Drizzle with the oil, season with salt and pepper and roast for 10 minutes.

Peel the onion and cut into quarters.  Add to the tomatoes with the unpeeled garlic and continue to roast for another 15 minutes.

Add the tomatoes, onion, carrot and potatoes to the soup maker,  Squeeze the garlic cloves out of their skins and add to the machine.  (Make sure not to go above the bottom line when adding the carrot and potatoes but use all of the tomatoes and onion.)

Add the stock and stock pot/cube plus enough water to fill to the top line.

Cook on smooth.

Makes 4 generous portions.

August 27, 2023

TIRAMISU egg free version and a note to self

Some years ago I posted about a Rachel Allen recipe for a strawberry tiramisu (see here) and some time after that a reader left a scathing comment about it.  Apparently this person got as far as assembling the dish before they realised it contained raw egg yolks, was disgusted that they hadn’t been warned about that, and had to throw all the ingredients in the bin!  (The word used was "trash" so I presume the reader was from the other side of the Atlantic somewhere.)

I remember thinking it weird that someone would (a) not read a recipe through before starting to cook it and therefore not realise the eggs were raw and would (b) throw expensive ingredients away without thinking of a different way of using them.  However, I did afterwards label all recipes that contain raw eggs although there are only a few!

Anyway, the other week a friend served us a delicious tiramisu made without any eggs at all.  The recipe was, she said, a John Torode recipe.  I eventually found it in one of my cook books, "Masterchef kitchen bible" and made it myself for visitors the other day.  She said it was a quick and easy tiramisu and it is definitely both of those as well as utterly divine! 

It differs quite a bit from my previous tiramisu recipe, apart from there being no eggs in it.  The alcohol used is coffee liqueur not Amaretto and there is no sprinkling of cocoa powder on the layers other than on the top.  Which just goes to show that, just like a fruit trifle, there are lots of different ways of making it and they are all delicious!
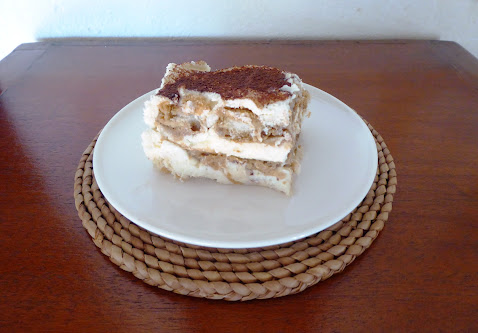
I modified the recipe a bit to account for the fact that a pot of mascarpone generally contains 250g, not the 350g in the original and I didn't want to have to buy two pots (the supermarket only had one pot on the shelf and supermarkets are a good distance apart here in rural France!).  I also found that my 20cm square Pyrex dish was perfect for it, creating the right depth of layers, but I did have to use more sponge fingers than stated due to its dimensions.  Happily there was still just the right amount of coffee liquid mixture to soak all of them.  The end result was a slightly denser, more cakey texture.  It wasn’t quite the same as my previous recipe (see here) being more creamy but somehow less rich but it was lovely.  As always it was even better the next day once the ingredients and flavours had melled together.  Note to self: always make tiramisu the day before you want to serve it!

Ingredients

120ml espresso coffee, cooled

75ml coffee flavoured liqueur such as Kahlua

250g pot mascarpone cheese

3 tblsp caster sugar

250ml double cream

14-20 sponge fingers (Boudoir biscuits) depending on the dimensions of your dish

cocoa powder to decorate

coarsely grated dark chocolate (optional)

Method

Mix the coffee and liqueur together and pour into a large flat dish such as a lasagne dish so that it's in a shallow layer.

In a large bowl whip the mascarpone and sugar together until the sugar has dissolved.

In another bowl whisk the cream until it holds its shape then fold into the mascarpone mixture.  Spread 2 tblsp of this mixture into the bottom of your serving dish.

Dip the sponge fingers one at a time into the coffee mixture, turning once until just soaked both sides, and arrange in a single layer in a serving dish.  A 20 cm square dish worked perfectly for me.

Cover the fingers with half of the mascarpone mixture then repeat with more sponge fingers and the remaining half of the mixture.

Level the top, cover with cling film and chill in the fridge for at least 4 hours.

Dust liberally with cocoa powder just before serving.  Add a sprinkling of grated chocolate if you like.

Serves 6-8, depending on the portion size!

August 26, 2023

A LEAKY QUICHE RESCUE MISSION success snatched from the jaws of disaster!


With guests arriving for dinner I was flummoxed when, on removing my blind baked quiche pastry from the oven there was a large crack in it and a couple of small ones.  It was bound to leak.

Rats!!  What to do, what to do?  There was no time to make a batch of pastry, or to pop to the shops to buy another pack.  I put my thinking cap on and came up with a solution.

I had half of a "wonderloaf" in the house.  The pappy white sliced bread that’s neither very nutritious nor tasty but is good for cucumber sandwiches and toast with marmalade.  I pinched a bit out of a slice, rolled it into a small sausage, brushed one side liberally with some of the egg filling and squashed it into the cracks with the back of a fork.  I hoped it would stick sufficiently to plug the gap.

It worked!  There was still a little leakage but nothing major.  I shall have to remember this for future and presumably any kind of bread would work. The quiche was delicious and nobody knew how close the leaky leek and goats cheese quiche was to becoming a frittata instead!

~~~~~~~~~~~~~

One week after the event/almost baking disaster it has just occurred to me that the thing to do would be to save the pastry trimmings until after the quiche shell comes out of the oven.

I could have easily used a bit of the pastry trimmings to plug the hole if I hadn't already discarded them.  Hmmm........I'll try to remember that in future!

August 18, 2023

CINNAMON BAKED PLUMS and a biscuit discovery!


In return for some courgettes and tomatoes, my friend Sally gave me a huge bag of plums the other day.  Our own plum trees have had hardly any fruit on them since the bumper crop a few years ago and we do love plums so I was very grateful!

Knowing what to do with so many at once was a head scratcher.  We were expecting visitors but they have  a long list of things they don’t like.  Plums are on the list (as are courgettes and tomatoes).  So with a need for baking but not with plums I had to do something to preserve them for our own use later.

Cooked plums take up less room in the freezer than whole ones so I decided to roast them.  We sat for a while at a shady table in the garden to halve them and remove all of the stones.  This was a bit fiddly but worth the trouble; the plums were at various stages of ripeness so some of the stones were easier to remove than others.


I then simply spread them in a single layer in roasting tins, sprinkled with demerara sugar and a dusting of ground cinnamon.  I baked them at 180° fan for 20 minutes by which time they were nice and soft and sticky.  We had some on our breakfast cereal and some with ice cream and a mini stroopwafel  The rest went into the freezer for future enjoyment.


Stroopwafels - where have they been all my life?  I had never heard of them until I spotted them in a French discount store called "Action". They are delicious little wafer sandwich biscuits with a caramel filling.  Utterly divine and wickedly sweet but luckily the mini version is not too detrimental to the waistline - as long you don’t eat too many!  They go perfectly with ice cream, fruit salad and Sally's delicious plums!

August 16, 2023

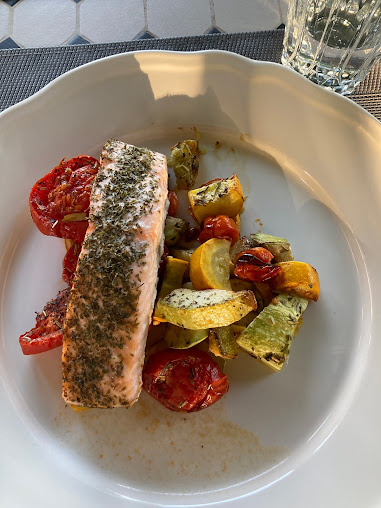
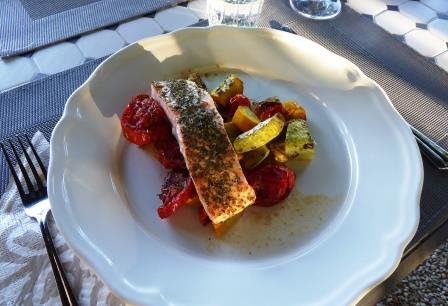
ROAST SALMON WITH COURGETTES AND TOMATOES


We are up to our necks in produce at the moment and finding ways to keep up with supplies is becoming a challenge.   As fast as we pick them the tomatoes and courgettes keep on coming and as fast as we give them to friends more stuff comes our way.

It's a marvellous yet humbling feeling, being so well supplied with fresh produce when so many people can't afford to eat properly.  Hence I feel even more determined to use it all and not waste any.

We gave two enormous tomatoes and some courgettes (green and yellow) to a friend who sent me a message the next day to say she had made them into a delicious chicken traybake.  I thought that was a good idea but on looking at the contents of our fridge found no chicken but a pack of two salmon fillets.  So "why not" I thought.

Roasting is now my preferred way to cook salmon fillets as I find the timing and the result more reliable.  Sometimes I sprinkle a few herbs on the top but otherwise I just bake them.  The days of foil parcels with herbs and lemon slices and having to peek inside to see if it's done are a distant memory!


The veg are roasted for a while before the salmon goes in as they take much longer to cook and it's very easy to overcook the fish.

Ingredients

1 large or 2-3 smaller tomatoes

1 courgette

2 salmon fillets

olive oil or Olive Fry Light

Herbes de Provence or fresh herbs of your choice (optional)

Method

Preheat the oven to 200°C / 180° fan / gas mk 6.

Wash and chop the courgette and tomatoes into large dice and place in a single layer in a suitable baking dish.  Drizzle a little olive oil over or spray with Fry Light, season with salt and pepper and sprinkle over some H de P. 

Bake in the oven for 25 minutes or until nearly done, tossing them once if they begin to brown.

Remove from the oven, place the salmon fillets skin side down on top (coated with herbs if you like) and return to the oven for another 15 minutes.  By this time the salmon should be pink and tender and the veg soft.  If you need to cook for longer do it for only a minute at a time as the salmon quickly becomes overcooked.

Serve with potatoes, rice or pasta and extra veg if you like.

Serves 2.