index of recipes

July 23, 2023

STUFFED CHICKEN FILLETS with thyme and goats cheese on a bed of courgettes and tomatoes.


When we recently invited some friends round for a bbq the weather decided to turn decidedly English - cool and showery. I was planning to serve the chicken, lemon and thyme kebabs with a ratatouille that I wrote about recently but had to have a quick change of menu that used mostly the same ingredients - especially as our veg patch is proving to be rather successful in producing courgettes this year!  We also have thyme growing in a corner of the garden. 

I spotted this recipe on the Good Food website and it ticked all the boxes.  All I needed in addition was some goats cheese and bacon which I happened to have in the fridge.


We looked at the weather forecast at about the time we would be marinading the kebabs and stuffed the chicken fillets instead, leaving them on a tray in the fridge. The most fiddly part of the recipe was stripping the tiny leaves from the thyme stalks, which I always find annoyingly tedious.   

It turned out well, looked good and was very tasty.   I served it with some buttery new potatoes (instead of the planned potato salad) and a dish of French beans (from the freezer) while the rain poured outside!

Ingredients

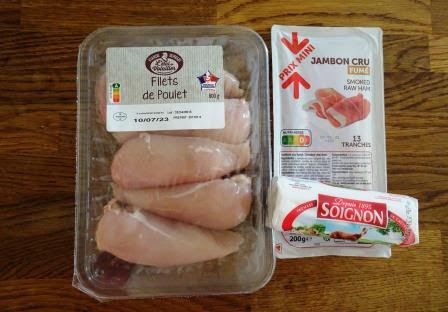
One skinless chicken fillet per person (six for this recipe)

1 log of goat’s cheese 

2 courgettes

4 tomatoes

4 sprigs of fresh thyme

1 pack of streaky bacon (you may need more)

3-4 tblsp olive oil or some Frylight spray

Method

Preheat the oven to 190°C / 170° fan / gas mk 5.

Strip the leaves from two of the sprigs of thyme.

Split each chicken fillet lengthwise but not all the way through.  Open out and flatten slightly by batting with a rolling pin or tin of beans.

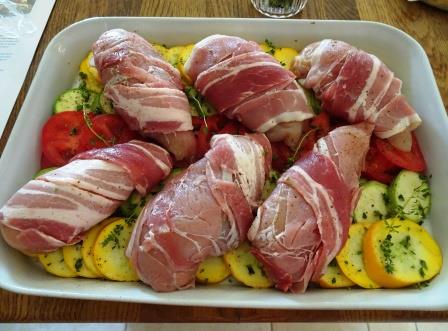
Thinly slice the goat’s cheese, place two slices into a chicken fillet and sprinkle with thyme leaves. Fold the fillet over to enclose the cheese and wrap in two rashers of bacon.  Repeat with the remaining chicken fillets.

Slice the courgettes and tomatoes and arrange in a suitable oiled roasting tin or baking dish.  Drizzle with oil or spray with Frylight, season with salt and pepper and put the thyme sprigs on top.  Sit the chicken fillets on top with the ends of the bacon tucked underneath.

Bake in the oven for 40-45 minutes or until the chicken is cooked, the bacon crisp and the courgettes tender.

Serve with potatoes or other veg of your choice.

Serves 6.

July 20, 2023

PLUM FRANGIPANE TART


A friend in the village has a tree loaded with very small plums and invited us to help ourselves.

I don’t know what variety they are but they’re about the size of a large cherry.

They are slightly sharp, not quite sweet enough to eat like cherries, but are excellent when cooked.  The only problem is the stones.  Plums make a delicious pudding but the stones take the edge off the pleasure of them I think and more so when the fruit is small and the number of stones even greater.  (I also love damsons but the zillions of little stones definitely spoil a damson pie or crumble for me!)

With over a pound of them in the bowl I decided to try using my pink cherry stoner. It worked a treat and I whistled through the whole bowlful in no time at all.  (I put the egg in the picture so you could gauge the size of the plums.)

I decided to use some of them for a favourite recipe by Mary Berry and the rest went into the freezer.

The base is made from slices of brioche and a basic ready sliced brioche loaf from the supermarket is ideal.  It creates a slightly cakey base that has a definite patisserie style to it.  (If a brioche loaf is not available you can use brioche finger rolls.)

The frangipane (almond) filling is quickly made using a food processor but a stick blender and mixing bowl would work.  Then you arrange the fruit on top as randomly or precisely as you fancy.


It looks good when it comes out of the oven but brushing it all over with melted apricot jam to give it a nice glaze is the finishing touch which definitely makes it look the business.  

I have made this recipe many times, or at least my own adaptation of it, using various different fruits.  It makes a great large dessert to feed a crowd and always goes down well.  Hence I make no apology for re-posting it and giving the recipe again.

Here are a few more versions:


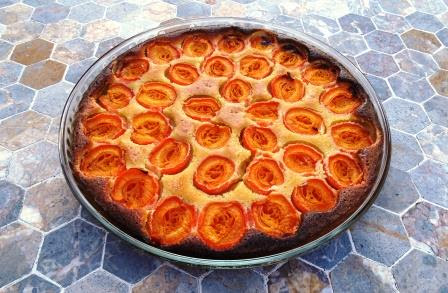
I made it recently using apricots.

You can see how the brioche turns into a nice cakey base.


I made it with rhubarb, which you can see here.


It was very good when I accidentally made it upside down - see here.


It was delicious when I made it using apples as per Mary Berry's original recipe - see here.

Ingredients

4-5 slices of a brioche loaf
175g spreadable butter or baking spread
175g caster sugar
1 tsp almond extract
150g ground almonds
3 eggs
50g plain flour
300-400g small plums, stoned and halved
2 tblsp apricot jam for glazing the pie

Method

Preheat the oven to 200° C / 180° fan / gas mk 6.  Butter a large, shallow baking dish about 28cm dia.

Press slices of brioche into the bottom of the dish, filling in gaps but not overlapping.  (You could also use 5-6 brioche rolls, in which case slice off the top and bottom crusts then slice in half horizontally.)

Put the butter and sugar into a food processor and whizz until light and fluffy.  Add the extract, almonds, eggs and flour and whizz again until nice and smooth.  

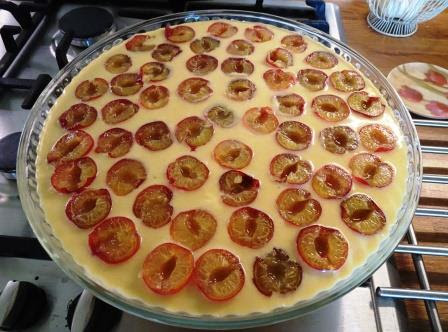
Spread the mixture evenly over the brioche base and arrange the fruit on top.  

Bake for about 40 minutes until golden brown and the centre is firm.  Warm the jam in a small saucepan to make it runny then brush it all over the top of the pie to glaze.  

Serve warm or at room temperature, with cream, ice cream or custard.

Cuts into 10-12 slices.

July 18, 2023

PEA AND MINT SOUP (soup maker recipe)

I have only had my Morphy Richards soup maker in the UK for a couple of years but it feels like for ever!  It’s become one of the most useful kitchen gadgets I have ever owned and I wouldn’t like to be without it.  In France I spotted a very similar model in a shop called Zodio and swooped when it was on offer for a bargain price of about £28.

The weather in our part of France has been odd so far this year.  Thankfully we haven’t yet had the heatwaves of the last couple of summers.  There have been a few days when the temperatures reached the low thirties but nothing like the high thirties and forty plus degrees that we endured last year. 

So much so that when friends came round for the evening recently, plans for chilled cucumber soup and a bbq were quickly shelved and I made this soup instead!  

Funnily enough, the friend who first recommended getting a soup maker told me this was her favourite soup to make in it but until now I never had.  So, with a bag of frozen peas in the freezer and a robust mint plant in the garden a rapid change of menu was easily achieved!

I found the recipe on the Morphy Richards blog which, at the time of writing, you can see here.  It has a few really nice, basic soup recipes which I shall no doubt work my way through - sooner rather than later if the weather continues to be a bit iffy this summer!

It was absolutely delicious! So easy to make that having a supply of frozen peas available has to be the easiest way to rustle up a super soup as a starter with the minimum effort ever!

Ingredients 

1 onion

700g frozen peas

2 cloves of garlic

1 medium potato 

2 vegetable stock cubes (I used one veg stock pot as that’s all I had)

A handful of fresh mint (or 1-2 tblsp dried mint)

700ml boiling water 

A squeeze of lime juice (optional - I omitted it as I didn’t have a handy lime in stock)

Salt and pepper to taste

Method 

Peel and chop the onion and garlic.  Peel and dice the potato.

Put everything into the soup maker machine and cook on the smooth setting.  Thin with a little boiling water if it’s too thick.  (You could also add a swirl of cream or crème fraîche for extra glamour before serving if you fancy!)

Makes 4 generous main course servings or 6 smaller portions as a starter.

July 16, 2023

TUNA SALAD


I seem to have been to a lot of picnics lately.  They are usually the kind of event where each person brings a salad, a quiche, sausage rolls, a dessert or so on, ending up with enough food to feed twelve or more people.

For the last picnic I volunteered a tuna salad - a salade Niçoise (or Niçoisée as per the American tourists in the marvelous film "A Good Year"!) 

I looked up what constitutes an authentic salade Niçoise and decided to lay everything out in rows rather than tossed in a large bowl.  That way people could pick out the bits they like without having to rummage around in the bowl too much.  It looked appetising too.

The whole lot was laid on a bed of crisp lettuce and I constructed it straight into a large plastic box to take to the picnic.  It was served with a simple home made French dressing.

One tin of tuna will serve four people if there is plenty of salad and everything can be scaled up or down to suit your taste or the number of servings required.  I reckon the amount shown above would serve six as it is, or twelve when you add a slice of quiche, a sausage roll, etc.


Details to be found here.

The beans were frozen haricots verts and to cook them I used a small steamer basket that came in a set from Sainsbury's - one shallow saucepan and two steamer sections for £20 or thereabouts.  This is what I brought to use here in France but in the UK I use just one steamer section with lid which I found for £2 in a charity shop.  We rarely use more than one steamer section and it fits several of my saucepans - bargain!

Ingredients

For the salad

crisp green lettuce

chopped peeled cucumber

hard boiled eggs (4 here)

cold boiled new potatoes, skin on

cold steamed French beans

halved black olives

quartered small tomatoes

tinned albercore tuna

For the dressing

6 tblsp olive oil

2 tblsp white wine vinegar

1 tsp Dijon mustard

a pinch of caster sugar

Method

Boil the eggs for 10 minutes.  Plunge immediately into cold water.  When cold, peel and cut into quarters.

Boil the potatoes in salted water for about 15 minutes or until just tender.  Put the frozen beans into a steamer basket on top of the potatoes and cook for about 5 minutes.  Drain and cool.

Wash all the salad ingredients, chop and arrange as in the photo.  

To make the dressing put all the ingredients into a jam jar or bottle with a lid and give it a good shake to combine.  Shake well before serving.

Voilà !!

July 15, 2023

BANANA, RUM AND SULTANA CAKE (with walnuts)


This is one of those recipes I've had my eye on for ages and with four small bananas looking unloved in the fruit bowl the opportunity came along.  Also, I had been chatting to one of the ladies that runs an English tea room at one of the local events every October here in France and she reminded me that I made a cake or two for them last year.  I’m still not eating much more than the occasional small slice of cake myself but it occurred to me that I could make a banana cake, freeze it, and bring it out for the designated day.

The recipe is Nigella Lawson's "banana bread" from her early book "how to be a domestic goddess" which I have very rarely used.  The banana bread appealed to me because it included rum soaked sultanas!  

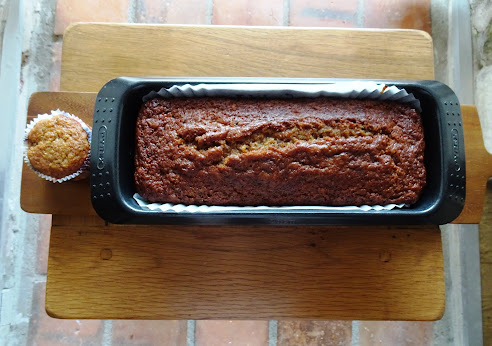
I stuck to the recipe apart from using golden caster sugar instead of white and did my usual trick of making a couple of muffins from a little of the mixture.  This enables me to do a "quality control" check.  In other words I can taste the cake and make sure it is good enough to sell - otherwise donating a cake I have never made before can be a bit risky.  I also covered the cake loosely with foil for the last fifteen minutes of baking as it was already looking nice and brown - cakes that look over baked do not sell well at cake stalls I have found! 

After tasting the muffin I would have to disagree with Nigella's statement that "the alcohol doesn't pervade". I thought you most definitely could taste the rum! I had used some Kraken spiced rum as that was what was lurking on the booze shelf in the pantry and it worked really well. In fact the rum flavour was so noticeable that I wondered if I had put too much in! (I hadn’t.)

So consequently I have renamed this cake from the rather uninspiring "banana bread" because I think the flavour of the rum soaked sultanas, and the walnuts, made it rather special.  It's my favourite banana cake recipe so far!

(It would also be great if made entirely into muffins, probably at least a dozen I would think.)

~~~~~~~~~~~~


UPDATE.

Well, as it happens, I fetched the cake from the freezer for an event at home as I ran out of time to bake anything else!  It was delicious, very moist, a lovely texture and you could definitely taste the rum!

Ingredients

100g sultanas

75ml rum

175g plain flour

½ tsp bicarb

½ tsp salt

2 tsp baking powder

125g unsalted butter, melted

150g golden caster sugar

2 large eggs

4 small very ripe bananas, or a total peeled weight of 300g, mashed

60g walnuts, roughly chopped

1 tsp vanilla extract

Method

First, put the rum and sultanas into a small saucepan, bring to the boil, turn off the heat and set aside.  Leave them for the sultanas to absorb the rum and plump up for at least an hour.

When ready to make the cake, put a paper liner into a 900g (2lb) loaf tin, or grease the tin well, and preheat the oven to 170°C / 150° fan / gas mk 3.

Put the flour, bicarb, salt and and baking powder into a medium bowl and mix together well.

In a separate large bowl, beat together the melted butter and the sugar.  I used a hand held electric food mixer but a wooden spoon would work fine.

Beat in the eggs one at a time then the mashed bananas.

Drain the soaked sultanas and add to the mixture with the walnuts and vanilla.  Stir well to combine.

Add one third of the flour mixture into the bowl and stir well to combine, then the rest, one third at a time.

Transfer the mixture to the prepared tin and level the top.  Bake for 50-60 minutes.  Cover loosely with foil for the last 15 minutes if the cake is already looking nice and brown.

*I used a couple of spoonfuls of the mixture to make separate muffins, taking them out of the oven when cooked, after 25 minutes.

Cool in the tin.

Cuts into 10-12 slices.

July 2, 2023

RATATOUILLE


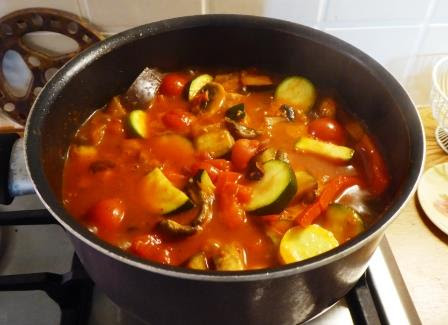
I saw Raymond Blanc make this version of the classic ratatouille in his TV series "Simply Raymond" a few years ago.  It's not easy to find on the internet but at the time of writing you can see it here.  It is obviously also in the book that goes with the series, which is full of great recipes.  I found a brand new copy in a UK charity shop for £2!  

(I would put Raymond Blanc on my list of famous people I would invite to dinner if I could choose from anyone living or dead.  I reckon he would get on well with some of the other guests (yet to be revealed) as he's such a sweetie pie.  Mind you, I would be nervous about my cooking skills so maybe I would invite him to get here early in time to cook dinner..............!!)

This recipe is my interpretation of Raymond's version of the classic dish.  I usually make it from what I have in the fridge (or growing in the veg plot) and only include an aubergine if plan to make it and happen to be going to the shops.  Also, Raymond uses 4 large tomatoes but I often use a tin of whole cherry tomatoes instead.

It's quick, easy and delicious, goes perfectly with barbecue food, sausages, chops, roast salmon or cod.  It's also excellent on its own with pasta or new potatoes.  The cold leftovers go well with a ham and egg or tuna salad, AND it makes an excellent base for home made soup (see here). The recipe is easy to size up to feed a crowd.

In fact the very first time I had ratatouille was in the 1980's without realising what it was.  I had gone to join some friends on their camping holiday in Italy.  They were both teachers and at the start of the six week school holidays they took their caravan to Tuscany where they camped on a beautiful site just outside Siena and stayed until it was time to come home and go back to work in September.  In my job I only had two weeks to take during the summer and they invited me to join them.  I got a flight to Rimini then an overnight train to Bologna where they picked me up at the station.  Quite an adventure for someone who had never been to anywhere warmer than Cornwall!

The camp site was wonderful, situated on a hillside in dappled shade with a fabulous swimming pool.   The view over the Tuscan hills was amazing.  On that first evening my friends cooked what they called "pasta with vegetables", outdoors where their camp kitchen was set up, and it was, essentially, ratatouille, served simply with a bowl of pasta.  It was so delicious that we had it several times that holiday and I made it myself regularly at home afterwards, long before I discovered it was a version of the famous Provence dish.

Ingredients.

1 aubergine (optional)

1 onion, peeled and chopped

2 cloves garlic, peeled and chopped

2 courgettes, 1 yellow, 1 green

1 red pepper, seeds removed

1 tin cherry tomatoes in juice or two large tomatoes 

1 tsp herbes de Provence

A few mushrooms 

1 tblsp olive oil

Method

Heat the oil in a large saucepan.  Add the onion and garlic and cook until soft but not browned.

Wash, trim and roughly chop all the other veg and add to the pan.  Add the tin of tomatoes and about half a tin of water.  Add the herbs and season with salt and pepper.

Cover and cook over medium heat for 6-8 minutes until all the veg are just tender.

Makes four generous servings or more as a side dish.